Nida OS — Complete User Manual
A screenshot-based encyclopedia of every module, every setup flow, every "tie-together" recipe.
Generated from live screenshots of Nida OS on June 18, 2026, workspace
kingaidan1000. All 24 module screenshots, 8 setup tutorials, 12 end-to-end recipes, troubleshooting, and a glossary are inside.
Table of Contents
Front Matter
- How to Read This Manual
- What Nida Is (and Isn't)
- Quick-Start: From Signup to First Lead in 30 Minutes
- The Sidebar at a Glance
Part 1 — Setup Tutorials (read in order if you're new)
- Tutorial 1 — Create Your Account and Workspace
- Tutorial 2 — Acknowledge the Open Testing Notice
- Tutorial 3 — Connect an AI Provider
- Tutorial 4 — Connect Stripe for Payments
- Tutorial 5 — Connect Twilio for Phone
- Tutorial 6 — Connect Google (Search Console, Analytics, Calendar)
- Tutorial 7 — Set Up Branding and the Portal Domain
- Tutorial 8 — Invite Your Team
Part 2 — The Dashboard
Part 3 — Overview
Part 4 — CRM
- Chapter 3 — CRM Pipeline
- Chapter 4 — Contacts
- Chapter 5 — Conversations
- Chapter 6 — Phone
- Chapter 7 — Calendar Engine
- Chapter 8 — Lead Finder
Part 5 — Content
- Chapter 9 — Websites
- Chapter 10 — Chatbots
- Chapter 11 — Forms
- Chapter 12 — SEO Blog Studio
- Chapter 13 — SEO Intelligence
- Chapter 14 — Reviews / Reputation Manager
Part 6 — Automation & AI
- Chapter 15 — Automations
- Chapter 16 — Autopilot
- Chapter 17 — AI Settings (Model Routing)
- Chapter 18 — System Variables
- Chapter 19 — API Keys
- Chapter 20 — API Reference (Agent API)
Part 7 — Analytics, Payments, Settings
- Chapter 21 — Analytics
- Chapter 22 — Payments
- Chapter 23 — Billing & Subscription
- Chapter 24 — Workspace Settings
Part 8 — The "Tie Together" Recipes (end-to-end flows)
- Recipe 1 — Capture a Lead from a Website Chatbot and Push to CRM
- Recipe 2 — Missed Call Text-Back Automation
- Recipe 3 — Form Submission → CRM → Email Follow-Up
- Recipe 4 — Booking → Calendar → Reminder SMS → Review Request
- Recipe 5 — Lead Finder → CRM → Auto-Dialer → Booking
- Recipe 6 — Stripe Payment → Onboarding → Delivery Hub Portal
- Recipe 7 — Weekly SEO Snapshot → AI Summary → Client Portal
- Recipe 8 — Autopilot "Re-engage Cold Leads" Goal
- Recipe 9 — Multi-Model AI: Cheap Model for Content, Smart Model for Chatbot
- Recipe 10 — White-Label Agency: Onboard a New Client Workspace
- Recipe 11 — External Agent (Codex/Claude/Hermes) Creates a Lead
- Recipe 12 — Negative Review Interception and Private Feedback
Part 9 — Reference
- Appendix A — Glossary
- Appendix B — Troubleshooting
- Appendix C — Frequently Asked Questions
- Appendix D — Keyboard Shortcuts and Power-User Tips
- Appendix E — Nida vs. GoHighLevel (Feature Comparison)
- Appendix F — Where to Get Help
How to Read This Manual
This is a reference encyclopedia, not a linear walkthrough. New users should follow Part 1 (Setup Tutorials) in order. Experienced users should jump straight to the relevant Chapter in Parts 2-7. Anyone integrating Nida with other systems should read Part 8 (the "Tie Together" recipes) and Chapter 20 (the Agent API).
Every module has the same structure:
- What it is — a one-paragraph purpose statement
- What you'll need — credentials, setup, or data prerequisites
- Walkthrough — step-by-step usage
- Screenshot — the current live UI
- Tips and pitfalls — things to know that aren't obvious
- Related chapters / recipes — cross-links
If something here is wrong or out of date, the UI changed: re-run the screenshot capture flow (see Appendix F).
What Nida Is (and Isn't)
Nida is a workspace OS for service businesses and the agencies that serve them. It is built around three ideas:
- A single workspace holds every tool — CRM, websites, chatbots, automations, phone, calendar, payments, SEO, reviews, AI agents. There is no "and then you also need…" afterthought.
- AI runs in the background. Every text-generating surface (chatbots, content, automations, lead scoring) can be powered by your choice of model — OpenAI, Anthropic, Gemini, Ollama, OpenRouter, or a private endpoint — routed per task.
- An agent API exposes everything so external systems (Hermes, Codex, Claude, n8n, Zapier) can read and act on the workspace through a single scoped token.
Nida is not:
- A point solution. If you just want a CRM, Nida is overkill. Nida is for people who need multiple tools working together.
- A social-media scheduler. (Yet.)
- A self-hosted product. Nida runs as a managed service at
nida-os.com(or on your own custom domain in White-Label mode). - A marketplace of prebuilt campaigns (like GHL's "snapshots"). Nida ships recipes — starter flows you can clone and customize.
Quick-Start: From Signup to First Lead in 30 Minutes
If you only have half an hour, do this:
- Sign up at https://www.nida-os.com/signup. Enter your email and a strong password.
- Acknowledge the Open Testing Notice (you'll see it on first login).
- Set up your workspace — name, slug, and a portal domain (any subdomain you control; you can change this later).
- Connect at least one AI provider under AI Settings (OpenRouter is the fastest — one click, all major models). (~5 min)
- Connect Stripe under Payments for the products you'll sell. (~3 min if your Stripe account is ready)
- Connect Twilio under Phone to enable calls and SMS. (~5 min if you have a Twilio subaccount)
- Build your first chatbot under Chatbots → + New chatbot. Pick a name, paste a knowledge base URL or your business description, save. (~5 min)
- Embed the chatbot on any page via the auto-generated script tag, OR drop it into a new Website with a
+ New Websiteflow. - Verify the lead shows up in CRM by submitting a test message in the chatbot.
If the test message lands in your CRM with a status of New and a lead.source of chatbot, you're done. From here you can build automations, set up booking, or layer on more modules.
The Sidebar at a Glance
The left sidebar is grouped into five purpose-driven sections. The exact labels vary by workspace tier (White-Label hides the "Powered by Nida" footer but the structure stays the same).
- OVERVIEW —
Dashboard(metrics and next actions),Delivery Hub(client workspaces and requests) - CRM —
CRM(pipeline),Contacts,Conversations,Phone,Calendar,Lead Finder,Meetings - CONTENT —
Websites,Chatbots,Forms,SEO Content,SEO Intelligence,Reviews - AUTOMATION —
Automations,Autopilot,AI Settings,Variables,API Keys,API Docs - SYSTEM —
Analytics,Payments,Billing,Settings
The far-left icon rail (apps, people, globe, chart, lightning, calendar, gear) collapses to a thin strip when you toggle the sidebar.
A theme toggle and a logout button sit at the bottom of the sidebar. The bell icon at the top-right is your in-app notification feed.
Part 1 — Setup Tutorials
If you're brand new, do all eight tutorials in order. Each takes 3-10 minutes. After Part 1, your workspace is fully wired and you can start using every module.
Tutorial 1 — Create Your Account and Workspace
What you'll need: an email address, a business name, and a portal domain (can be a placeholder — change later).
Steps:
- Open https://www.nida-os.com/signup.
- Enter your email and create a strong password (8+ characters, mix of letters and numbers).
- Confirm your email by clicking the link Nida sends you.
- After confirming, Nida sends you to the workspace setup wizard.
- Workspace name — pick the name your clients will see. You can change this later, but the name appears in email signatures, portal login pages, and white-label URLs.
- Workspace slug — a URL-safe identifier. Nida suggests one; you can override. The slug appears in
app.nida-os.com/<slug>until you set a custom domain. - Business info — phone, address, industry. This seeds the merge tags (
{{workspace.phone}},{{workspace.city}}, etc.) used across emails, SMS, and chatbot responses. - Click "Create workspace." You land on the dashboard.
Tips:
- If you sign up with a Google account, you skip the email confirmation step.
- The first 50 workspaces to subscribe to a paid plan at V1 launch get a lifetime deal. Nida will surface this in the billing page when paid plans open.
Tutorial 2 — Acknowledge the Open Testing Notice
The first time you sign in to a fresh workspace, Nida shows an Open Testing Notice dialog. It is required to click through — read each line carefully.
What it says (paraphrased):
- Nida is in open testing — data loss may occur.
- Do not rely on Nida as your sole CRM system during the test phase.
- Performance and security guarantees are not in place yet.
- Nida is free to use during open testing — no credit card required, no surprise charges.
- The first 50 subscribers at V1 launch receive a lifetime deal.
What to do:
- Read the full notice.
- Tick the checkbox: I understand and acknowledge this open testing notice.
- Click I Understand. The button stays disabled until the checkbox is checked.
- The notice is dismissed. You won't see it again on that workspace.
Pitfall: The notice reappears if you create a new workspace, sign in from a different account, or wipe your cookies. This is by design.
Tutorial 3 — Connect an AI Provider
Nida's AI surfaces (chatbots, content generation, lead scoring, automation conductor) need at least one provider configured. Without one, every "generate" button shows an empty state.
What you'll need: an API key from at least one of: OpenAI, Anthropic, Gemini, OpenRouter, or a self-hosted Ollama instance.
Steps:
- Open AI Settings in the sidebar (
/ai-settings). - The page shows the task slots: General, Chatbot, Prospector, SEO Writer, Website Builder, AI Form Builder, Logo Designer, Image Generator, Email Writer, Text Messaging, AI Voice, Automation. None are filled yet.
- Click + Add Provider (or Connect OpenRouter for the one-click flow).
- Pick a provider. If you picked OpenRouter, the flow continues in a popup — paste your OpenRouter key and Nida imports all the models OpenRouter exposes.
- If you picked a direct provider, paste the API key. Nida validates it by listing available models, then closes the modal.
- The provider appears as a card. Now click the OPEN button on any task slot (e.g., Content) and pick the provider + model you want.
- Repeat for every task slot you want to use.
Which model goes where:
| Task | Recommended model class | Why |
|---|---|---|
| Content | Mid-tier (GPT-4o-mini, Claude Haiku, Gemini Flash) | High volume, low cost. Quality is "good enough." |
| Chatbot | Top-tier (GPT-4o, Claude Sonnet, Gemini Pro) | Customer-facing; needs to reason. |
| Metadata | Mid-tier | SEO meta is short and structured. |
| Website | Mid-tier | Templates + section copy. |
| Logo | Image-capable (DALL-E, Imagen, Flux) | Generates images. |
| Lead Scoring | Mid-tier with structured output | Reads business data, returns scores. |
| Automation Conductor | Top-tier (Claude Sonnet+, GPT-4o+) | Reasons over workspace state to propose actions. |
Tips:
- OpenRouter is the fastest way to get started — one key unlocks every major model.
- Ollama is the cheapest if you have a GPU (or pay for Ollama Cloud) — runs local models for free.
- BYOK stays workspace-scoped — keys never leave your tenant and are not shared with other workspaces.
- Client workspaces inherit routing rules — if you set Content to
gpt-5-nanoon your agency workspace, all client workspaces will too unless they override. - Re-route any task, any time. No need to commit to a model choice.
Pitfall: Some models don't support image generation. If you assign an LLM-only model to the Logo task, image requests will fail. Match model capability to task type.
Tutorial 4 — Connect Stripe for Payments
Nida doesn't take a cut of payments. You connect your own Stripe account; checkout, subscriptions, and webhook events flow through your Stripe dashboard.
What you'll need: a Stripe account (free, takes 5 min to create at https://dashboard.stripe.com/register).
Steps:
- Open Payments in the sidebar (
/payments). - Click Connect Stripe. A popup walks you through Stripe's OAuth flow. Approve the permissions Nida requests.
- After OAuth completes, you land back on the Payments page. The connection card now shows your Stripe account email and a green "Connected" badge.
- Click New Product. Give the product a name (e.g., "Strategy Session — 60 min"), a one-time or recurring price, a Stripe Price ID (auto-created if you skip), and an internal description.
- The product appears in the catalog with a status of
Draft. Click Publish to make it buyable. - Once published, Nida generates a shareable link:
https://app.nida-os.com/buy/<product_id>. Drop this link into an email, a chatbot reply, an SMS, or a website product-grid block. - To add the product to a website: open any Websites page, drop in a Product Grid block, and pick the product.
Webhook setup: Stripe's standard event delivery is used. Nida listens to charge.succeeded, customer.subscription.created/updated/deleted, invoice.paid, and invoice.payment_failed. No manual webhook URL needed — OAuth wires this up.
Tips:
- Test mode is automatic. Stripe OAuth starts in test mode. Toggle to live in the Stripe dashboard.
- Recurring products create a Stripe Subscription. Nida's
Payment To Onboardingautomation recipe handles the post-purchase flow (see Recipe 6). - One-time products create a Stripe PaymentIntent. Nida tracks the order in Recent Orders.
- Use the
{{payment.amount_total}}and{{payment.customer_email}}system variables in your email confirmations (see Chapter 18).
Tutorial 5 — Connect Twilio for Phone
Nida's Phone module is a Twilio-backed browser dialer. To make or receive calls, you connect a Twilio number.
What you'll need: a Twilio account with at least one phone number (~$1.15/month + usage). Sign up at https://console.twilio.com.
Steps:
- Open Phone in the sidebar (
/phone). - The current status card shows No line connected with a Setup button.
- Click Setup. The connect flow asks for:
- Twilio Account SID — found in Twilio Console → Account → API keys & tokens.
- Twilio Auth Token — same place.
- Twilio Phone Number — the number you want connected. Must be owned by the Twilio account above.
- Paste each value, click Save.
- Nida registers the number with Twilio's Voice and SMS webhooks so calls route through Nida.
- The status card flips to Online with the connected number visible.
Configuring the voicemail greeting:
- Open Voicemail Greeting on the Phone page.
- Either upload an MP3/WAV (max 10MB) or edit the text greeting in the editor.
- Click Save. (Text-to-speech is handled by Twilio's
<Say>verb on the backend.)
Making your first call:
- Use the Quick Call panel: type any number, click the call button. Nida rings your browser (WebRTC) first, then connects to the destination.
- The active call appears in the right-side Select a call panel with duration, mute/hold controls, and a hang-up button.
- After the call ends, it lands in the Recent Call Activity table with a recording (if enabled in Twilio).
Tips:
- The first 30 seconds of an outbound call are usually free. Nida displays the per-minute rate on the call detail panel.
- Recording must be enabled in Twilio (Compliance → Recording). Once enabled, calls automatically record and show in Call logs.
- SMS is not in the Phone module — it lives in Conversations → Texts (see Chapter 5). This split is intentional but confuses some users.
Pitfall: If the line status shows "Offline" after connecting, check that:
- The Twilio number is voice-capable (some numbers are SMS-only).
- The Twilio account has positive balance.
- The webhook URLs were registered correctly (Nida retries registration on every Save — you can verify in Twilio Console → Phone Numbers → your number → Voice & Fax).
Tutorial 6 — Connect Google (Search Console, Analytics, Calendar)
Nida connects to Google in three places: Search Console (for SEO Intelligence), Analytics 4 (for the Analytics module), and Calendar (for booking). You can do all three with one Google account, but each connection is a separate flow.
6A. Search Console (SEO Intelligence)
- Open SEO Intelligence (
/seo-intelligence). - Click Search Console in the top-right.
- Sign in with a Google account that has access to the Search Console property you want to track.
- Pick the property from the dropdown.
- Enter the live site URL (must match the property).
- Enter tracked keywords (one per line, max 100).
- Click Save. The page now shows your property in the header and the Generate snapshot button becomes clickable.
6B. Google Analytics 4 (Analytics)
- Open Analytics (
/analytics). - The Google connection card asks for:
- Live site URL (e.g.,
https://yourdomain.com) - GA4 Property ID (numeric, found in GA4 Admin → Property settings)
- Measurement ID (optional, e.g.,
G-XXXXXXXXXX)
- Live site URL (e.g.,
- Click Save settings, then Connect Google. OAuth pops a Google login → permission grant → return.
- The page now shows live data (after a few minutes of propagation).
6C. Google Calendar (Calendar Engine)
- Open Calendar (
/calendar). - In the Calendar Sync section, click Connect next to Google.
- OAuth grant. Nida requests
calendar.eventsscope. - Once connected, your existing Google Calendar events appear in the Week and Day views.
- New bookings created in Nida push to your Google Calendar automatically.
Outlook is also supported — same flow, Microsoft OAuth instead of Google.
Tips:
- Use a service account for production Search Console access if you don't want to tie the connection to a single user's login.
- GA4 has a 24-48 hour delay on data — don't expect instant numbers after connecting.
- Calendar connections persist across workspace restarts; you don't need to reconnect.
Tutorial 7 — Set Up Branding and the Portal Domain
Branding controls the logo, colors, and copy your clients see when they log in to your Nida portal. White-Label customers get a custom domain so the portal URL is theirs, not Nida's.
Steps:
- Open Settings (
/settings). - Click the Branding tab.
- Upload your logo (PNG with transparent background, max 2MB, recommended 200×60).
- Set your primary brand color (hex code, used for buttons, accents, and the chat bubble). Most agencies use their existing website brand color.
- Set the portal background — pick a dark or light theme, or upload a custom background image.
- Add custom email signatures (used in transactional emails).
- Click Save Changes.
Setting a custom domain (White-Label only):
- Stay in Settings → General.
- In the Portal Domain field, enter
app.yourdomain.com(or any subdomain you own). - Click Save. Nida generates a DNS instruction card showing the CNAME record to add.
- In your DNS provider, add the CNAME. DNS propagation takes 5-60 minutes.
- Once propagated, clients log in at your custom URL and never see the Nida brand.
Tips:
- The portal background affects the entire white-label portal (login page, dashboard chrome). Test it in both light and dark.
- Workspace name appears in every email. Make it the name your customers should see, not your internal DBA.
- No "Powered by Nida" footer is a White-Label-only feature. Agency tier still shows the badge.
Pitfall: Custom domains only work on the White-Label plan. If you set one on Agency, it will accept the input but show a "upgrade to enable" message on the actual portal.
Tutorial 8 — Invite Your Team
Nida workspaces support multiple users. Roles determine what each user can do.
Roles:
- Owner — full access including billing. Only one per workspace.
- Admin — everything except billing and destructive workspace actions.
- Member — can use modules but cannot edit workspace settings, branding, or billing.
- Viewer — read-only access to dashboards and reports.
Steps:
- Open Settings → Team (
/settings/team). - Click + Invite member.
- Enter the invitee's email and pick a role.
- Click Send invite. Nida emails a one-time join link.
- The invitee clicks the link, creates a password, and is added to the workspace.
- Pending invites appear in the Team tab with a status of
Pending. Resend or revoke from there.
Tips:
- Client workspaces (Delivery Hub) have their own team list, separate from your agency workspace. See Recipe 10.
- Audit log — Nida logs every user action. Admins can see who changed what in the activity log on the Team tab.
- Remove a member — deactivates their access but preserves their work (automations, contacts). Their activity stays attributed to them.
Part 2 — The Dashboard
Chapter 1 — Dashboard
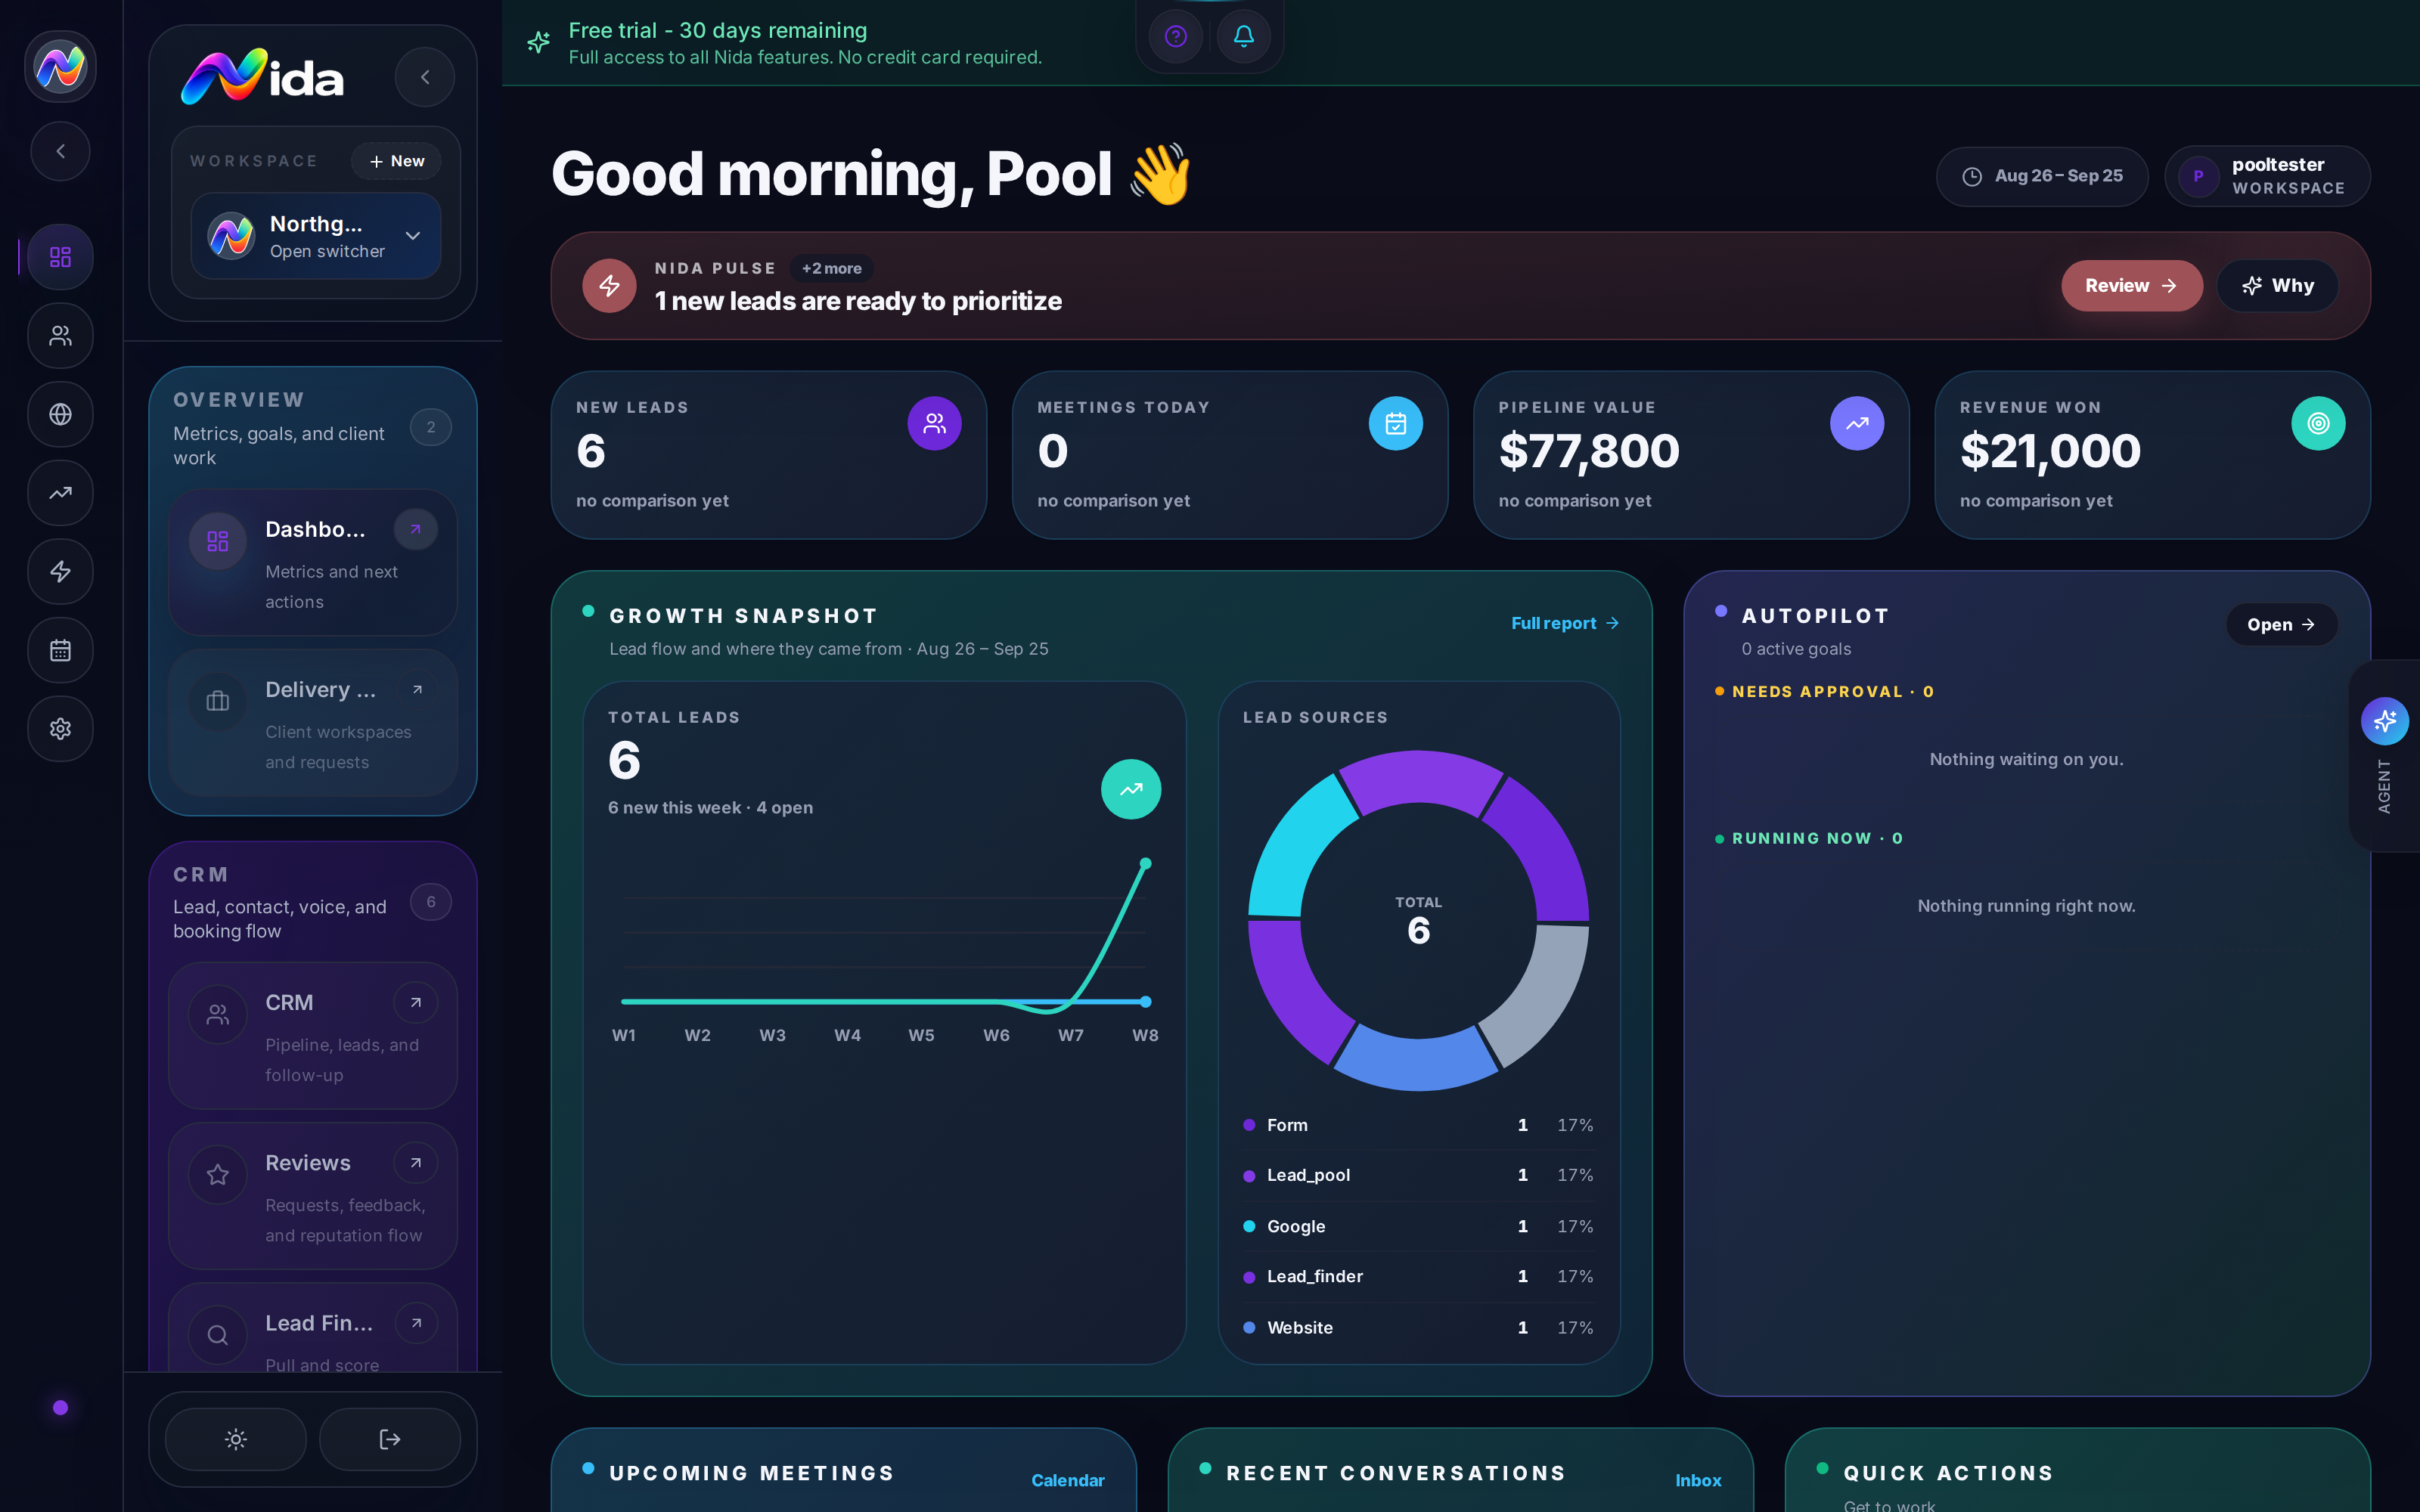
**Purpose:**Purpose: the at-a-glance control center of your workspace. Shows what just happened, what needs attention, and what the AI thinks you should do next.
What you'll need: a connected workspace with at least one channel active (chatbot, forms, phone, or Stripe).
Walkthrough
The dashboard has three regions:
- Top metrics strip — Page Views, Visitors, Sessions, Conversions, Conversion Rate (the last 30 days, from your GA4 connection if you have one). Each metric card has a thin progress bar in a brand color.
- Live activity block — "LIVE NOW" with a green dot, last-30-minutes view. Shows Active Now users, Live Views, top live pages, top live events. Becomes useful the moment your site has traffic.
- Lead Activity Timeline — the shared timeline used across Dashboard, CRM, and Delivery Hub. Shows every lead touch in reverse-chronological order: form submissions, chatbot conversations, calls, payments, status changes, automation fires.
- Next Actions panel — Nida's AI proposes 3-5 actions based on current workspace state. "Send a follow-up email to 12 leads that came in last week but haven't been contacted." "Review the negative review that came in yesterday." "Approve 3 proposed automations from Autopilot."
- Module quick-launch tiles — shortcuts into the most-used modules: New Lead, New Website, New Form, New Chatbot, New Invoice, New Automation.
Tips
- First-day experience is rough. On a brand-new workspace the dashboard is all zeros. Add a chatbot to a website, drive one lead through it, and the dashboard comes alive.
- The "Next Actions" panel is workspace-specific. It reads your actual data — don't dismiss it.
- Click any timeline event to jump to it. A form submission opens the lead; a call opens the call log; a payment opens the order.
- Filter the timeline by channel (chatbot, form, call, payment, automation), date range, or lead owner.
- Customize your top metrics by clicking the gear on any card and picking a different KPI (Leads, Revenue, Bookings, etc.).
Pitfalls
- No traffic? No charts. Analytics cards stay at 0 if GA4 isn't connected. Connect it under Tutorial 6B.
- Empty workspaces show 0s, not "Welcome." If you want a friendlier first impression, ship a "Load sample workspace" CTA — this is a known gap, see [Chapter 20 — payments-onboarding] for the sample flow.
- The dashboard does NOT show: workspace billing usage, API call volume, error rates. Those live in [Chapter 24 — Settings → Usage].
Related
- Chapter 2 — Delivery Hub — the client-side dashboard
- Chapter 3 — CRM Pipeline — for full lead detail
- Chapter 16 — Autopilot — for the autonomous agent
Part 3 — Overview
Chapter 2 — Delivery Hub
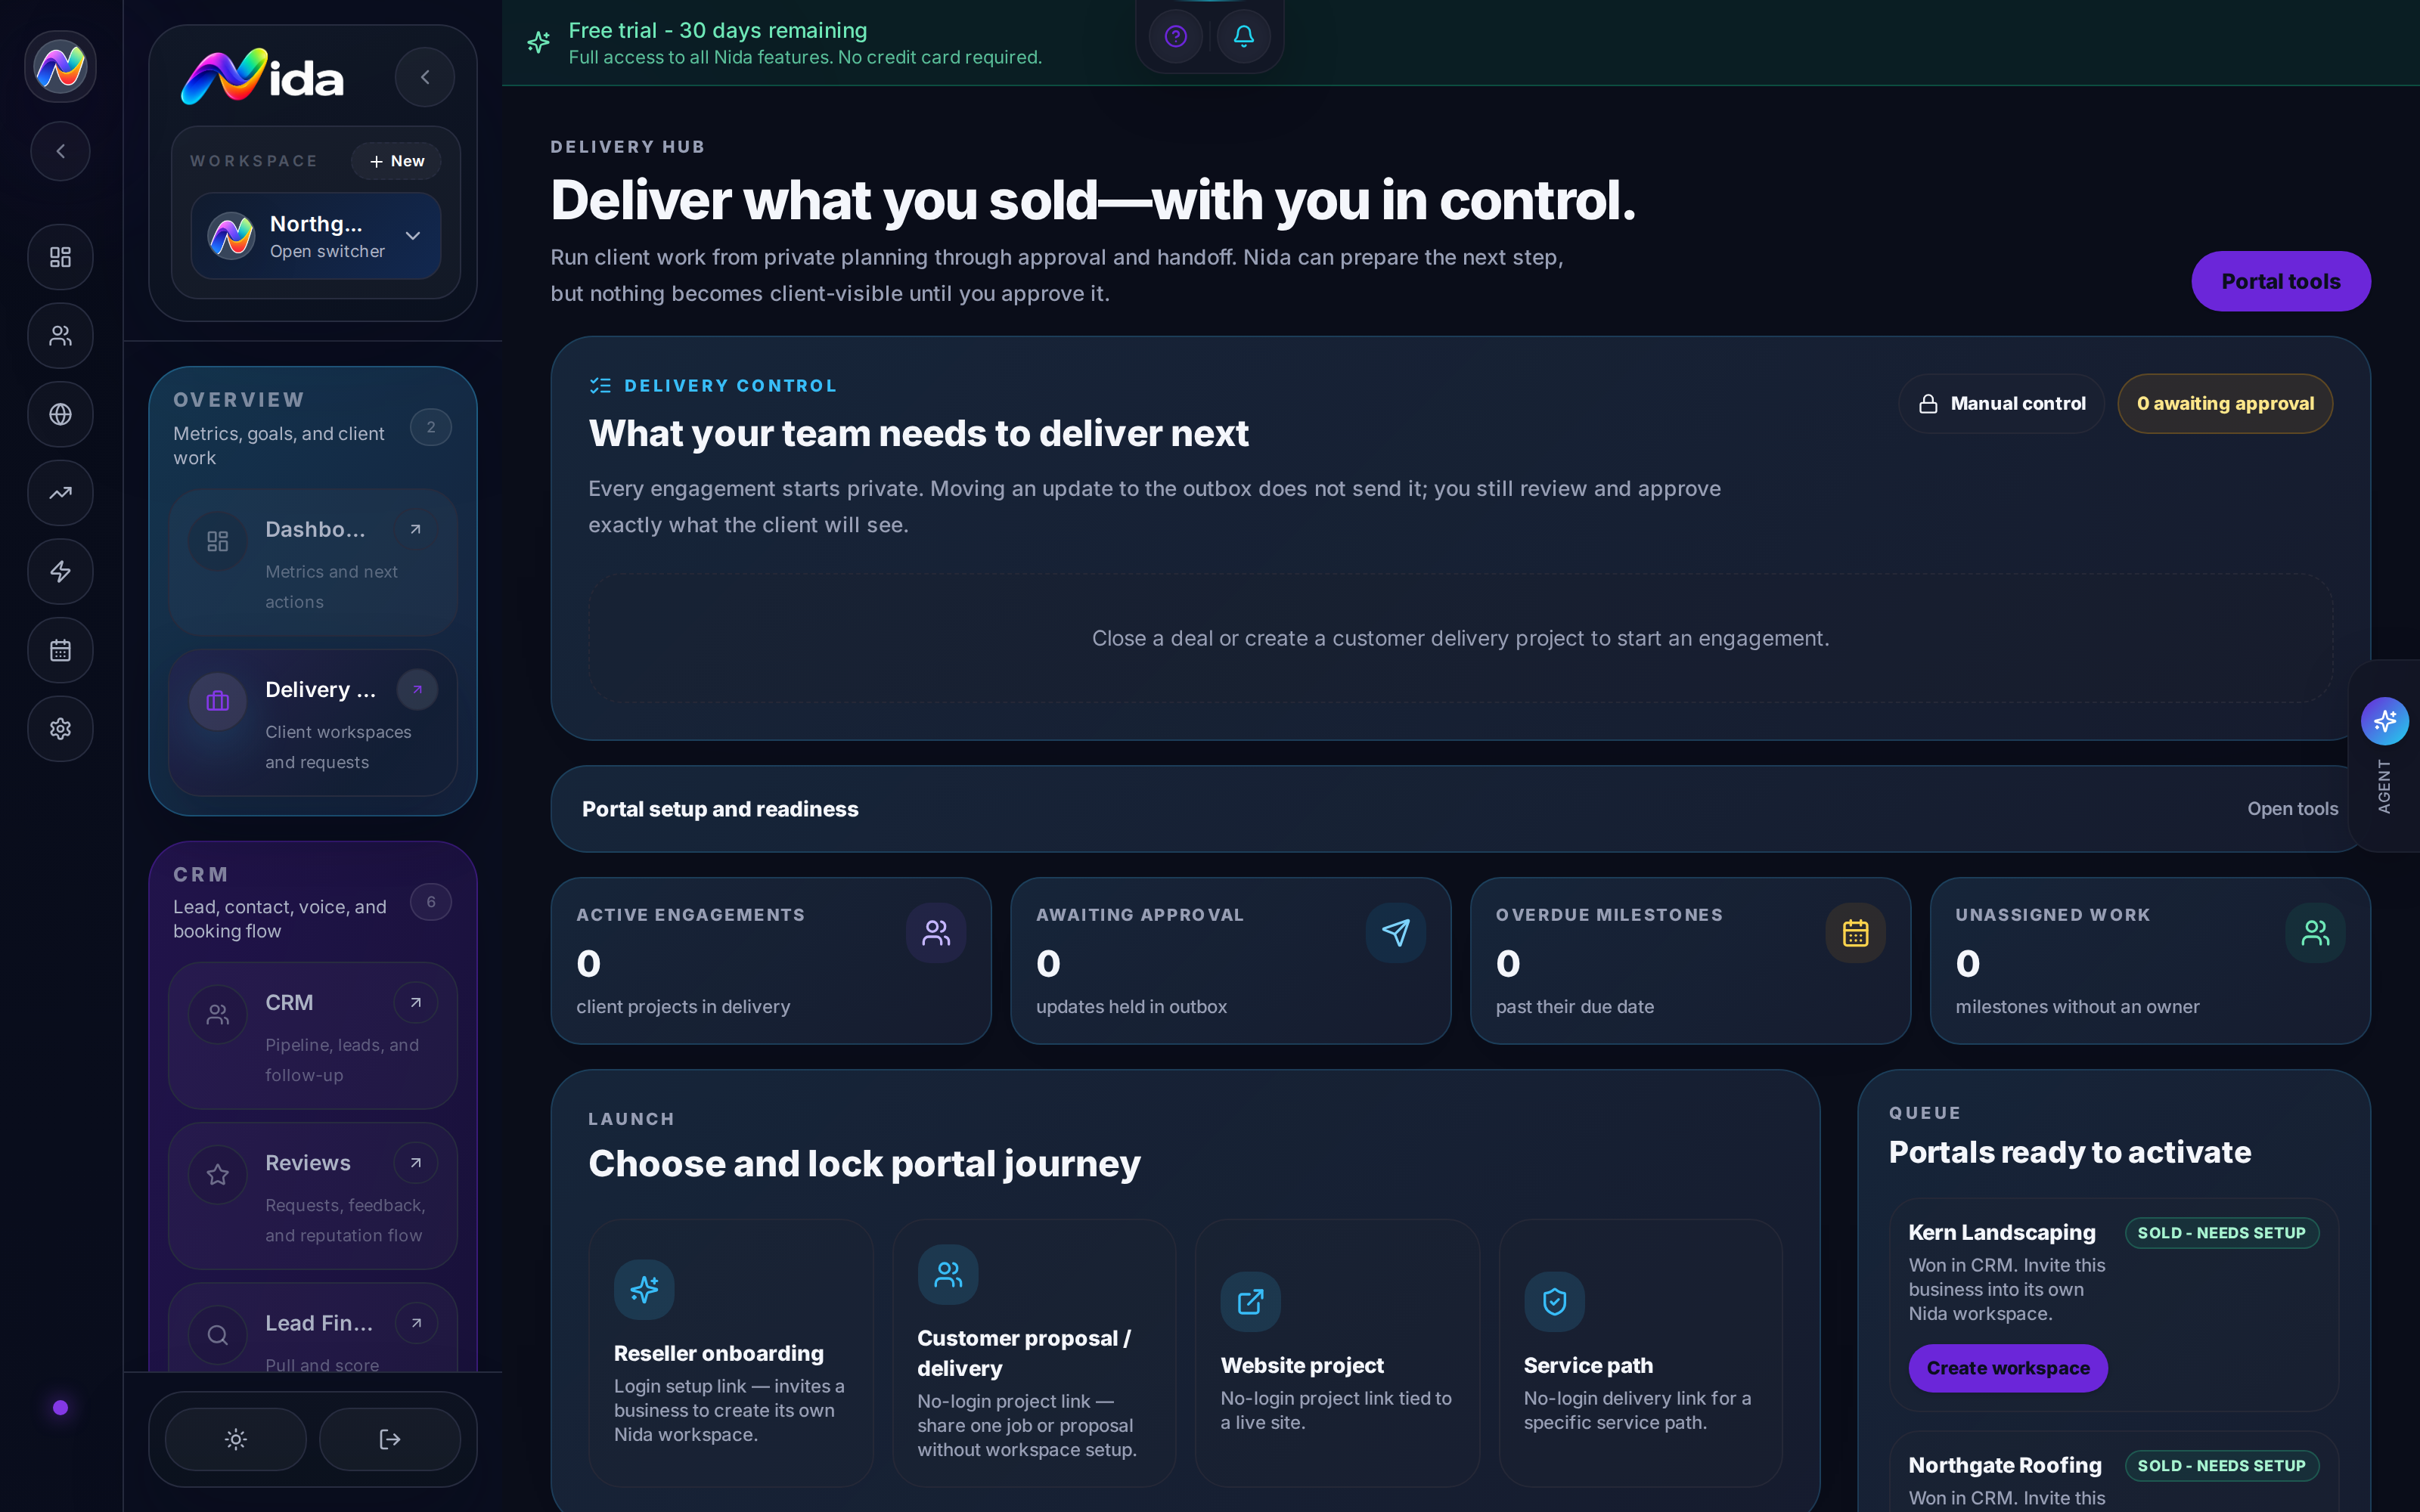
**Purpose:**Purpose: the white-label client portal. A separate, branded view of the workspace your client sees when they log in. Also the home of the onboarding "checklist" pattern.
What you'll need: a White-Label tier subscription (Agency tier can preview but cannot publish to clients).
Walkthrough
The Delivery Hub has two portal types, both managed from the same page:
Portal Type 1 — Nida Onboarding
A task checklist the client works through to kick off their engagement with your agency. Default checklist has 6 tasks:
- Sign in to the client portal
- Complete your business profile
- Connect your Google Business Profile
- Upload your brand assets (logo, photos)
- Approve the launch timeline
- Schedule your kickoff call
Each task has a status (Pending, In Progress, Complete). The client sees progress as a percentage bar. You see the same status in the agency view.
Portal Type 2 — Customer Delivery
A second, longer-running checklist for the actual delivery phase. Once the project is in motion, this is the client's "what's being done this week" view. Default tasks:
- Weekly progress snapshot
- Approve draft content
- Review lead report
- Approve new ad creative
- Sign off on monthly deliverable
KPI tiles (visible to the agency, hidden from the client)
- Portal Visits — last 7 / 30 days
- Active Clients — how many client workspaces are in onboarding or delivery
- Average Time to Onboard — how many days from client workspace creation to "complete" status
- Tasks Completed This Week — across all client workspaces
Readiness meter
A circular indicator that says "Onboarding 60% complete across 4 active clients." This is a quick visual that shows which clients are on track and which are stalled.
How to create a new client portal
- + New client portal in the top-right.
- Pick the portal type (Onboarding or Delivery).
- Pick a name (e.g., "Acme Landscaping Onboarding").
- Assign to a client workspace. (If you haven't created a client workspace yet, see Recipe 10.)
- Pick a template. Nida ships 3 onboarding templates (Service Business, E-commerce, Restaurant) and 2 delivery templates (Weekly Sprints, Monthly Reports).
- Customize tasks. Add, remove, reorder. Each task can be a checkbox, a file-upload, a form, or a signature.
- Save. The client gets an email invite with a sign-in link.
How clients access their portal
- Onboarding clients get a one-time magic link + a persistent password. They sign in at the workspace's portal domain.
- Delivery clients get the same. Once signed in, they see only the portal page (not the agency sidebar).
Tips
- Embed a portal in your website. The portal pages support iframe embed — drop a
<iframe>on a "Client Login" page and the client never leaves your site. - Portal domains are separate from workspace domains. A workspace can have a portal domain (
app.clientdomain.com) and the agency workspace can have a totally different branding. - Custom branding per portal — each client portal can have its own colors, logo, and background. Set it under Settings → Branding → Client Workspaces.
- Use the readiness meter as a health check. If a client's readiness is below 30% after week 1, that's a flag.
Pitfalls
- White-Label only. Don't promise a branded client portal to an Agency-tier customer.
- Tasks are not synchronized with external tools (Trello, Asana). If you use those, you'll have a duplicate source of truth.
- No multi-language portals yet. If your client speaks Spanish, you're writing tasks in Spanish in the same portal.
Related
Part 4 — CRM
Chapter 3 — CRM Pipeline
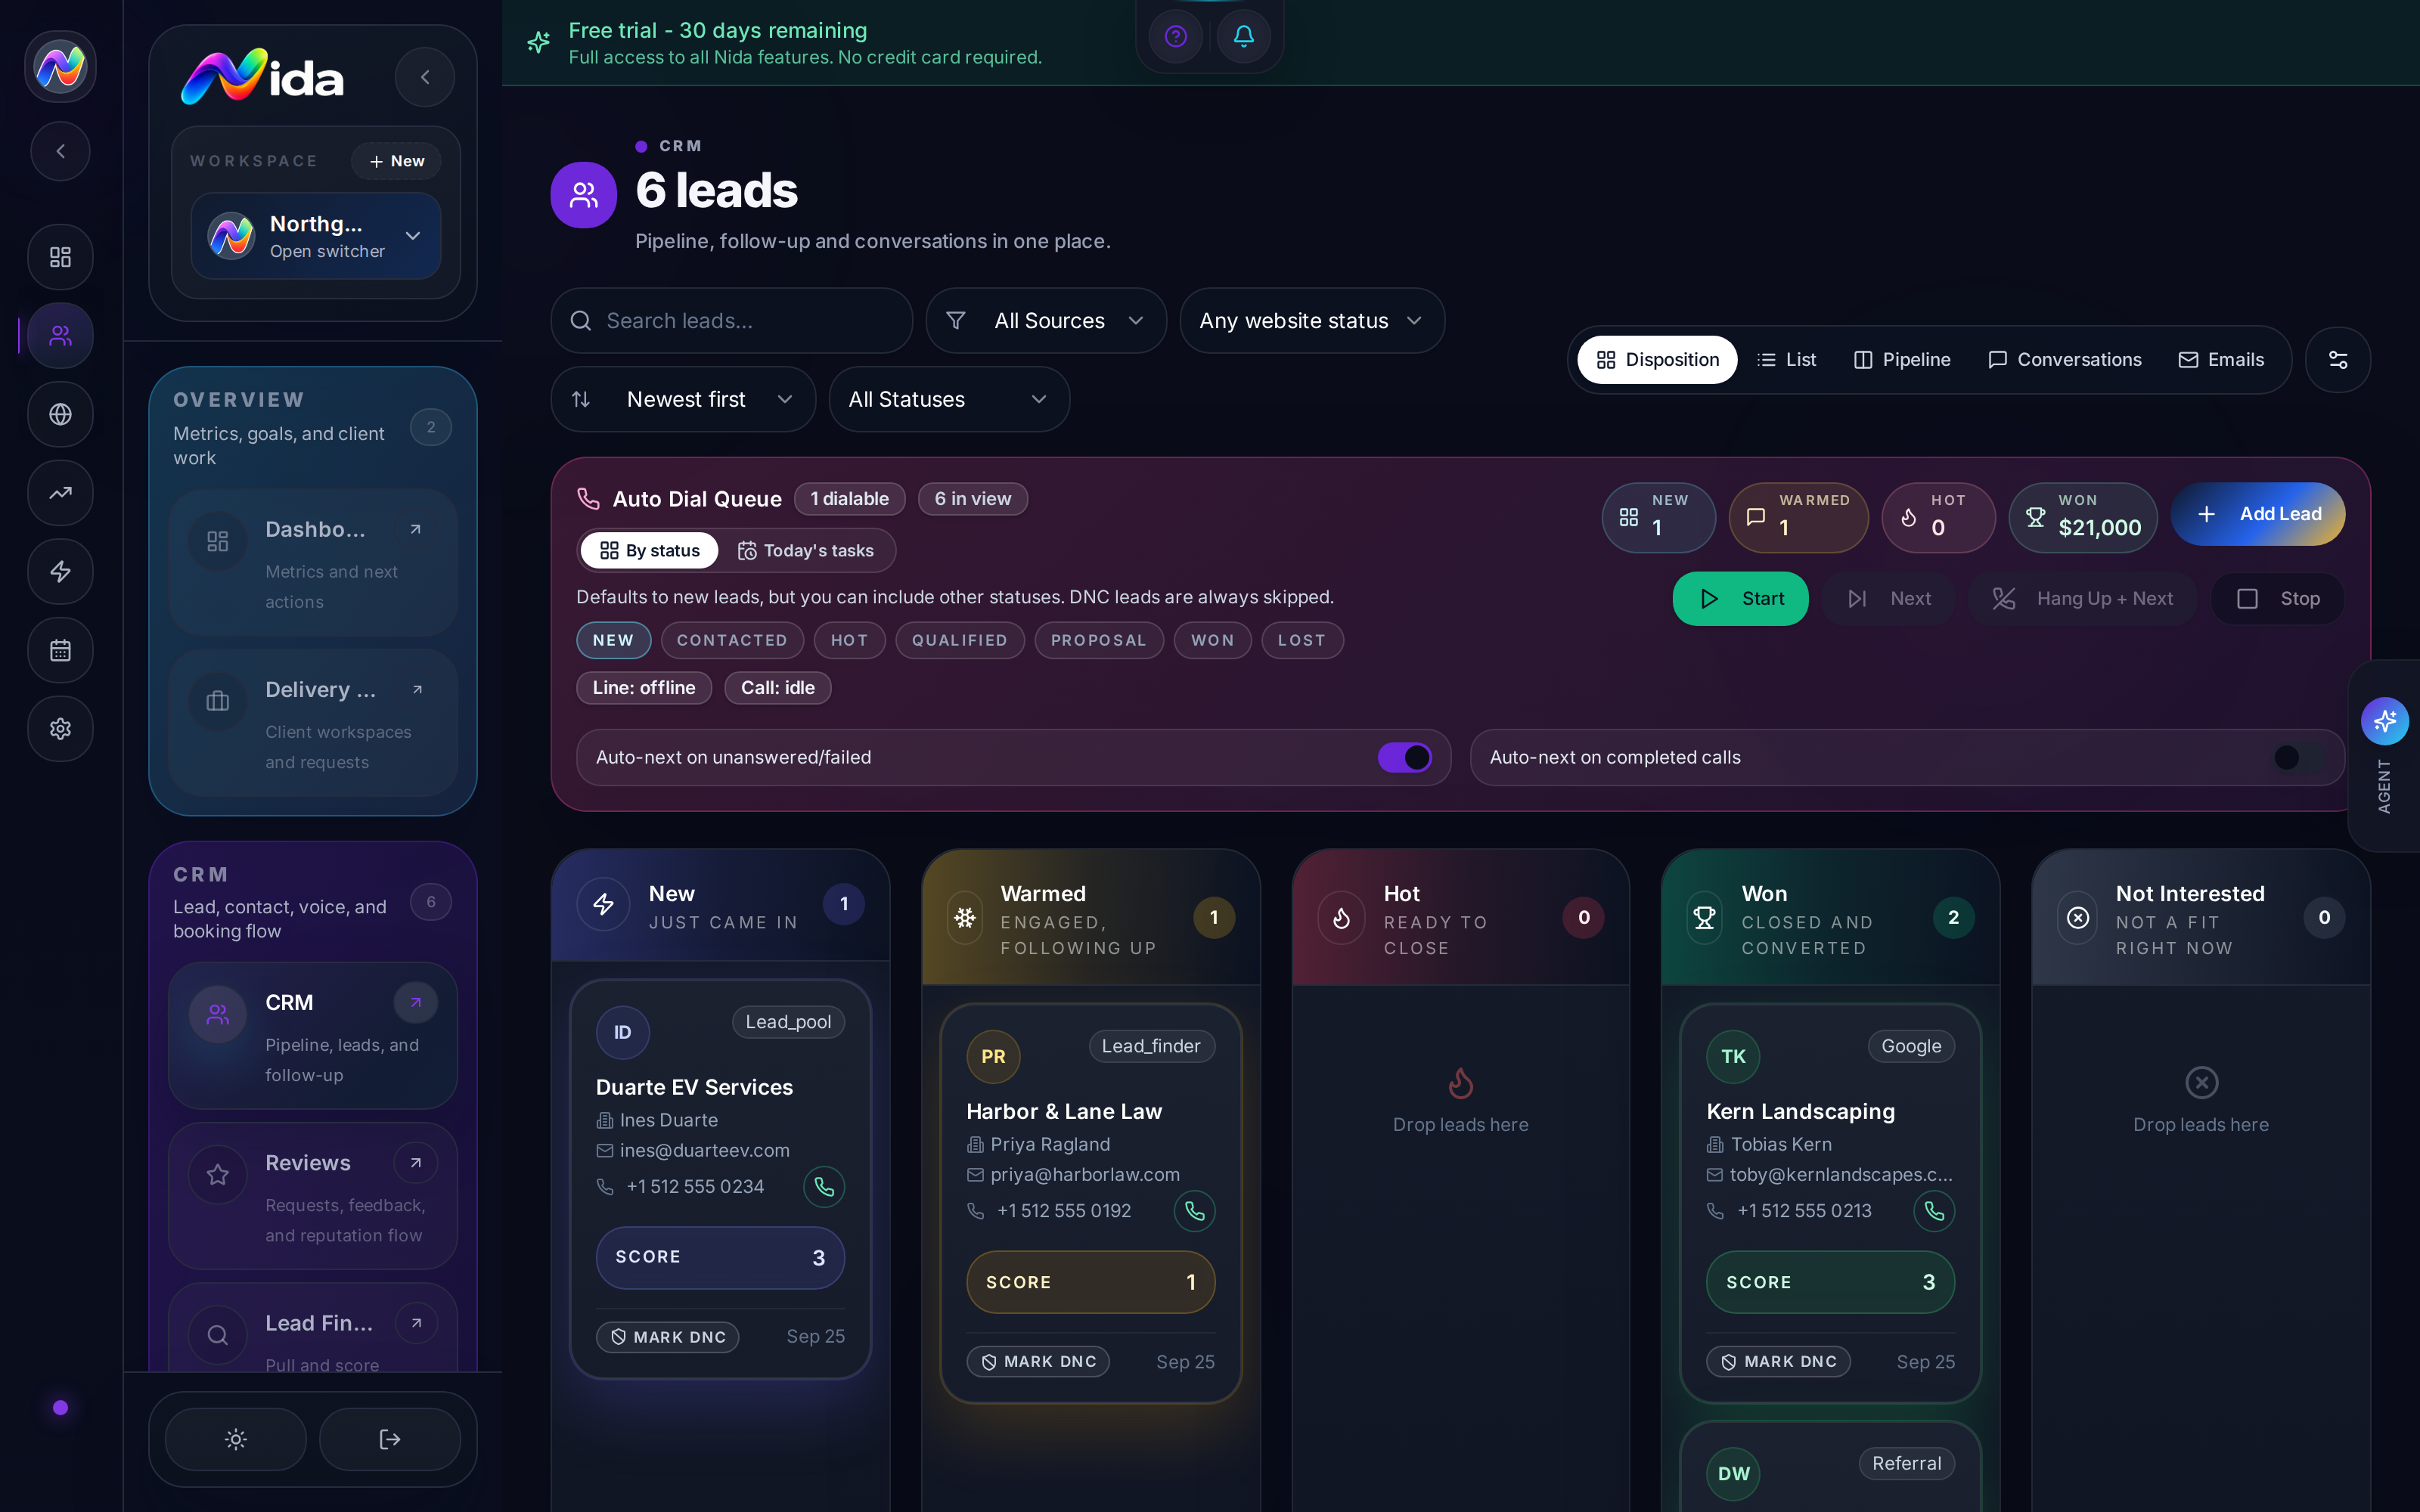
**Purpose:**Purpose: the visual deal-flow board. Every lead moves through a customizable pipeline of stages, from "New" to "Won" (or "Lost"). Drag-and-drop, filter, and trigger automations on stage change.
What you'll need: at least one lead (or a connected form/chatbot to generate them).
Walkthrough
The pipeline is a Kanban board. Default stages:
- New — lead just arrived, not contacted
- Contacted — first touch made (call, email, SMS)
- Qualified — confirmed they have need + budget + timeline
- Proposal — sent a quote or proposal
- Won — closed (paid, signed, or marked won)
- Lost — disqualified, no-bid, dead
Each column shows the leads in that stage as cards. Each card shows: lead name, company, last activity timestamp, value (if set), and the assigned owner.
Customize the pipeline:
- Settings → CRM → Pipeline stages to add, rename, reorder, or delete stages.
- Stage colors are picked from a fixed palette. Match them to your sales motion (e.g., warm stages in yellow, hot in orange, won in green).
- Add a stage gate — automation that fires when a lead enters the stage (e.g., auto-send an email when moved to "Qualified").
Lead detail drawer:
Click any lead card to open a right-side drawer with:
- Contact info — name, email, phone, company, source, owner
- Activity timeline — the shared LeadActivityTimeline (calls, emails, SMS, form submissions, chatbot conversations, payments, automation fires, status changes)
- Tasks — to-dos assigned to the lead (manual or auto-created by automations)
- Notes — internal-only notes, not visible to the lead
- Custom fields — workspace-defined fields (e.g., square footage, project type)
- Quick actions — call, email, text, book a meeting, send a proposal, move stage
Add a lead manually:
- + New lead in the top-right of the CRM page.
- Fill in at minimum: First name, Last name, Email or Phone, Source.
- Click Create. The lead lands in the New column.
Filter and search:
- Top-right has a search field, a stage filter, an owner filter, a source filter, and a date-range filter.
- Filters combine with AND. Search is case-insensitive substring match across name, company, email, phone.
Bulk actions:
Select multiple leads with the checkboxes:
- Move stage — bulk-move to a different stage
- Assign owner — bulk-assign
- Add tag — bulk-tag
- Delete — bulk-delete (with confirmation)
Tips
- Move cards by drag-and-drop or use the keyboard:
J/Kto navigate,1-6to set stage,Eto open email,Tto open task,Escto close drawer. - The lead drawer can be pinned (click the pin icon in the drawer header) so it stays open as you move between leads.
- Stage change creates a timeline event. If you have an automation listening to "Stage changed → X," it fires.
- Set a value on every lead. Even a rough estimate ($5,000) makes the pipeline's "Total Value" metric meaningful.
- AI Lead Scoring (if enabled in Chapter 17) shows a score badge on every card: Hot (red), Warm (orange), Cool (blue).
Pitfalls
- Pipeline stages are workspace-wide. Two pipelines per workspace is the current limit. Use the existing one well.
- Deleting a stage requires moving its leads first. Nida will not orphan them.
- Lead source matters. The default source dropdown is "Manual, Chatbot, Form, Phone, Stripe, Import." Pick a non-Manual source when you can — it powers the source breakdown report.
- Custom fields are not unique to the pipeline. They apply across contacts and leads. Don't create a "Pipeline stage" field — that's the stage itself.
Related
- Chapter 4 — Contacts — for the long-term list view
- Chapter 5 — Conversations — for the unified inbox
- Recipe 1 — Chatbot → CRM
- Recipe 3 — Form → CRM
Chapter 4 — Contacts
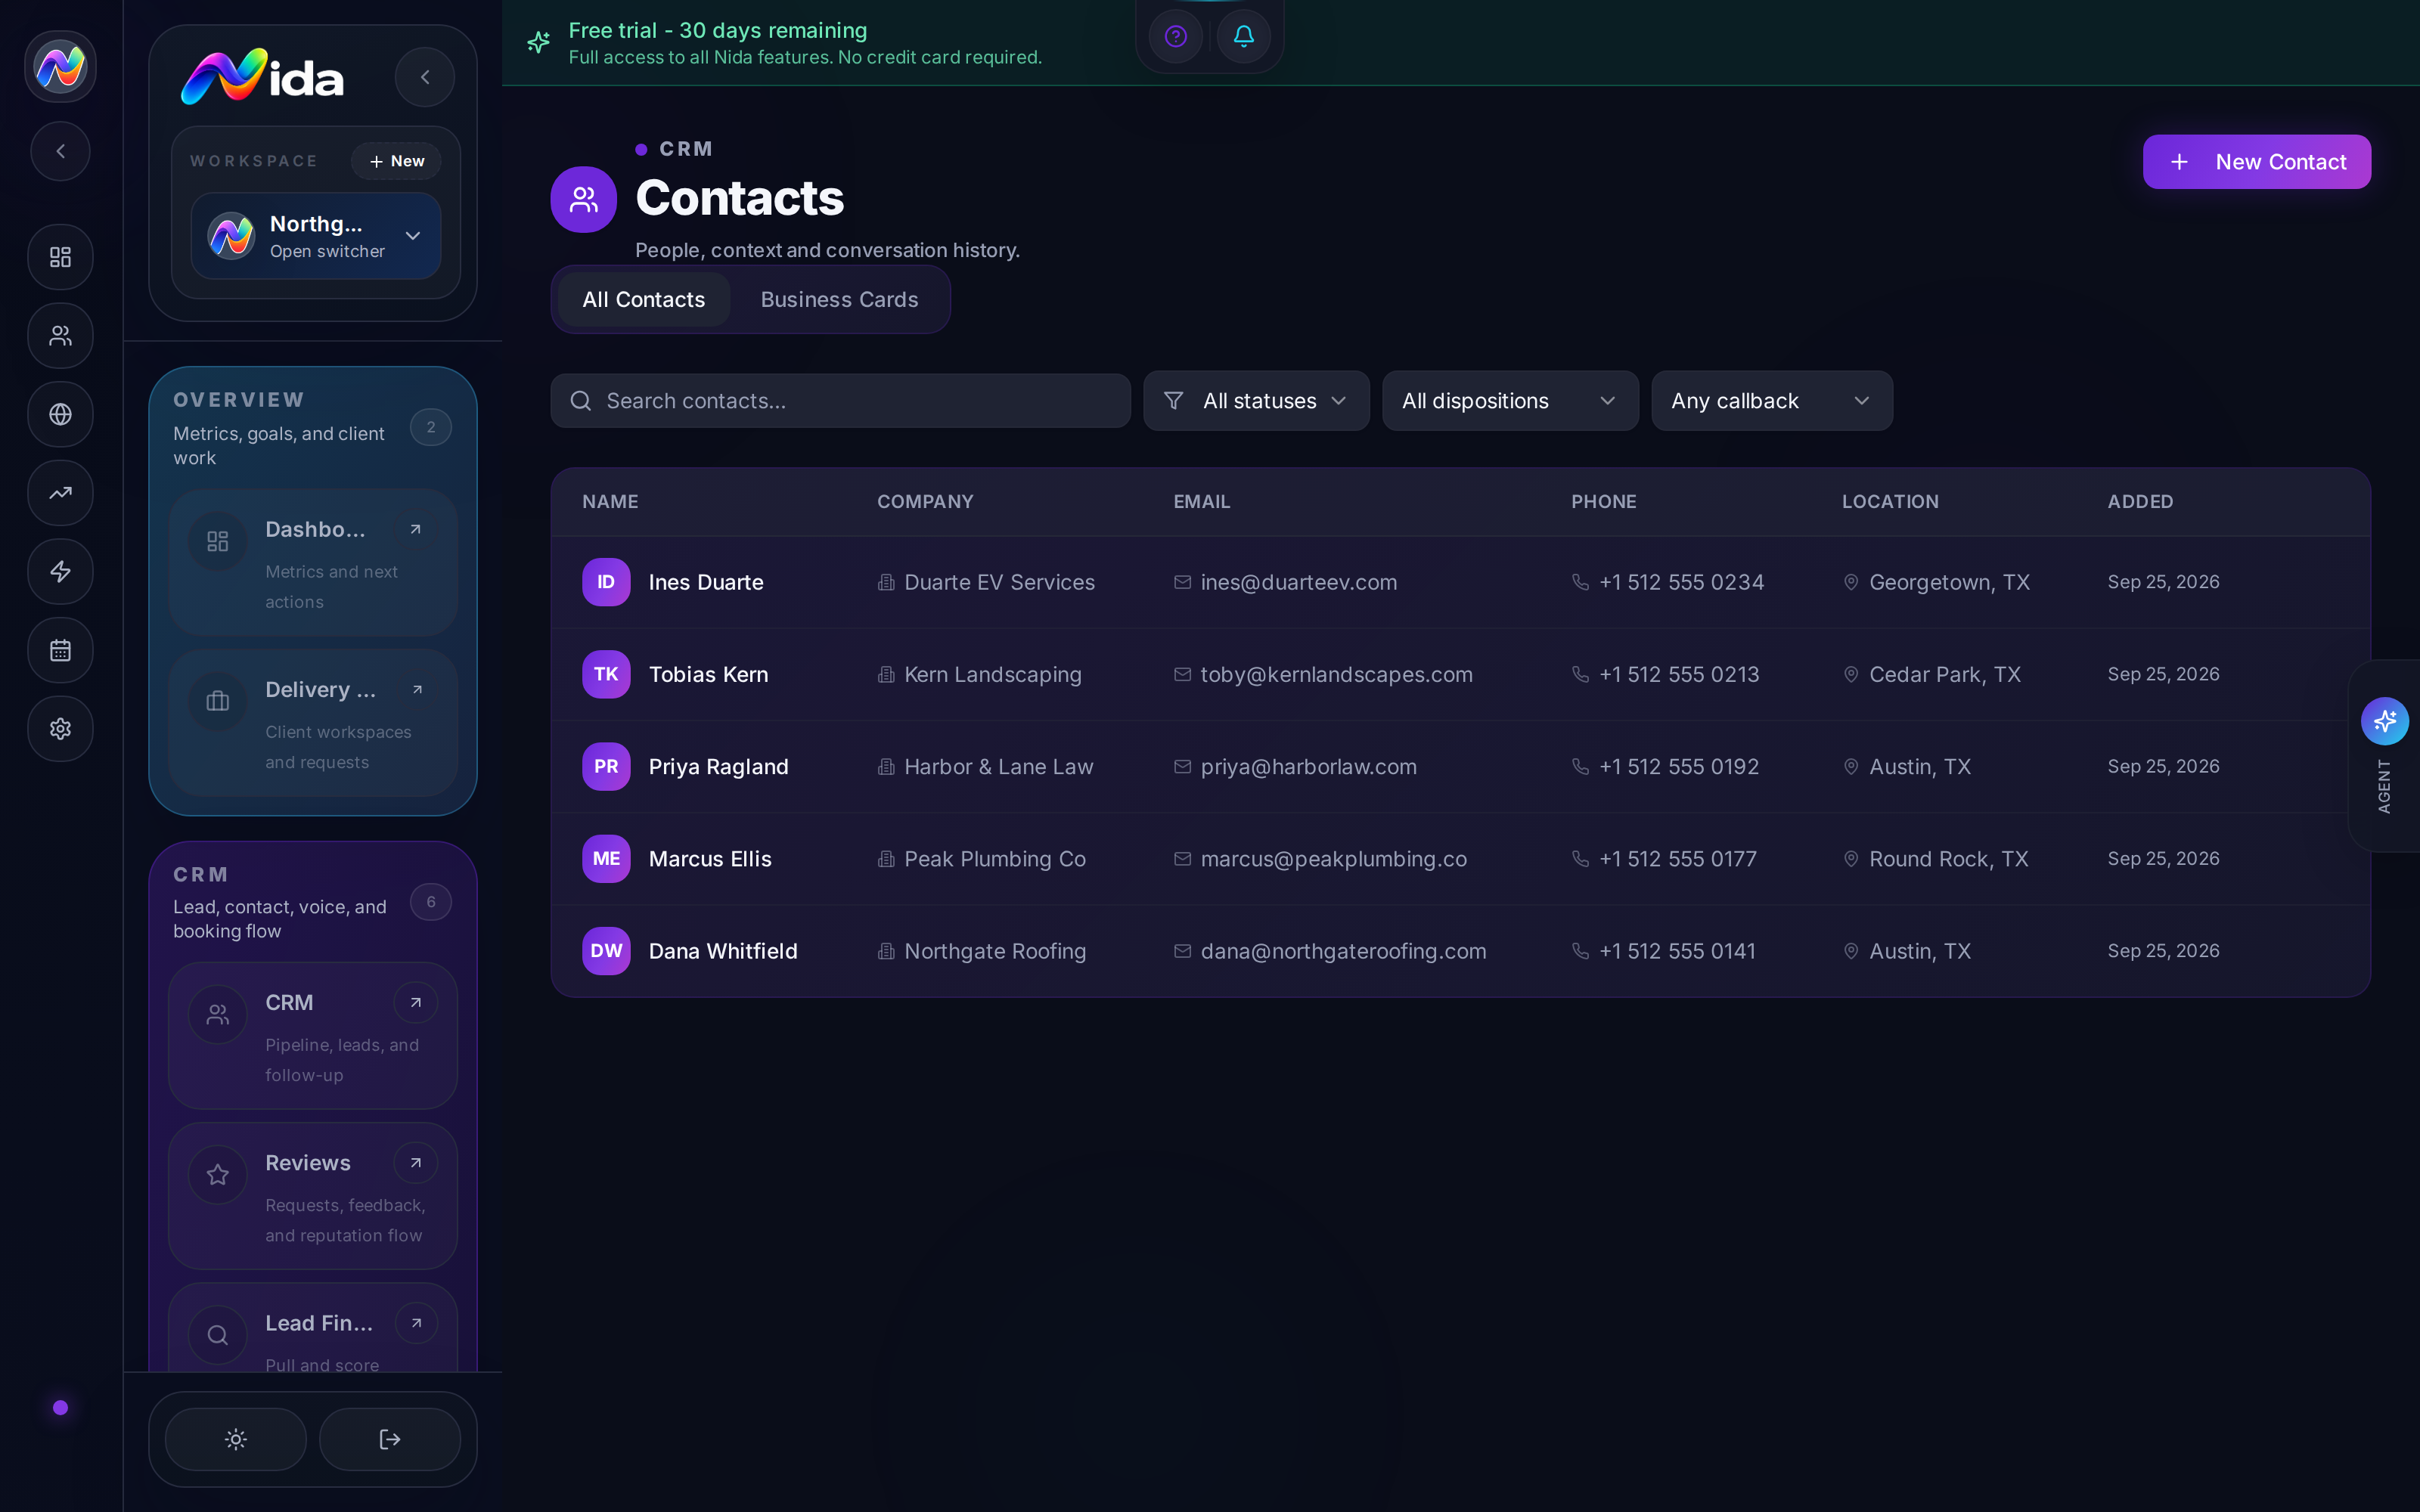
**Purpose:**Purpose: the long-term address book. People you've sold to, people you've worked with, people who opted in but didn't become customers. Different from the CRM pipeline, which is about active opportunities.
What you'll need: nothing. Open and start adding.
Walkthrough
A tabular list view. Columns:
- Name
- Company
- Phone
- Location
- Added (timestamp)
A search bar at the top filters by any field (case-insensitive substring).
Add a contact:
- + New contact in the top-right.
- Fill in name, email, phone, company, location. None are required — name alone works.
- Click Save.
Promote a contact to a lead:
Contacts who become opportunities get moved into the pipeline:
- Open the contact → Convert to lead → pick a pipeline stage → save.
- The contact is now also a lead, and the lead's activity timeline shows the contact history.
Demote a lead to a contact:
- Open the lead → Archive → choose "Move to contacts."
- Useful for closed-lost leads you want to keep for future re-engagement.
Merge duplicates:
- Find two duplicate contacts → check both → Merge → pick which fields win.
- Nida merges activities, notes, and tasks from both into the surviving contact.
Tips
- Use contacts for newsletter recipients, past customers, referral partners — anyone you want to stay in touch with but who isn't an active deal.
- Contacts are not deleted by default when a lead is deleted. The lead is removed from the pipeline but the contact record persists.
- Bulk import — Nida supports CSV upload (Settings → Contacts → Import). First row must be headers matching the contact fields. Max 10,000 rows per import.
- Export — Nida supports CSV export of the full contact list or filtered subset.
Pitfalls
- No tagging on the contact list view yet. Tags exist on leads (in CRM) but not surfaced on contacts. Use notes for freeform labels.
- No custom fields in the table view. Custom fields are stored but the list table shows only the 6 standard columns. Open a contact to see custom fields.
- No built-in duplicate detection. If you import a CSV and a contact with the same email already exists, Nida will not warn you. Use the merge flow post-import.
Related
- Chapter 3 — CRM Pipeline — for converting contacts to leads
- Recipe 11 — External Agent Creates a Lead — for programmatic contact creation
Chapter 5 — Conversations
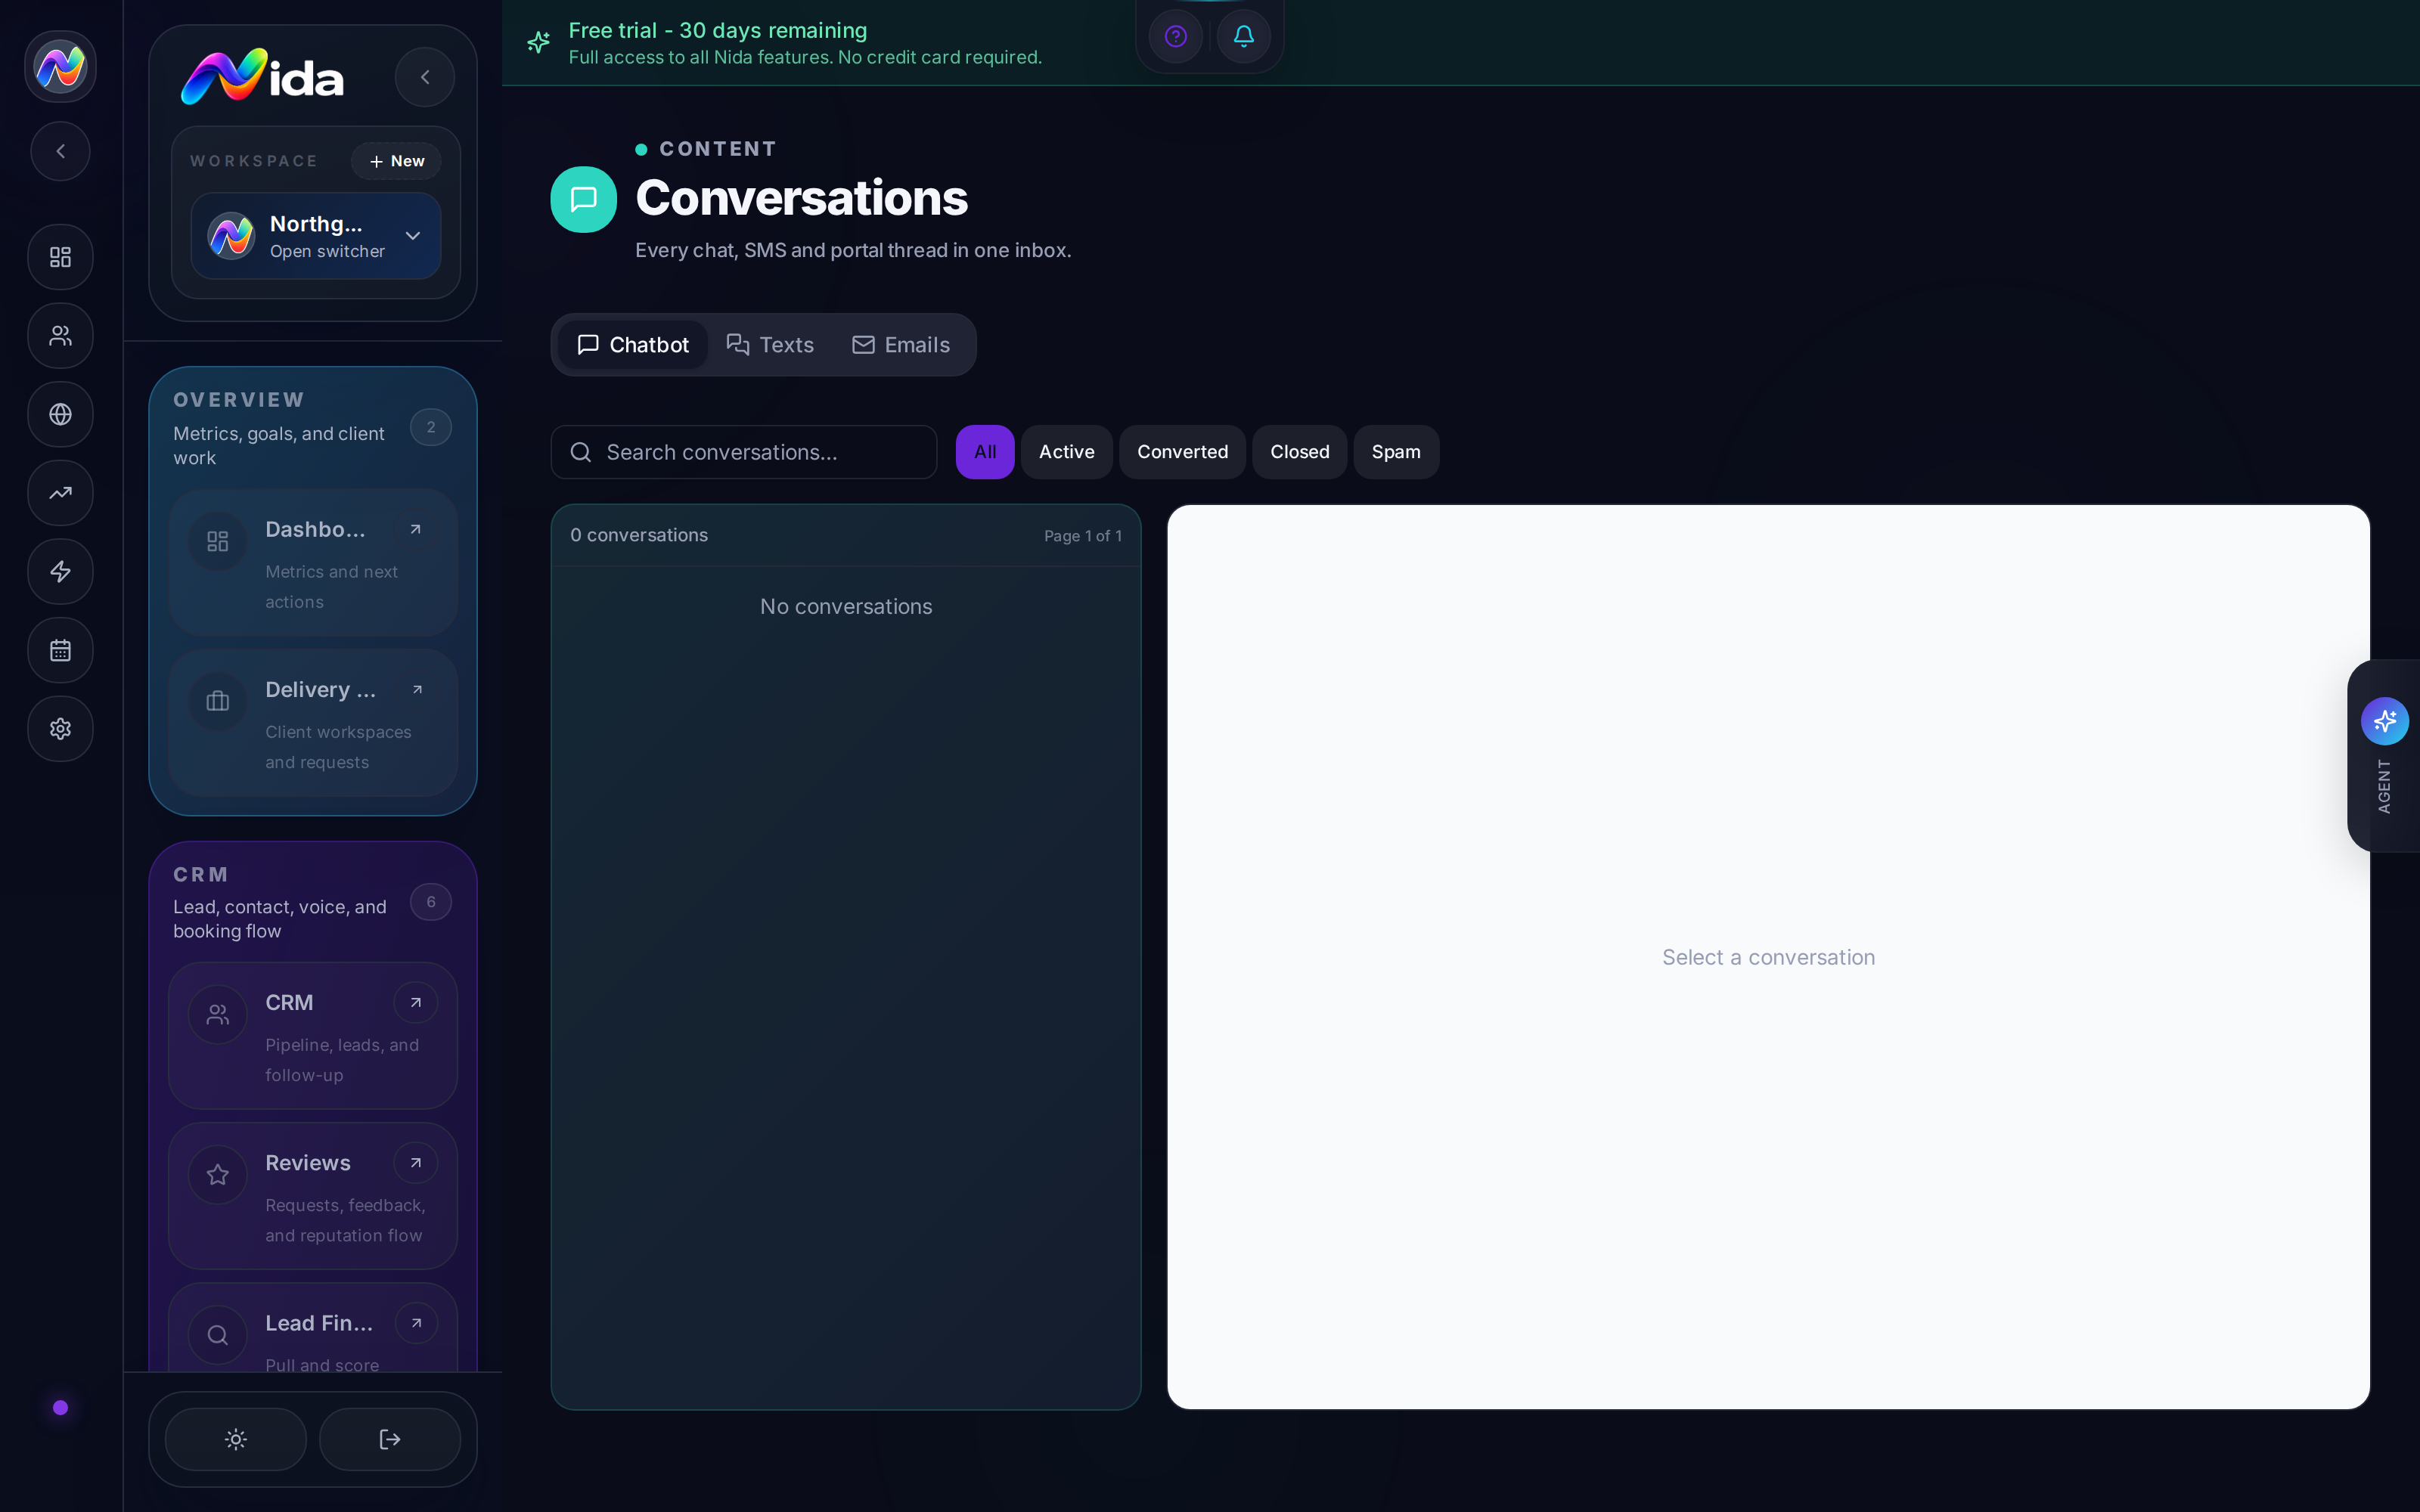
**Purpose:**Purpose: the conversation inbox — where all incoming and outgoing messages across chatbot, SMS, and email land. Three tabs, but in one view.
What you'll need: at least one channel connected (chatbot live, Twilio for SMS, or email sender configured).
Walkthrough
The page has three tabs:
Tab 1 — Chatbot
A live view of every active chatbot conversation. Right panel shows the conversation thread; left panel shows a list of all threads, sortable by Last message, First message, Lead status, or Channel.
- Click a thread to open the conversation.
- Take over — close the AI auto-reply and reply manually. Useful when the AI is going in circles or the lead is asking to speak to a human.
- Mark resolved — closes the thread and removes it from the active list. Resolved threads move to Closed and are searchable.
- View lead — jumps to the lead's CRM record.
Tab 2 — Texts (SMS)
SMS threads with leads who texted the business number (the Twilio number you connected).
- Reply — type and send. Nida uses your Twilio number as the sender.
- Schedule — schedule a text to send at a specific time (useful for "9am tomorrow" follow-ups).
- Templates — saved message templates with merge tags. Insert with one click.
Tab 3 — Emails
Email threads with leads (and contacts) on the workspace's email address.
- Compose — opens an email composer with subject, body, and merge-tag picker.
- Reply — threaded reply, same chain as the original.
- Forward — forward to a teammate or external address.
- Templates — saved email templates with subject + body.
Common features across all three tabs
- Search — top-right search field searches across all message content in the active tab.
- Filter by lead status —
New,Active,Replied,Unreplied,Resolved. - Filter by channel —
Chatbot,SMS,Email. - Bulk select and assign — assign threads to a teammate.
- AI suggest-reply — when enabled in AI Settings, Nida generates 3 suggested replies above the composer. Click to insert.
Tips
- The three tabs are intentionally separate. This is a known design choice — Nida chose clarity over a single unified inbox. If you want a single thread across channels, the timeline view in the lead drawer gives you that (sorted by timestamp).
- Notifications — by default, new messages ding the bell icon. You can configure per-channel notification rules.
- Voicemail transcriptions — if you have voicemail transcription enabled in Twilio, transcripts appear as Voicemail entries in the Texts tab (with a recording attached).
- Auto-reply rules — set in Chapter 15 — Automations, not in Conversations. Conversations is the inbox view; Automations is the rules engine.
Pitfalls
- No Facebook Messenger / Instagram DM / WhatsApp integration at the time of writing. Nida supports chatbot (web), SMS, and email. Adding social channels is on the roadmap.
- No group threads — every conversation is 1:1 with a lead. Group conversations aren't supported.
- AI suggest-reply requires an AI provider connected — without one, the suggestion area is hidden, not empty.
Related
- Chapter 10 — Chatbots — for configuring the chatbot
- Chapter 6 — Phone — for voice calls
- Recipe 1 — Chatbot → CRM
- Recipe 2 — Missed Call Text-Back
Chapter 6 — Phone
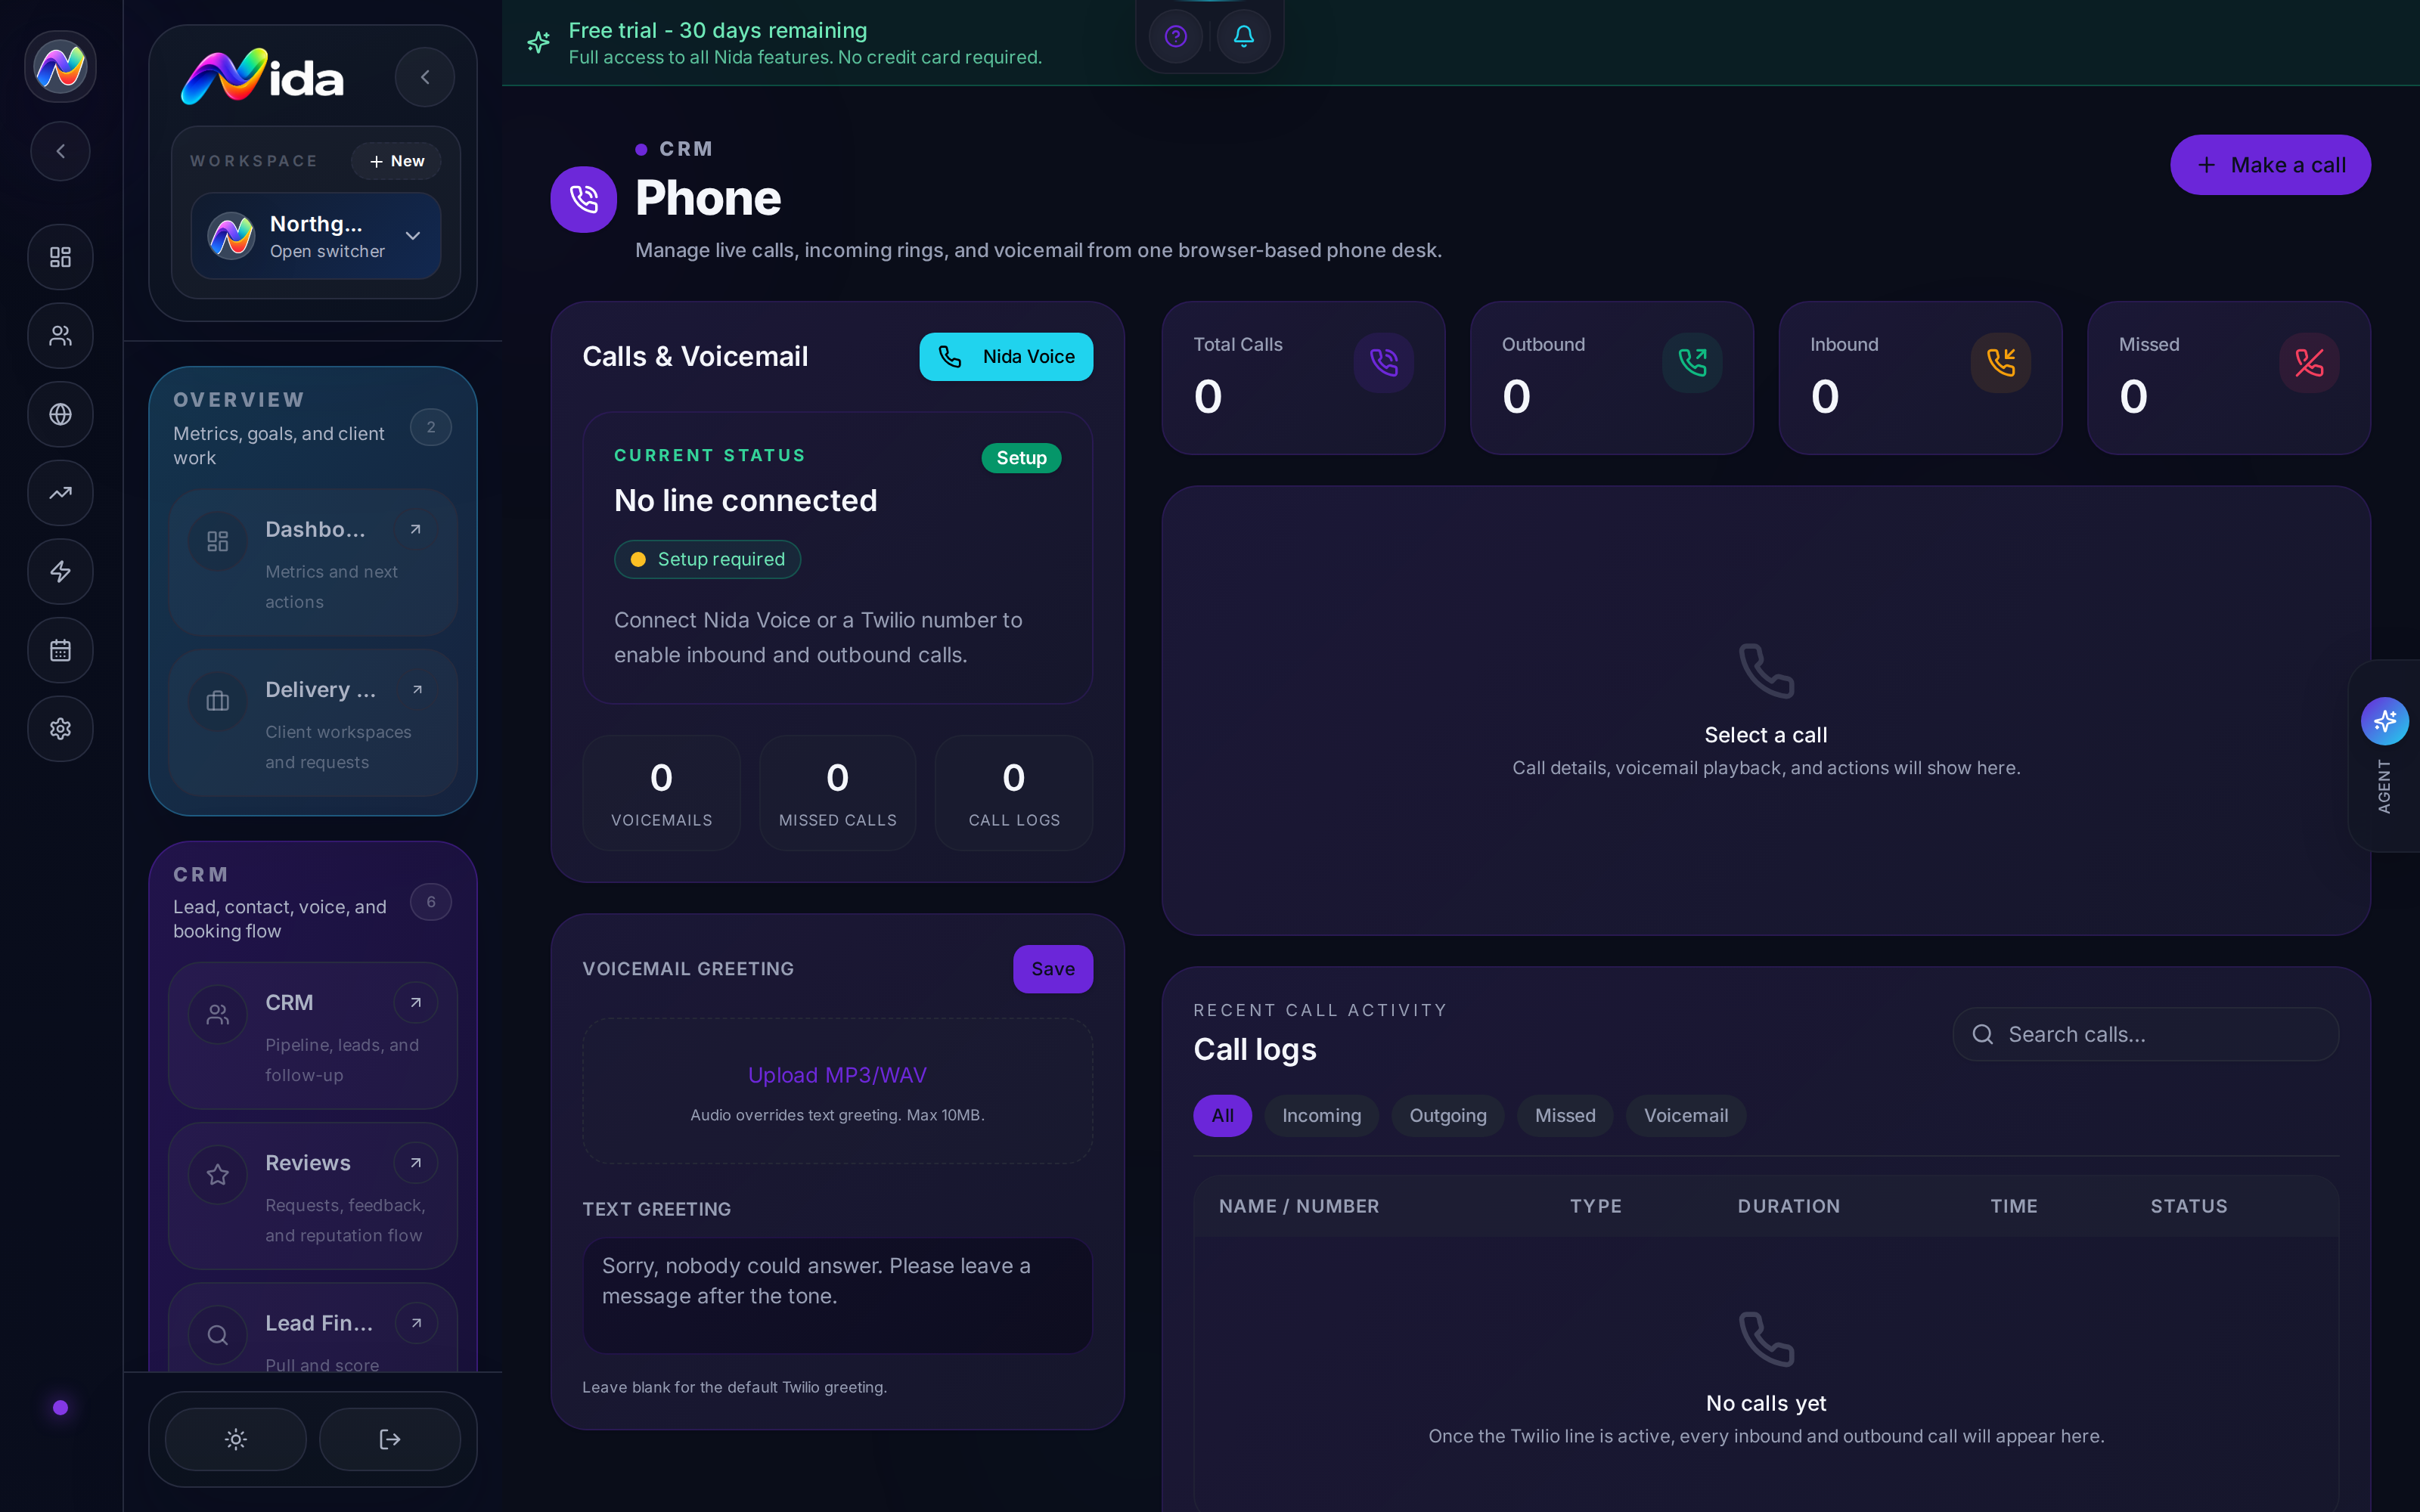
**Purpose:**Purpose: the browser-based phone system. Twilio-powered. Make calls, receive calls, take voicemail, send SMS (via the Conversations module — see note below).
What you'll need: a connected Twilio account and at least one Twilio phone number. See Tutorial 5.
Walkthrough
The Phone page has three panels:
Left panel — Setup and Status
- Status card — shows the connected number, current status (
Online,Offline,Setup needed). - Voicemail greeting — record or upload a greeting.
- Call recording — toggle on/off (must also be enabled in Twilio).
- SMS-enabled toggle — shows whether the number can send SMS (most Twilio numbers can).
- Working hours — set hours-of-operation; calls outside hours route to voicemail.
Center panel — Quick Call
- A phone number input field with country-code picker.
- Call button initiates an outbound call.
- The active call appears with controls: mute, hold, transfer, hang up, send DTMF (touch tones).
- Call duration displayed live.
- Drop a note — type a quick note during the call; it saves to the lead's timeline.
Right panel — Recent Call Activity
A table of recent calls with columns:
- Lead (name + avatar)
- Direction (inbound/outbound)
- Duration
- Recording (play button if recorded)
- Transcript (auto-generated if you have voicemail transcription enabled)
- Outcome (Connected, Voicemail, No Answer, Busy)
- Timestamp
Click any call row to open the full call detail with: full transcript (if available), recording playback, timeline of the call, linked lead, post-call action buttons (Send SMS, Add note, Move stage).
Outbound calls
- Open Phone.
- Type a number or pick a contact from the Pick from contacts dropdown (suggestions appear as you type).
- Click the phone icon. Nida rings your browser (WebRTC) first — you answer by clicking "Accept" in the browser.
- Once you accept, Nida connects the call to the destination.
- When the call ends, the call lands in Recent Call Activity.
Inbound calls
- The Twilio number you connected rings to the workspace.
- All members of the workspace with the Phone permission see the incoming call in their browser.
- First to click "Accept" takes the call. Others see "Call in progress."
- If no one accepts in 25 seconds (configurable), the call goes to voicemail.
SMS (note)
- SMS is NOT in the Phone module. It lives in Conversations → Texts. This is a deliberate split.
- You can send an SMS from a call detail (post-call "Send SMS" button), but the thread is in Conversations.
Tips
- Click-to-call from a lead card — open any lead, click the phone icon, the call initiates.
- Recording opt-out — if your Twilio configuration includes an opt-out prompt, Nida plays it before recording. The opt-out is logged on the call record.
- Caller ID — the Twilio number you connected is the caller ID for outbound calls. For US/Canada, this is automatic. For other countries, Twilio's local-caller-ID rules apply.
- Transfers — click "Transfer" during a call, type a teammate's name or number, the call is moved. (Both must be on the workspace.)
- Call queuing — if multiple calls come in at once, they queue. The queue is visible at the top of the Phone page.
Pitfalls
- Browser must allow microphone access. First call will prompt; click "Allow" and remember the choice.
- No native mobile app for making calls on the go. (GHL wins here.) Use a VoIP softphone that proxies through your Twilio number as a workaround.
- No AI voice agent at the time of writing. (GHL also wins here.) Roadmap item.
- WebRTC quality depends on your network. A bad connection means choppy audio. Test on a stable connection before relying on it for a sales call.
- Calls are not recorded by default in some jurisdictions. Check your local laws; Nida logs the recording consent opt-out, but you're responsible for compliance.
Related
- Tutorial 5 — Connect Twilio
- Chapter 5 — Conversations — for SMS
- Recipe 2 — Missed Call Text-Back
- Recipe 5 — Lead Finder → Auto-Dialer
Chapter 7 — Calendar Engine
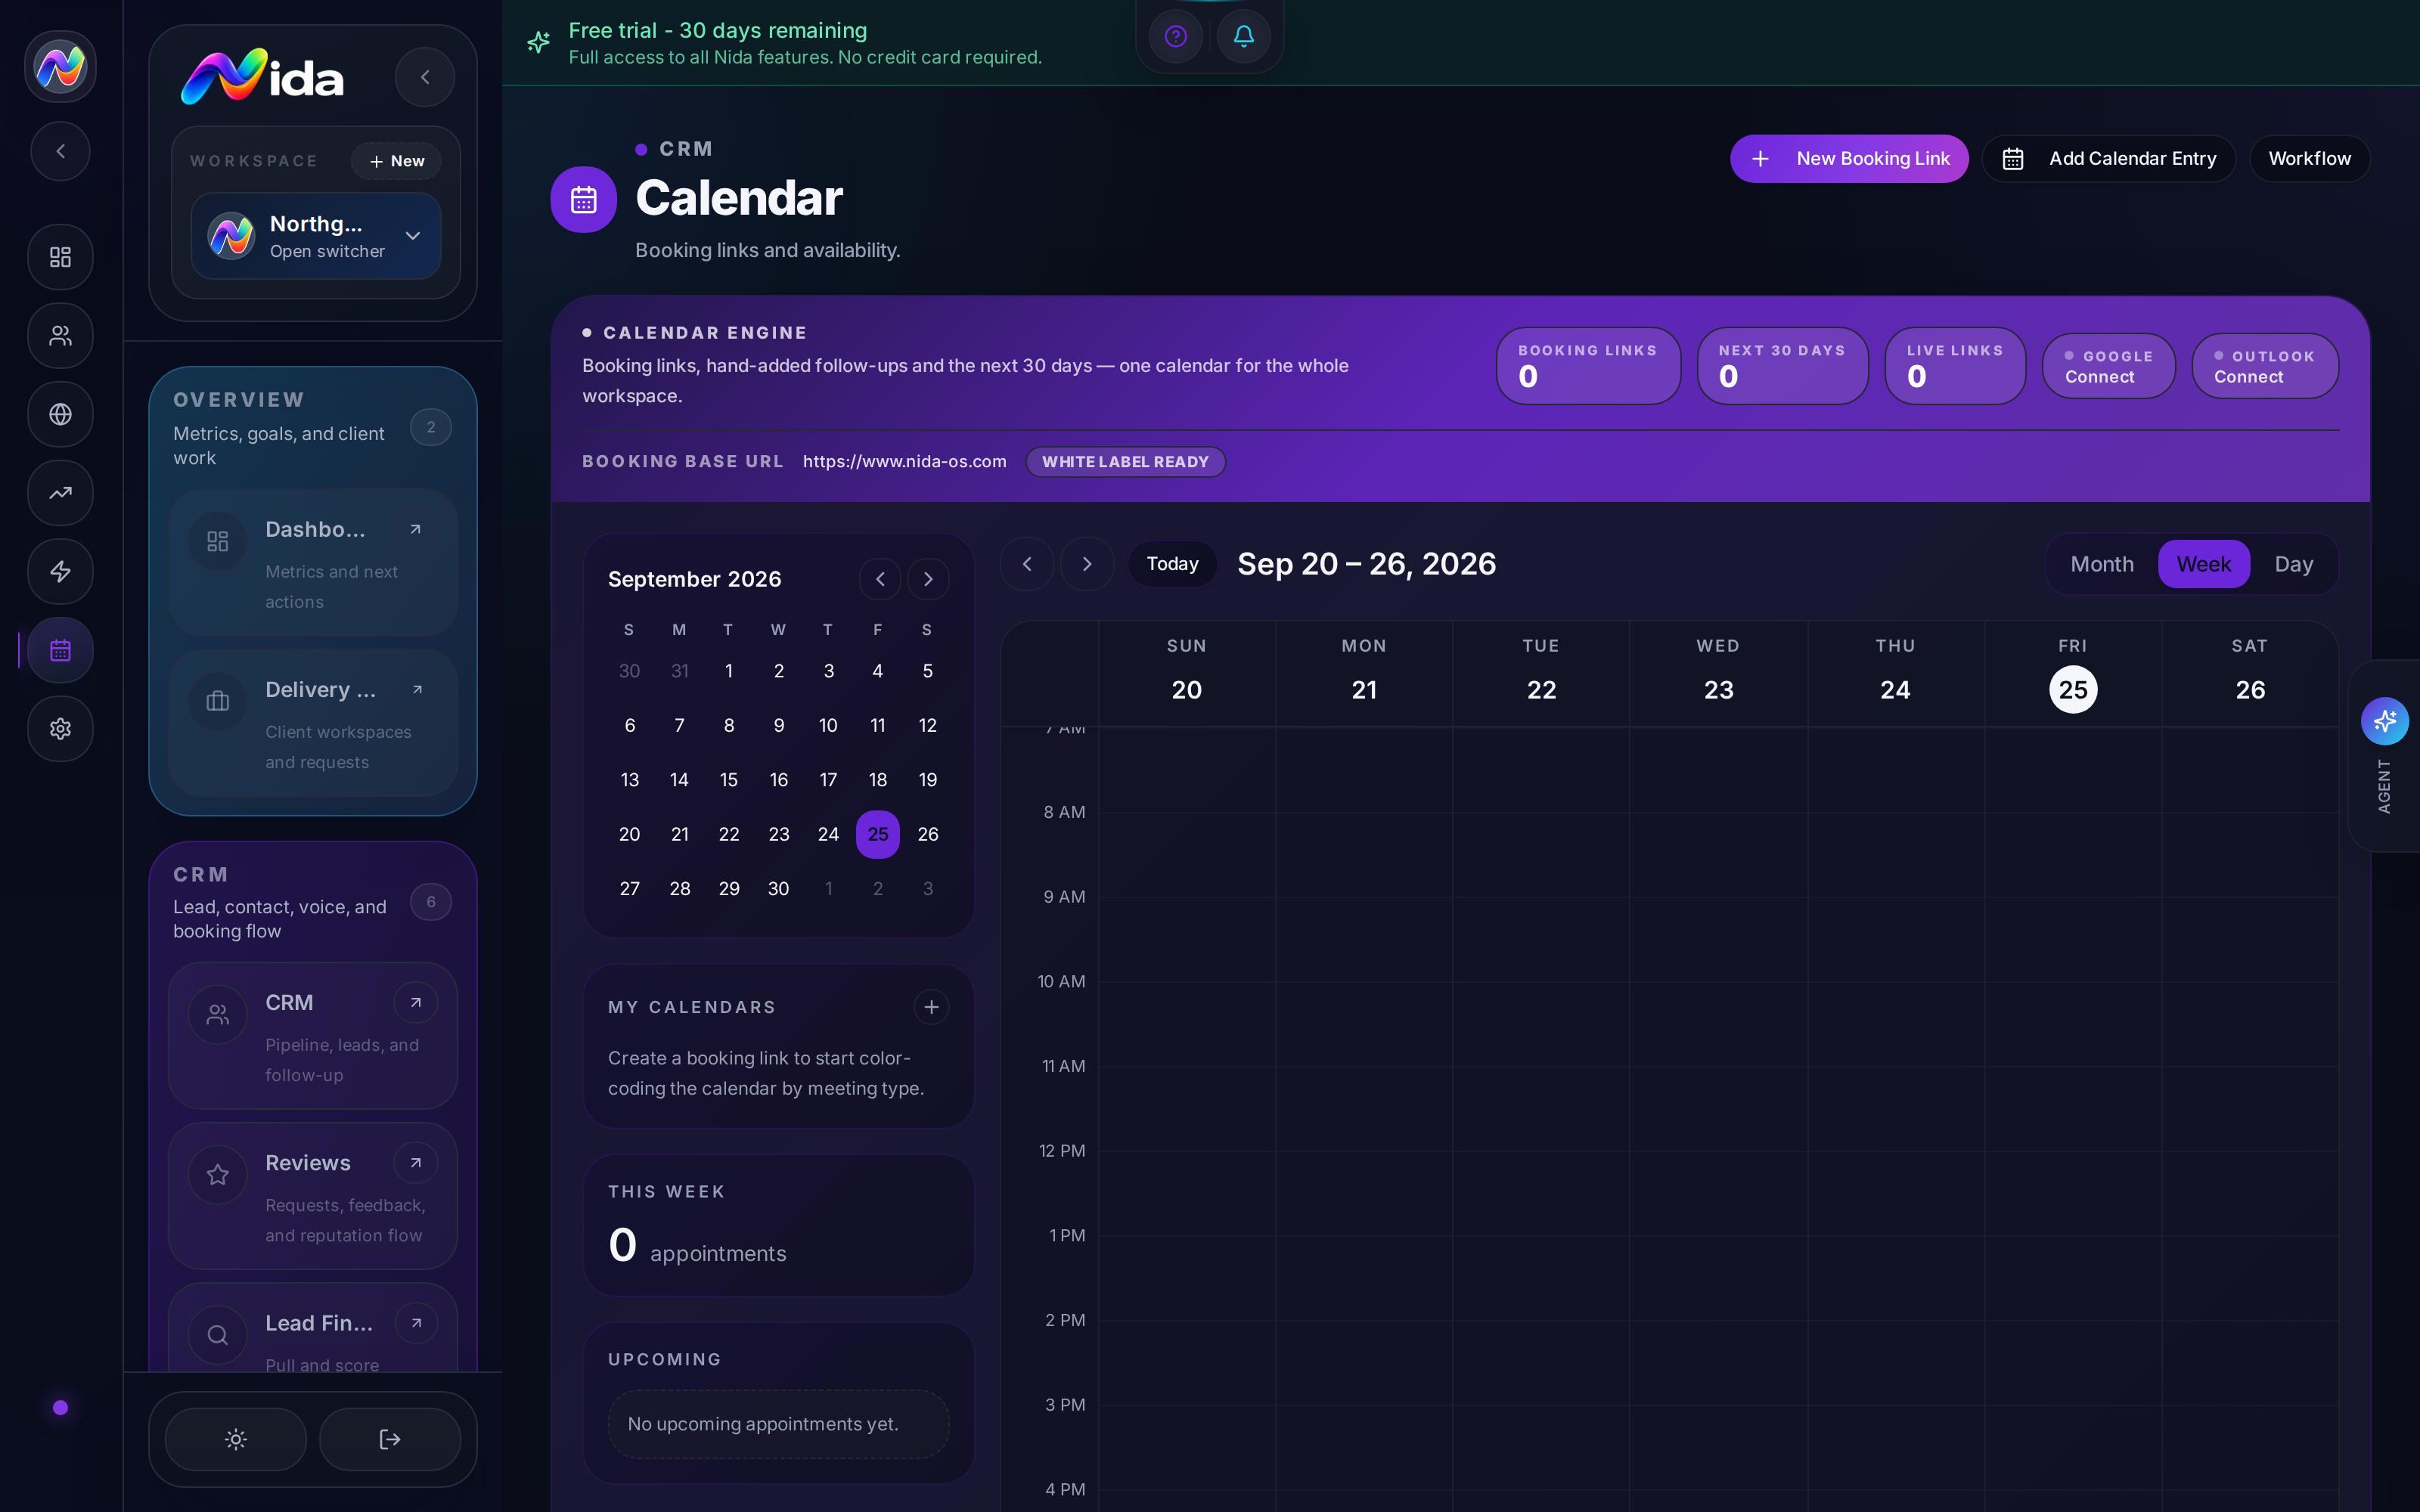
**Purpose:**Purpose: the booking system. Calendly competitor. Lets leads book time with you, your team, or a round-robin pool.
What you'll need: a connected Google or Outlook calendar (so Nida can check your real availability).
Walkthrough
The Calendar page has two regions:
Top — Booking Links
A list of every booking link you've created. Each link is a public URL a lead can visit to book a time.
Create a new booking link:
- + New booking link in the top-right.
- Fill in:
- Name (e.g., "Strategy Call — 30 min")
- Duration (15, 30, 45, 60, 90 min, or custom)
- Location (Zoom, Google Meet, phone, in-person, custom URL)
- Assigned to (you, a teammate, or a round-robin pool)
- Availability (pulled from your connected calendar, plus working hours override)
- Buffer time (15 min before/after each booking)
- Minimum notice (e.g., 4 hours — can't book in the next 4h)
- Maximum advance (e.g., 60 days — can't book more than 60d out)
- Click Save. The link is now live.
Booking link variants:
- 1:1 — assigned to one person
- Round-robin — assigned to a pool; each new booking goes to the next person in the pool in rotation
- Collective — assigned to multiple people; all must be available
- Group — for workshops and classes; cap on attendees
Bottom — Calendar View
Three views: Day, Week, Month. Shows all bookings on your connected calendars. Click any event for details. Click an empty slot to create a manual event.
Time zone: displayed in your workspace time zone (set in Settings → General). Lead's time zone is shown next to their name if different.
Booking page customization
Open any booking link to edit:
- Hero image — upload a photo (or pick from your brand assets)
- Description — what the lead should expect
- Pre-booking questions — collect info before the booking (text, email, phone, dropdown, file upload)
- Confirmation message — what the lead sees after booking
- Confirmation email — auto-sent; can be customized with merge tags (
{{lead.first_name}}, etc.) - Reminder SMS/email — send reminders at T-24h, T-1h, or custom
- No-show handling — what happens if the lead doesn't show (auto-mark, auto-charge fee if deposit, etc.)
Tips
- Round-robin is the killer feature for sales teams. Pool 5 reps, Nida distributes bookings evenly.
- Buffer time prevents back-to-back meetings. Set 15 min before/after to give yourself breathing room.
- Minimum notice prevents surprise bookings. 4 hours is a sensible default.
- Collective meetings auto-cancel if any required attendee can't make it.
- Embed booking links in your chatbot replies, SMS templates, email signatures, and website.
Pitfalls
- Calendar sync is one-way by default — Nida reads your availability from Google/Outlook, and writes bookings back. Nida does NOT import your existing Google/Outlook events as "busy" unless you have the right calendar selected. Check the Calendar Sync section in Settings.
- No group video conferencing — Zoom/Meet links are generated by your connected integration, not by Nida. Make sure your Zoom/Meet integration is set up.
- No payment collection at booking — to charge a deposit, link a Stripe product and require it in the booking form. Nida doesn't take a cut; the charge goes to your Stripe.
Related
- Chapter 18 — System Variables — for merge tags in confirmation emails
- Recipe 4 — Booking → SMS Reminder
- Tutorial 6C — Google Calendar
Chapter 8 — Lead Finder
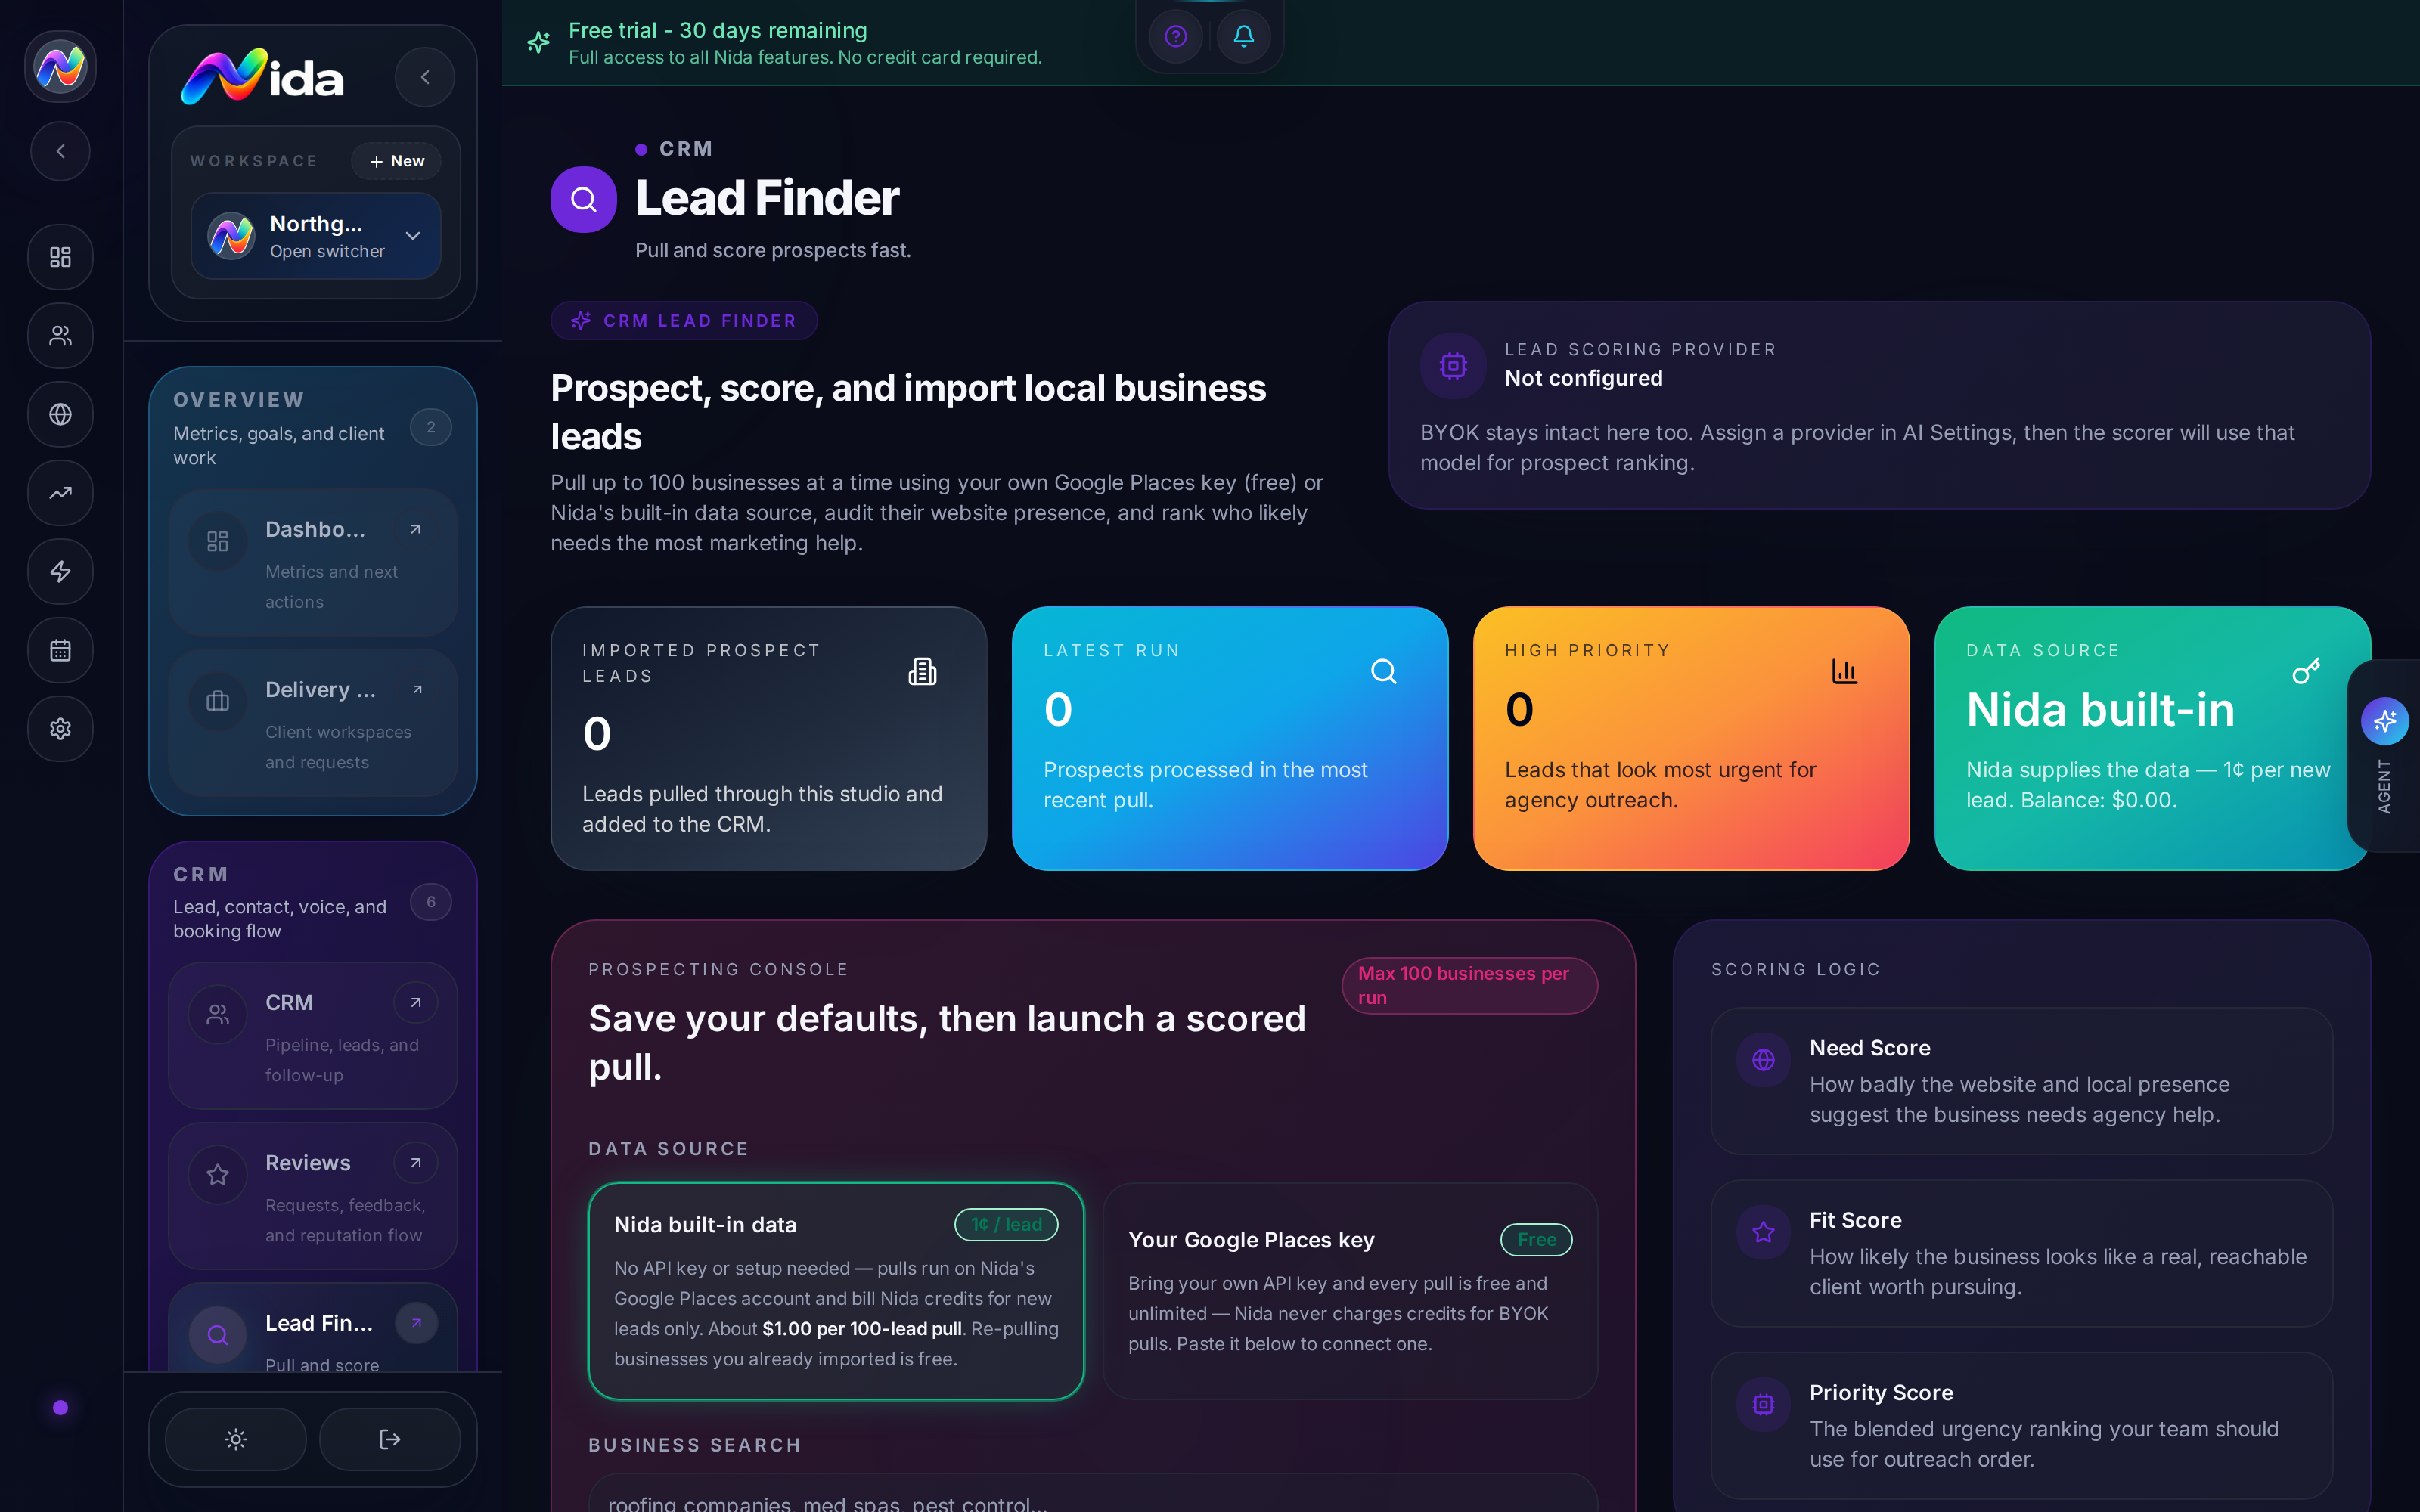
**Purpose:**Purpose: an outbound prospecting tool. Find businesses matching your ICP, score them with AI, push them into your CRM as leads.
What you'll need: a Google Places API key (for the search) and an AI provider (for scoring). See Tutorial 3.
Walkthrough
The Lead Finder has four steps:
Step 1 — Search
- Open Lead Finder (
/lead-finder). - Pick a search type:
- Google Places — search by category + location (e.g., "HVAC contractors in Austin, TX")
- Custom — paste a CSV of business names/addresses
- Niche seed — pick from a saved niche preset (e.g., "roofers, US, 5+ reviews")
- Fill in the parameters: category, location, radius, max results.
- Click Search. Nida calls Google Places and returns a list.
Step 2 — Filter
The results panel shows: business name, address, phone, website, rating, review count, distance. Filter by:
- Minimum rating
- Minimum review count
- Has website / no website
- Has phone / no phone
- Hours (open now)
- Custom (e.g., "owner title contains 'CEO'")
Step 3 — Score
Click Score with AI. Nida sends each business (name, address, website, reviews) to the model configured in AI Settings → Lead Scoring. The model returns three scores per lead:
- Need (0-100) — how likely this business needs your service
- Fit (0-100) — how well the business matches your ICP
- Priority (0-100) — combined score = Need × Fit / 100
The model also returns a reasoning field: "Roofing company in hurricane-prone area; recent reviews mention storm damage repair; likely needs our lead-gen services." Display this reasoning on hover.
Step 4 — Import
Select the leads you want to push to CRM. Pick:
- Stage (where they land in the pipeline)
- Owner (who gets assigned)
- Tag (optional)
Click Import to CRM. The leads land in the chosen stage with lead.source = 'lead_finder'.
Tips
- Save successful searches as niches. If you find a category/location combo that works, save it. Next week, one click re-runs the search and scores fresh.
- Score is only as good as your model. Test with
claude-sonnet-4-6orgpt-5.2for the best Need/Fit reasoning. - The priority score is a hint, not a rule. A 95 priority with no website may be a 60 in practice (because you can't reach them online). Add a custom field "Verified by human" and re-score manually.
- Don't import more than 200 at a time. Larger imports are throttled to protect Google Places quotas.
Pitfalls
- Google Places API has a cost. $32 per 1,000 calls after the free tier (1,000/month). Watch your bill.
- Lead scoring is non-deterministic. Running the same leads through scoring twice can return slightly different scores. Don't over-rely on small score differences.
- "Fit" depends on the workspace's ICP setting. Set this in Settings → Lead Scoring. If you haven't set it, scoring is generic.
- No email addresses from Google Places. Google Places does not return emails. You'll need an enrichment step (Clearbit, Hunter.io) to add them. Nida doesn't do this automatically yet.
Related
- Chapter 3 — CRM Pipeline — where the leads land
- Chapter 17 — AI Settings — for the scoring model
- Recipe 5 — Lead Finder → Auto-Dialer
Part 5 — Content
Chapter 9 — Websites
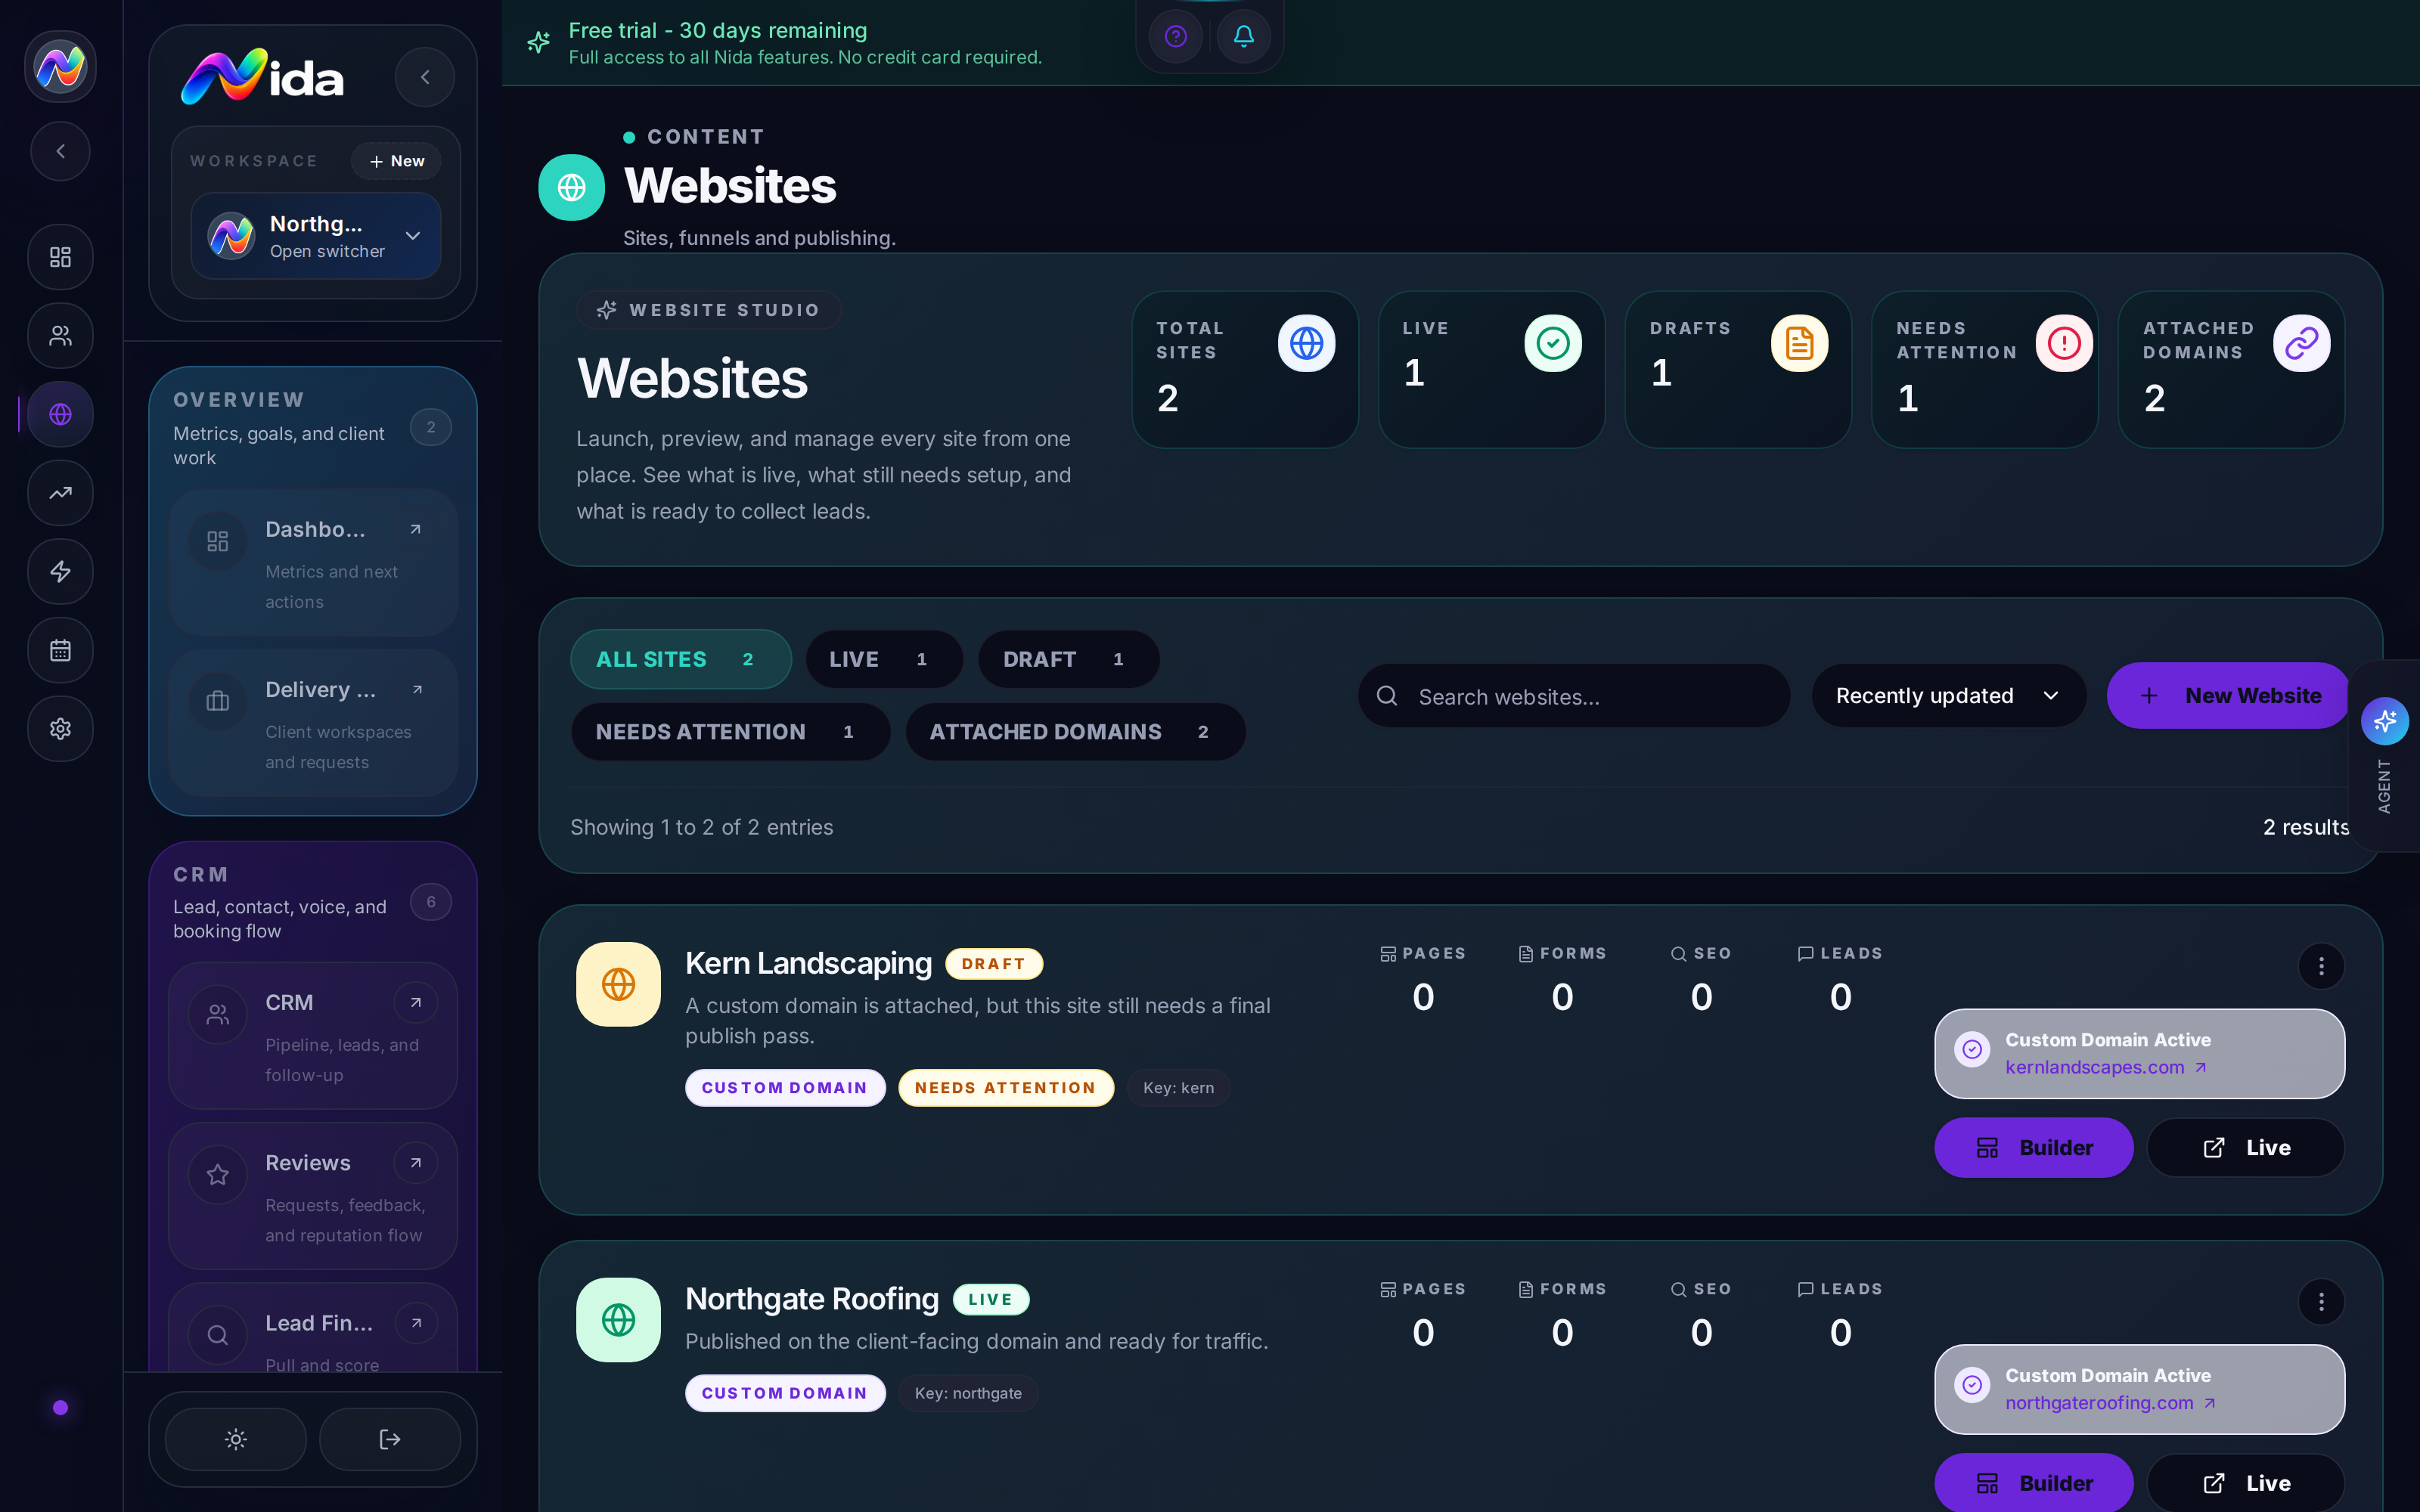
**Purpose:**Purpose: the website builder. Multi-page sites, custom domains, block-based editor, integrated with forms, chatbots, and products.
What you'll need: a workspace (any tier). Custom domains are White-Label only.
Walkthrough
The Websites page (/websites) is the portfolio/operations view. It shows all sites in your workspace: Live (X), Draft (Y), Needs Attention (Z), Archived (W). The Workspace Sites card in the top-right shows total counts and a + New Website button.
Create a website
- + New Website in the top-right.
- Pick a site type:
- Landing page — single-page, lead-capture focused
- Full site — multi-page, with nav, blog, contact
- Portal — gated, requires login (used for client portals)
- Pick a template (or start blank):
- Service Business Landing
- E-commerce Catalog
- Restaurant Menu
- Portfolio
- Event Page
- And ~20 more
- Enter a name, slug, and (optionally) a custom domain.
- Click Create. You land in the block editor for the new site.
Block editor
The block editor has three regions:
- Left rail — block library, organized by category (Hero, Content, Forms, Products, Media, Footer)
- Center canvas — the page itself, drag-and-drop blocks
- Right panel — selected block's properties, styles, and visibility rules
Block types (most-used):
- Hero — headline, subhead, CTA button, background image
- Text — rich text
- Image — single image, with optional caption
- Gallery — image grid
- Form — embed any form you've created
- Chatbot — embed any chatbot you've created
- Product grid — embed any Stripe product
- Map — embed a map (Google Maps)
- Testimonial — single quote with author
- FAQ — collapsible Q&A
- CTA — call-to-action block
- Footer — links, contact, social
Drag a block from the left rail into the canvas. Click a block to edit it in the right panel. Hover to see move, duplicate, and delete controls.
Multi-page sites
- The left rail (in edit mode) shows a page list: Home, About, Services, Contact, etc.
- + Add page to add more.
- Set nav visibility per page (some pages can be hidden from the nav, e.g., legal pages).
- Set the homepage explicitly (defaults to the first page).
Publishing
- Preview — opens the page in a new tab as it would render on the live site.
- Publish — pushes the current draft to the live URL. The change goes live in <60 seconds.
- Unpublish — reverts to the previous published version (Nida keeps 5 versions).
- Domain settings — under Settings → Domains for the site. Add a custom domain (White-Label only), or use the auto-generated subdomain
site-name.workspaces.nida-os.com.
SEO
Every page has an SEO panel:
- Meta title (60 char limit)
- Meta description (160 char limit)
- URL slug
- OpenGraph image (used for social shares)
- Index / noindex toggle
- Canonical URL
Nida's AI can auto-generate meta title/description from the page content (uses the Metadata AI task).
Tips
- Use the chatbot block, not a chatbot popover. The block embeds the chatbot inline in the page (less intrusive than a corner popover). Use popover for sites where you want the chatbot available everywhere.
- The product grid block is a quick win — if you have Stripe products, drop the block on a "Pricing" page and you're done.
- Site templates include copy and structure — they save 80% of the work. Start from a template, customize.
- Forms and chatbots in the page are workspace-scoped. Change the chatbot in the Chatbots module, every site that embeds it updates.
Pitfalls
- No version control for pages. Each site keeps 5 published versions, but drafts are overwritten on publish. Make a copy of the site if you want to try big changes.
- No A/B testing built in. To A/B, create two versions of the page, split traffic at the DNS level or with a custom script.
- Custom domains are White-Label only. Agency tier gets the auto-generated subdomain only.
- No e-commerce on full sites — only the Product grid block (links to Stripe checkout). For a full Shopify-like store, use Stripe + a separate site, or wait for Nida's roadmap.
Related
- Tutorial 7 — Branding — for white-label sites
- Chapter 11 — Forms — for the form block
- Chapter 10 — Chatbots — for the chatbot block
- Chapter 22 — Payments — for the product block
Chapter 10 — Chatbots
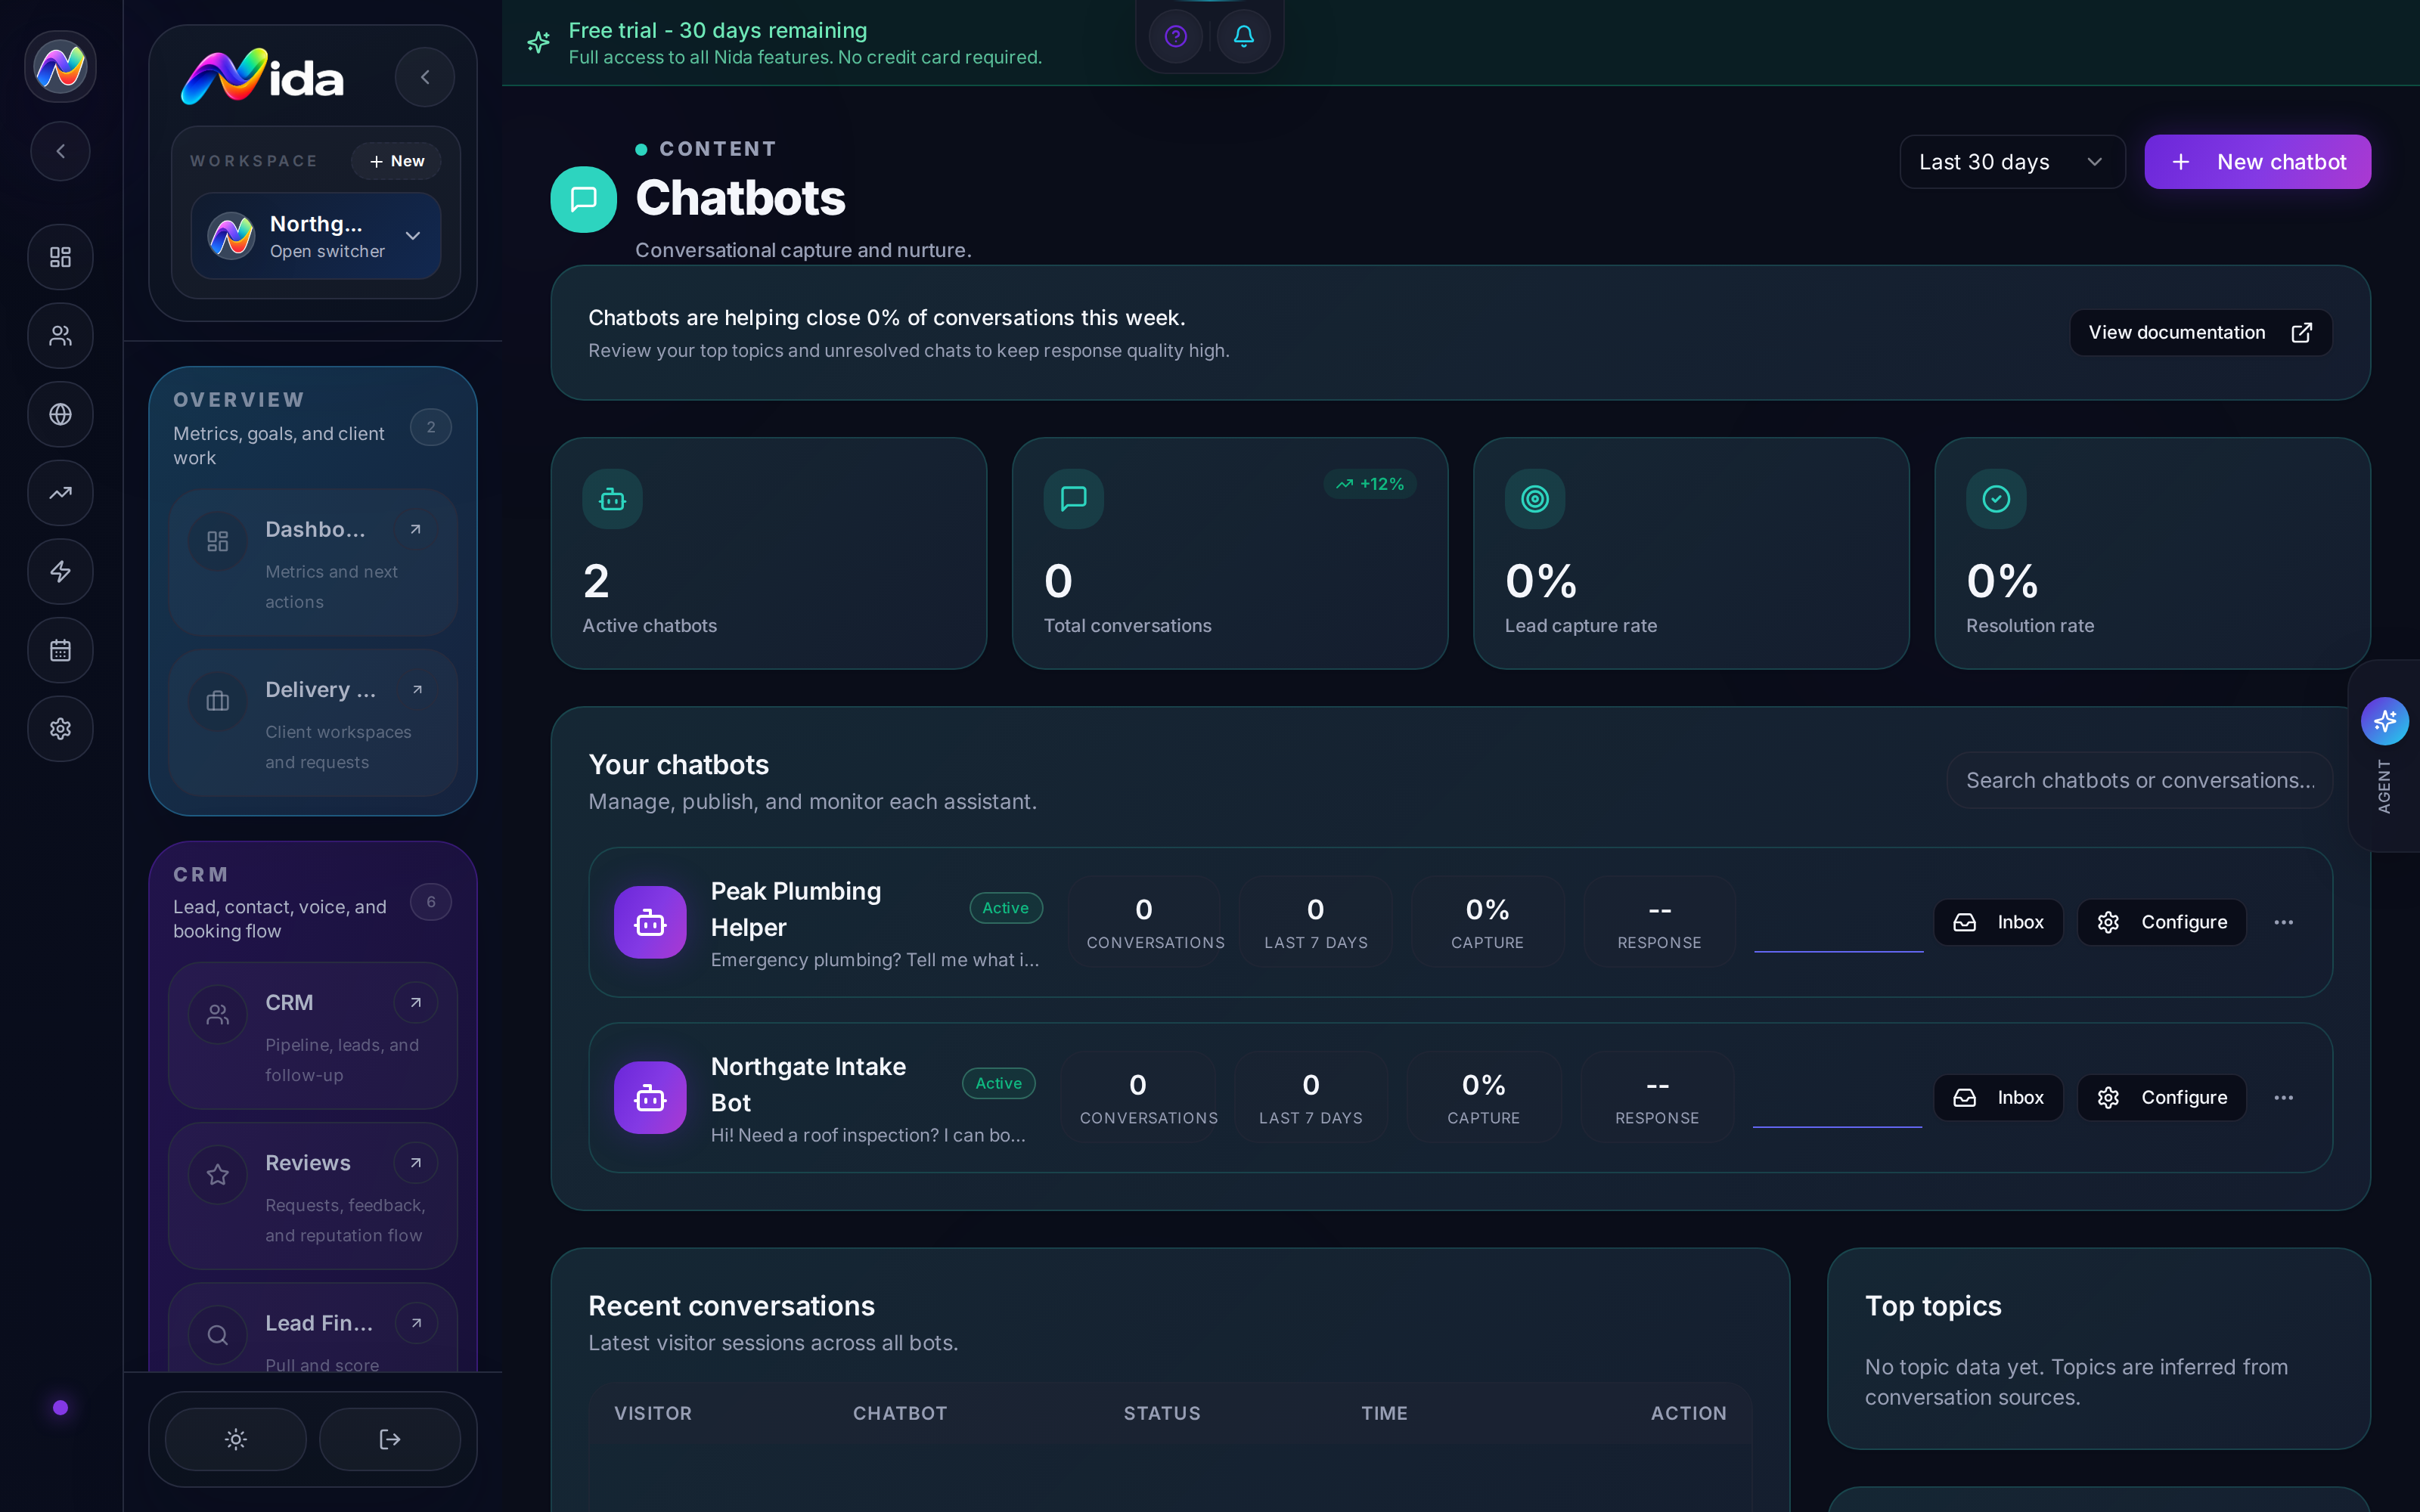
**Purpose:**Purpose: AI-powered conversational agents that answer questions, capture leads, and route conversations to humans. Embed on websites, share via link, or trigger from automations.
What you'll need: an AI provider connected (see Tutorial 3).
Walkthrough
The Chatbots page (/chatbots) shows a list of chatbots in the workspace. Each card shows: name, channel (web, embed, sms, link), knowledge base size, and active status.
Create a chatbot
- + New chatbot in the top-right.
- Name your chatbot (e.g., "Acme Sales Assistant").
- Channel — pick where the bot lives:
- Web — a script tag you drop into any website
- Embed (iframe) — an iframe snippet
- Link — a shareable URL that opens the bot in a full-page chat
- SMS — bot responds to inbound SMS on your Twilio number
- Persona — short description of the bot's role and tone ("Friendly sales assistant for a roofing company. Speaks casually, qualifies leads, books estimates.")
- Knowledge base — paste a URL, upload a PDF, or type text. Nida scrapes the URL, extracts content, and stores it as the bot's knowledge.
- Behavior:
- Greeting message — first message the user sees
- Fallback message — what the bot says when it doesn't know
- Escalation trigger — phrases that transfer to a human (e.g., "speak to a person", "human please")
- Lead capture form — turn on to ask for name/email/phone after a few exchanges
- Click Save. The bot is live.
Knowledge base management
Open any chatbot and click Knowledge Base to:
- Add a source — URL, PDF, text
- Re-sync — refresh the content from a URL (Nida re-scrapes on schedule: hourly, daily, weekly)
- View chunks — see how the content was split (Nida chunks content into ~500-token pieces for retrieval)
- Test a query — type a question, see which chunks get retrieved, see the bot's response
Conversation behavior
Lead capture:
If enabled, after 3-5 exchanges (configurable) the bot asks: "Want me to send you a follow-up email? What's your name and email?" Once the lead provides both, Nida creates a lead in the CRM with source = chatbot.
Human handoff:
If the user says a phrase matching the escalation trigger, Nida:
- Stops the AI replies
- Notifies the workspace (bell icon)
- Sends the user a message: "I'll connect you to a human — someone will be with you in a few minutes."
- The conversation appears in Conversations → Chatbot with a "Take over" button
Escalation triggers:
- "speak to a person"
- "human"
- "agent"
- "real person"
- (Customizable — add your own phrases)
Embedding the bot
Web snippet (drop in any HTML page):
<script src="https://app.nida-os.com/embed/chatbot/CHATBOT_ID.js" async></script>This loads a chat bubble in the bottom-right corner. Customize position with data-position attribute.
Iframe:
<iframe src="https://app.nida-os.com/embed/chatbot/CHATBOT_ID" width="400" height="600"></iframe>Useful for embedding inline in a page section.
Direct link:
Share https://app.nida-os.com/c/CHATBOT_ID as a URL. The bot opens full-page.
Tips
- Knowledge base is everything. A bot with no knowledge base just says "I don't know." Spend time feeding it your best content: services, FAQs, case studies, pricing.
- URLs are re-scraped on schedule. If you update your website, the bot knows within the refresh interval.
- Test before publishing. The "Test query" feature is your friend.
- Multiple bots per workspace. Use different bots for different surfaces: "Sales Bot" on the website, "Support Bot" in the client portal, "Demo Bot" for trial signups.
- The lead capture form is opt-in only. The bot doesn't force a name+email — it offers. Nida's view: forced forms hurt conversion.
Pitfalls
- No multi-language support yet. The bot speaks whatever language the knowledge base is in. Translate your knowledge base manually for now.
- No image inputs — the bot is text-only. Don't promise customers they can send photos.
- Knowledge base size limit is 10MB per source. Bigger documents need to be split.
- Bot responses are not deterministic. Different runs may give slightly different answers. For mission-critical answers (e.g., legal disclaimers), hard-code them in the persona.
Related
- Chapter 5 — Conversations — for the inbox view
- Chapter 17 — AI Settings — for the chatbot model
- Recipe 1 — Chatbot → CRM
Chapter 11 — Forms
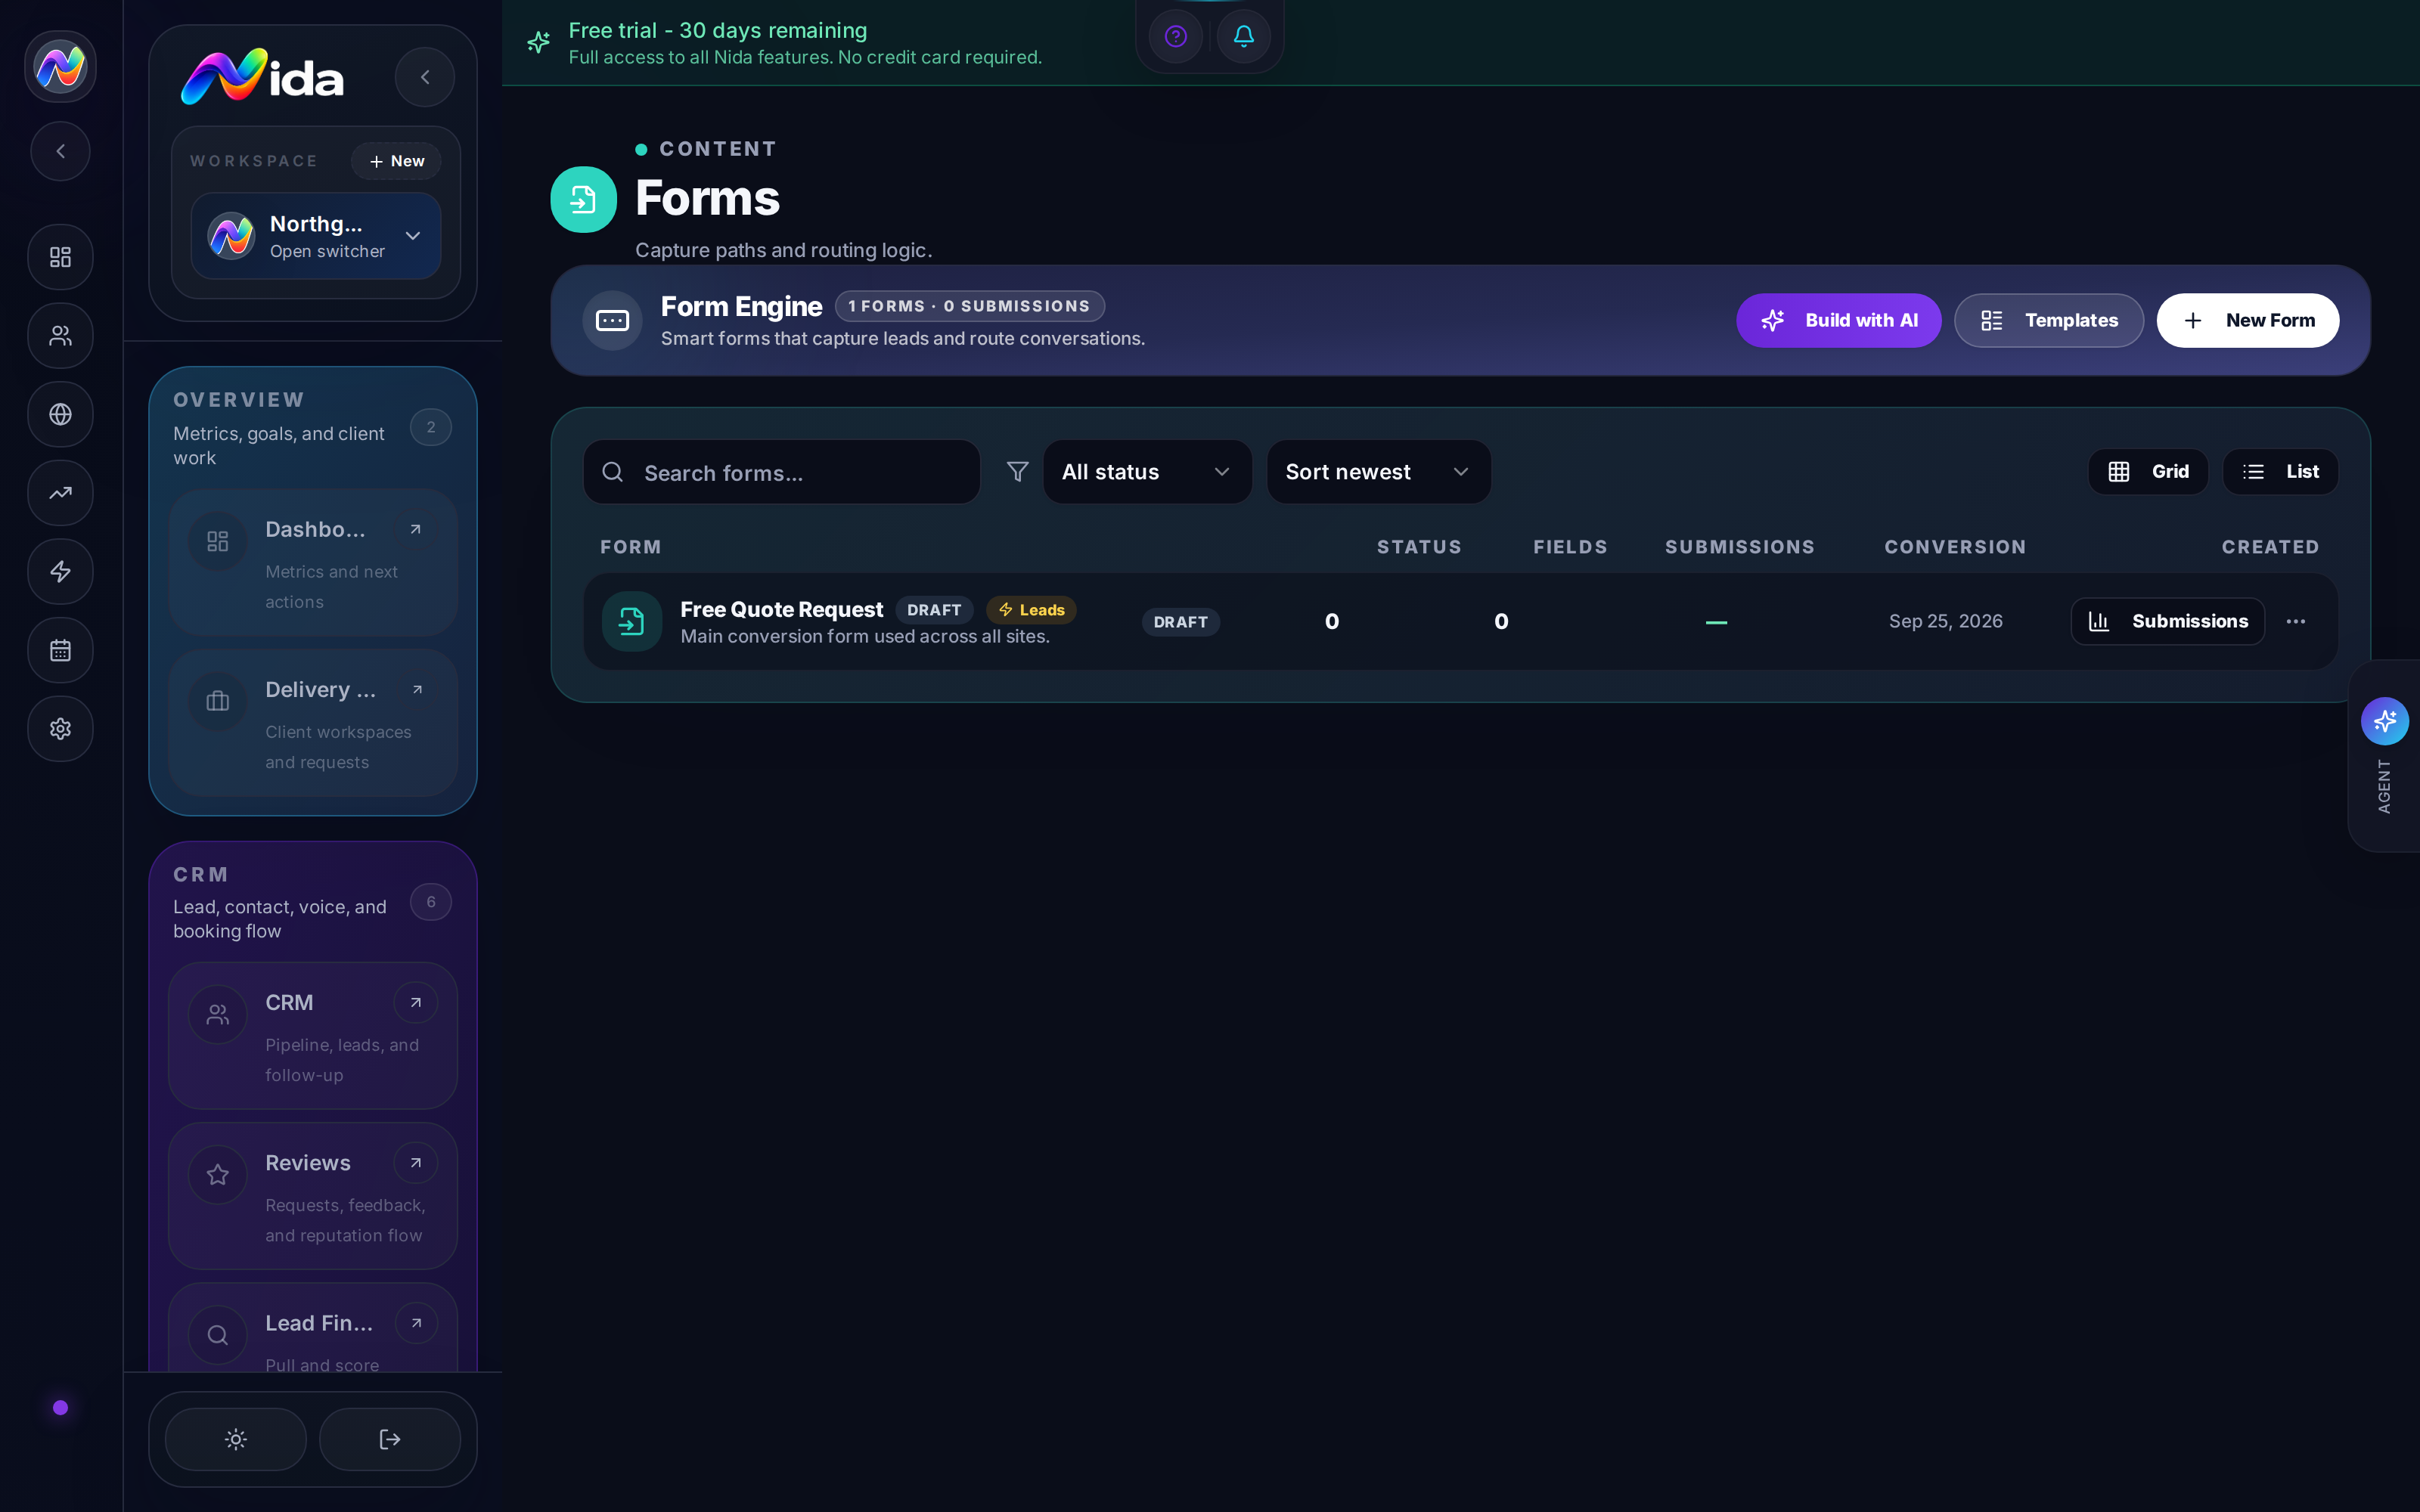
**Purpose:**Purpose: lead-capture forms. Embed on websites, share via link, trigger from QR codes, route to CRM with custom field mapping.
What you'll need: nothing. Open and start building.
Walkthrough
The Forms page (/forms) shows all forms in the workspace. Each card: name, submissions count, last submission, channel.
Create a form
- + New form in the top-right.
- Name your form (e.g., "Contact Us").
- Pick a type:
- Single-step — all fields on one page
- Multi-step — break into pages (better conversion)
- Popover — opens as a modal
- Slide-in — slides in from the corner
- Add fields — drag from the left rail:
- Short text — single line
- Long text — textarea
- Email — with format validation
- Phone — with format validation
- Number
- Date
- Dropdown — single-select
- Multi-select — checkbox group
- Radio — single-select buttons
- File upload — collect attachments
- Signature — collect e-signatures
- Hidden field — set a value the user doesn't see (e.g., source, campaign)
- Configure each field:
- Label (what the user sees)
- Placeholder (hint text)
- Required toggle
- Validation (e.g., email format, phone format, min/max)
- Mapping — what CRM field this maps to
- Set up routing:
- Where do submissions go? — CRM (with stage), webhook (URL), email (to an address), or all three
- Auto-response email — what the user gets after submitting
- Redirect URL — where to send the user after submitting
- Save the form.
Multi-step forms
- Drag fields to a "page" in the left rail
- Set per-page validation (don't validate page 2 fields on page 1)
- Add a progress bar (auto-shown by default)
- Add conditional logic ("If Q3 = 'Yes', show Q4")
Conditional logic
Click any field → Logic tab → add rules:
- Show this field if [field] [is / is not / contains] [value]
- Skip to page if [condition]
- Submit to webhook if [condition]
Publishing a form
- Web — embed with
<script>tag - Iframe —
<iframe src="..."> - Direct link —
https://app.nida-os.com/f/FORM_ID - QR code — auto-generated, downloadable as PNG
- Popover trigger — open via JS function:
NidaForms.open('FORM_ID')
Tips
- Multi-step forms convert better. A 6-field single-step form feels like work; a 3-page 6-field form feels easy.
- Hidden fields are powerful. Use them to capture UTM parameters, referrer, or campaign source. Pass them in the URL:
?utm_source=facebook&utm_campaign=spring - Pre-fill from URL —
?email=foo@bar.compre-fills the email field. Useful for email-link submissions. - The auto-response email is the first touch — make it warm, not transactional. ("Thanks! I'll be in touch within 24 hours. In the meantime, here's a guide to our services.")
Pitfalls
- No file upload preview — uploaded files don't render in the lead drawer, just download links.
- Conditional logic has a learning curve. Test every branch before publishing.
- Forms don't talk to the chatbot by default. A form submission creates a lead; it doesn't open a chat. Use automation to send a chatbot intro message if needed.
- No A/B testing on forms. To A/B, create two forms and split traffic at the URL level.
Related
- Chapter 3 — CRM Pipeline — where submissions go
- Chapter 9 — Websites — for embedding forms in sites
- Recipe 3 — Form → CRM
Chapter 12 — SEO Blog Studio
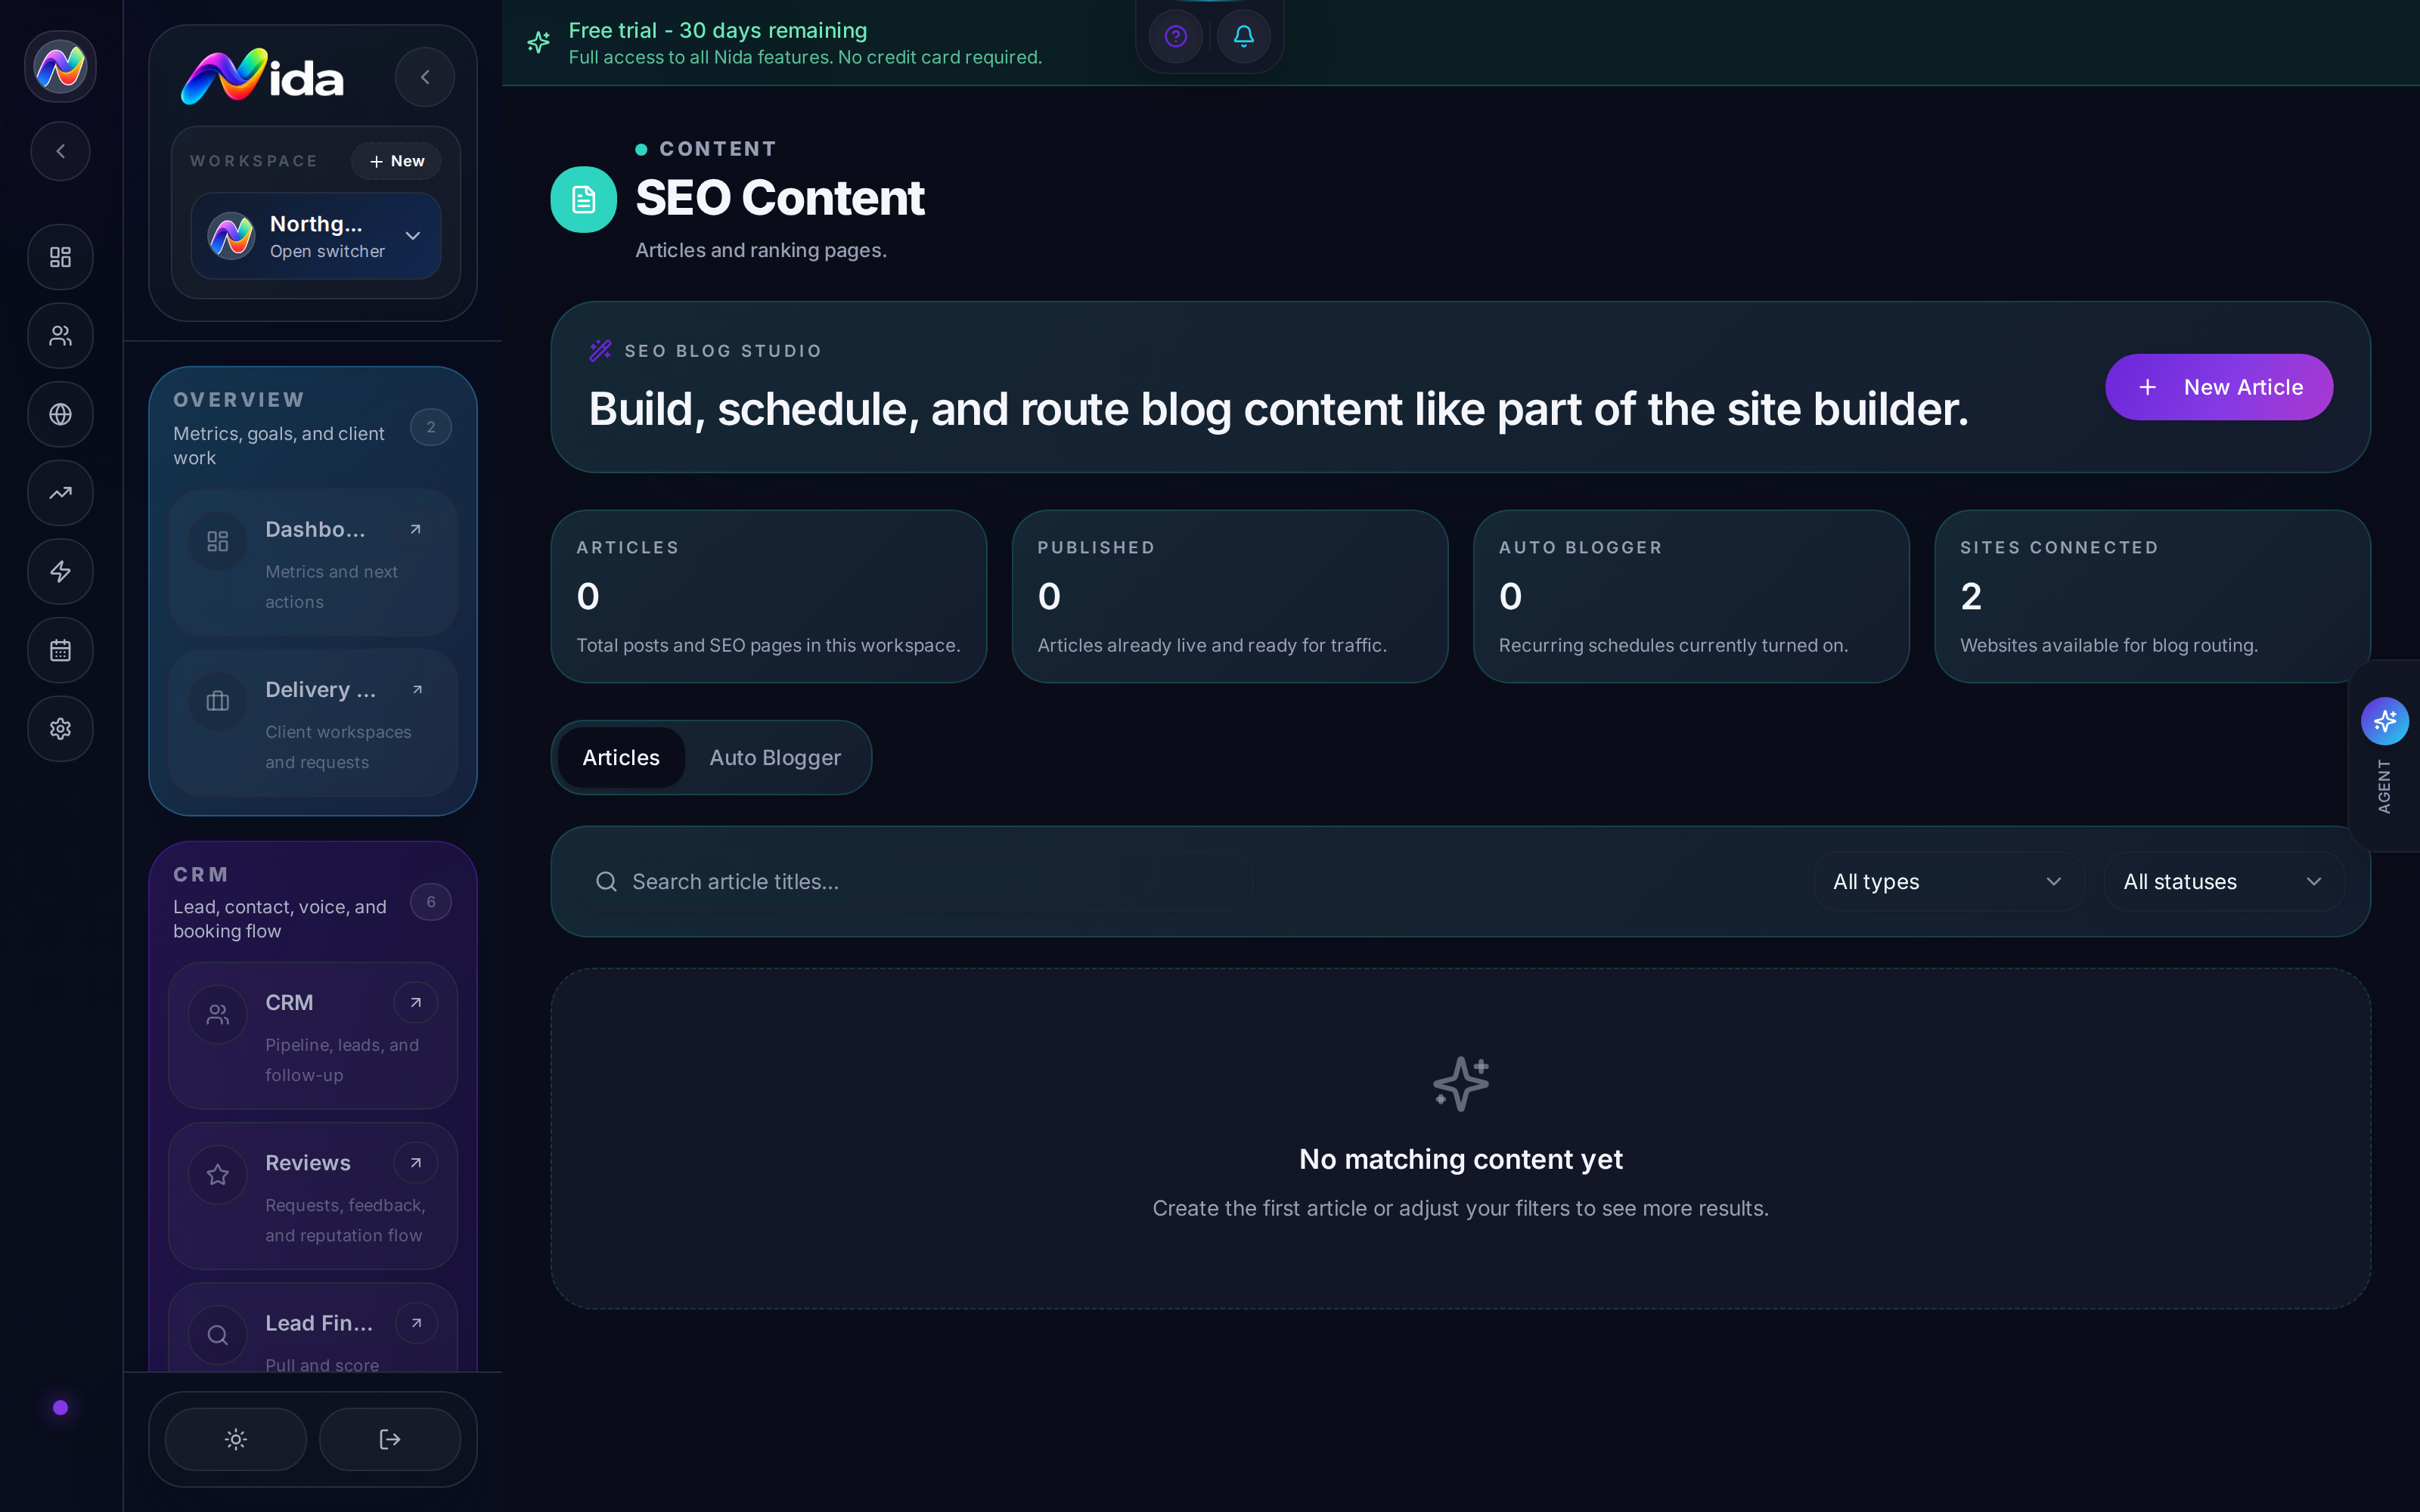
**Purpose:**Purpose: the content marketing hub. Write articles, schedule Auto Blogger (AI-generated recurring content), and route content to your sites.
What you'll need: an AI provider (for Auto Blogger).
Walkthrough
The Blog Studio has two tabs:
Tab 1 — Articles
A list of all articles (drafts, scheduled, published). Each row: title, type, status, target site, last edited.
Create an article:
- + New Article in the top-right.
- Title — the article's H1.
- Type —
Blog post,SEO page,Landing page copy,Email newsletter,Ad copy. - Target site — which website the article should publish to.
- Editor opens with a blank document. Type or use the AI assistant:
- /outline — generate an outline from the title
- /intro — generate the intro paragraph
- /expand — expand the selected paragraph
- /rewrite — rewrite in a different tone
- /SEO — generate meta title, meta description, slug suggestions
- Save as draft, or click Publish to push to the target site.
- Schedule to publish at a future time.
Tab 2 — Auto Blogger
Recurring AI-generated content. A schedule that, on cadence, generates and publishes content automatically.
Create an Auto Blogger schedule:
- + New schedule in the Auto Blogger tab.
- Name the schedule (e.g., "Weekly Home Services Blog").
- Topic source:
- Keyword list — paste a list, one article per keyword per week
- Niche seed — pick a niche and Nida generates relevant topics
- Trending — pull from a Google Trends-like feed (where available)
- Custom prompt — supply a prompt template
- Cadence — daily, weekly, biweekly, monthly
- Target site — where to publish
- Approval mode:
- Auto-publish — Nida generates and publishes without review (high risk)
- Draft for review — Nida generates, saves as draft, you approve before publish (recommended)
- Skip if low quality — Nida generates, runs a quality check, skips if score < threshold
- Save the schedule.
Tips
- "Draft for review" is the right default. Auto-publish is risky — AI can hallucinate facts, and an AI-published article with bad info is a brand risk.
- The
/SEOcommand is gold. It generates a meta title, meta description, and URL slug suggestions based on the article. Use it before publishing. - Auto Blogger scales content production. A 4-per-week schedule that would have taken a writer 8 hours is now ~5 minutes of review per week.
- Set a content style guide in AI Settings → Content — tone (formal, casual, friendly), POV (first-person, third-person), vocabulary level.
Pitfalls
- AI content can hallucinate. Always run a final read-through on Auto Blogger content. Add a fact-check step to your workflow.
- No built-in plagiarism checker. Nida does not scan for duplicate content. If you're worried, paste a snippet into a free checker.
- Google's algorithm policy on AI content is "fine if it's helpful, not fine if it's spam." Make Auto Blogger content genuinely useful, not keyword-stuffed.
- Schedule collisions — if you have 3 Auto Blogger schedules all running on Monday, they may all generate content in the same hour. Stagger them.
Related
- Chapter 13 — SEO Intelligence — for tracking what works
- Chapter 17 — AI Settings — for the content model and style
- Recipe 7 — Weekly SEO Snapshot
Chapter 13 — SEO Intelligence
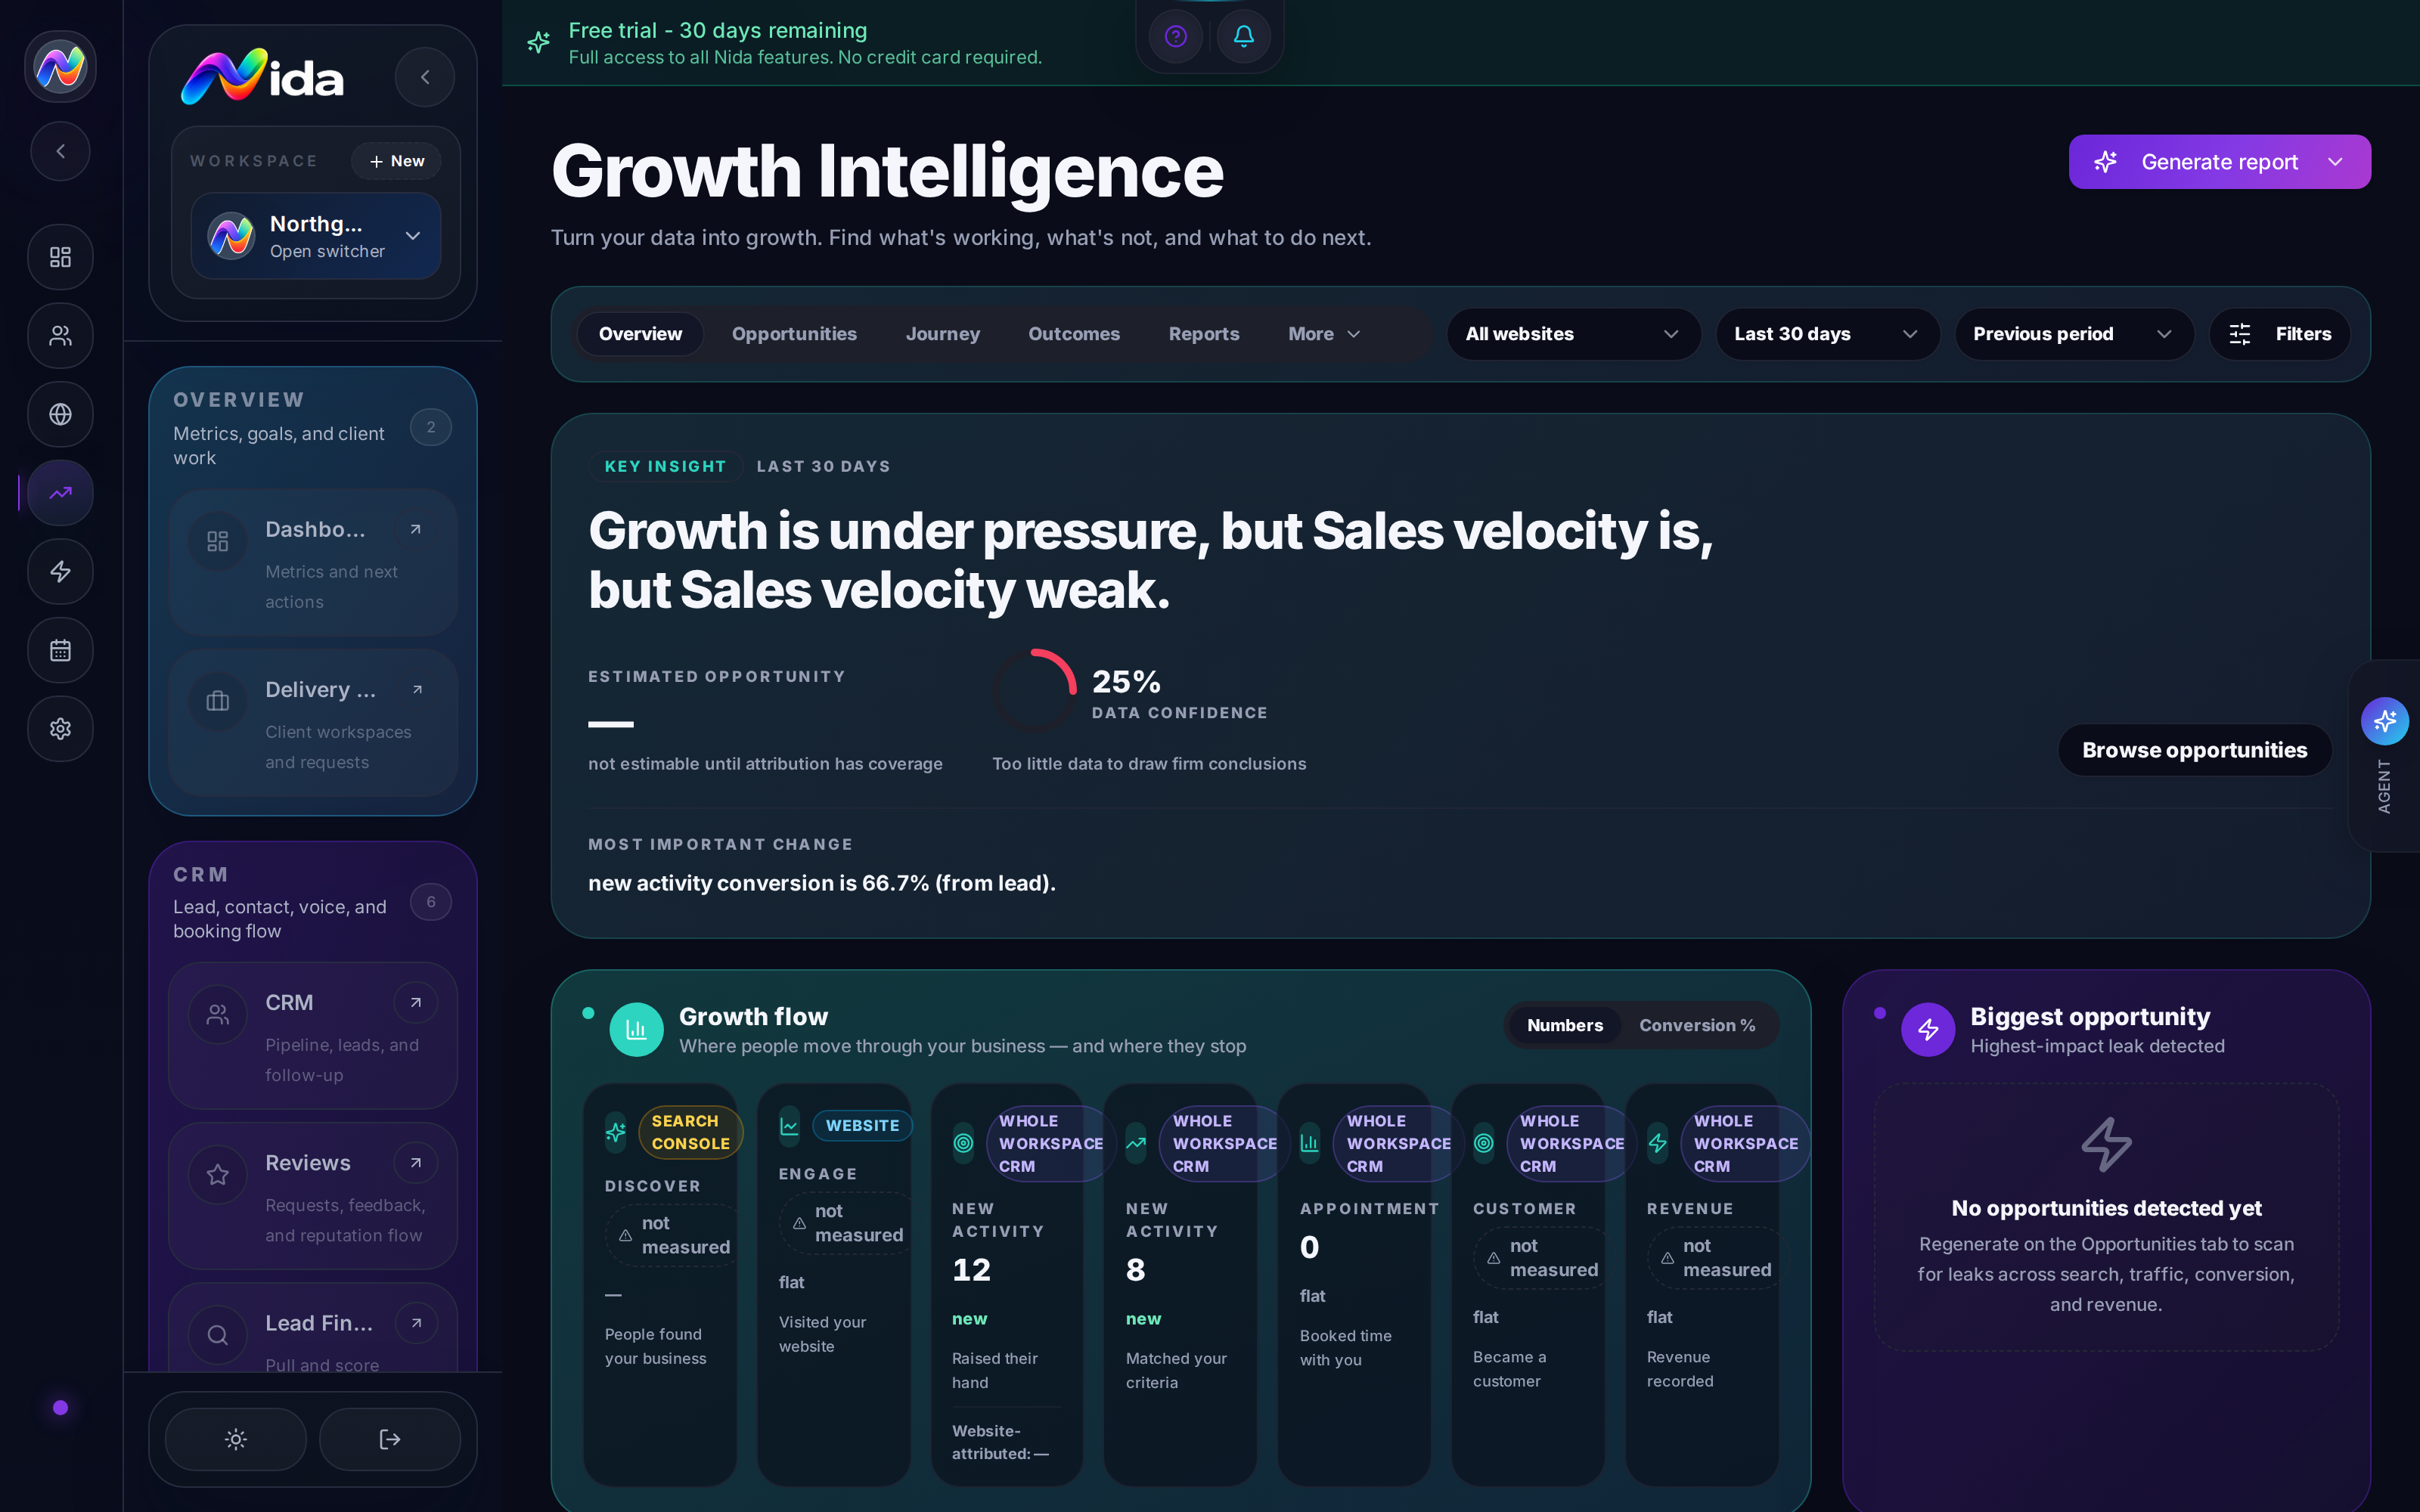
**Purpose:**Purpose: the search-performance command center. Connect Google Search Console, track keyword positions, monitor PageSpeed, and get AI-generated client summaries.
What you'll need: Google Search Console access for at least one property, and (optionally) PageSpeed Insights API access (free from Google).
Walkthrough
The SEO Intelligence page (/seo-intelligence) has three regions:
Top — Search Console connection
- Shows connected property, status, last sync time.
- + Connect property to add a new one.
- Sync now to manually trigger a data pull.
Center — KPI tiles
Five tiles, updated daily from Search Console:
- Impressions (last 28 days)
- Clicks (last 28 days)
- Average CTR (last 28 days)
- Average Position (last 28 days)
- PageSpeed Score (current)
Each tile has a sparkline and a delta vs prior 28 days.
Tracked keywords
A list of keywords you're monitoring. For each:
- Keyword
- Current Position
- Position Change (▲ or ▼)
- Impressions
- Clicks
- CTR
- Target URL
Click any row to see the position history (a small chart) and the URL details.
Opportunity queue
AI-generated list of pages that could rank higher. The model looks at:
- Pages ranking position 8-20 (easy wins)
- Pages with high impressions but low CTR (need better title/description)
- Pages with position drops (regressions to investigate)
- Keywords your competitors rank for but you don't (gap analysis)
Click an opportunity to see the AI's recommendation, accept it (Nida opens the page in the editor with the suggested change), or dismiss it.
PageSpeed audit
- Add a URL to run a PageSpeed audit (desktop + mobile).
- Nida fetches the page, runs Lighthouse, returns a score and the top 3 issues.
- AI generates a fix recommendation per issue.
- Accept the fix to push the change to the live site (for simple fixes like adding alt text, lazy-loading images, etc.).
Client summary
- Generate AI summary — Nida reads all the SEO data, your site, your goals, and writes a 1-page client-facing summary.
- The summary is plain English ("Your site is up 12% in impressions this month. Your top opportunity is the 'roofing services' page, which is ranking position 14 — better title and a few backlinks could push it to page 1.")
- Send via email, push to the Delivery Hub portal, or copy to clipboard.
Tips
- The opportunity queue is the highest-value feature. Don't ignore it. Spend 30 min/week acting on the top 3.
- PageSpeed is mobile-first. Google's index is mobile. A 95 desktop score with a 45 mobile score is a problem.
- Client summary → portal. Generate a weekly summary, push it to a client workspace — see Recipe 7.
- Sync frequency is daily. Nida's search-console sync runs at 6am UTC. Click Sync now if you need same-day data.
Pitfalls
- Search Console data is delayed. The most recent 2-3 days are usually missing. Don't expect same-day numbers.
- PageSpeed audits count against your quota. Free tier allows ~25 audits/day. Heavy users need an API key.
- Opportunity queue is heuristic, not magic. The model doesn't actually check your competitors in real time. Use it as a starting point, not gospel.
- No backlink tracking. Nida does not show your link profile. Use Ahrefs or Semrush for that.
Related
- Chapter 12 — SEO Blog Studio — for content to support rankings
- Chapter 9 — Websites — for the pages you're tracking
- Recipe 7 — Weekly SEO Snapshot
- Tutorial 6A — Search Console
Chapter 14 — Reviews / Reputation Manager
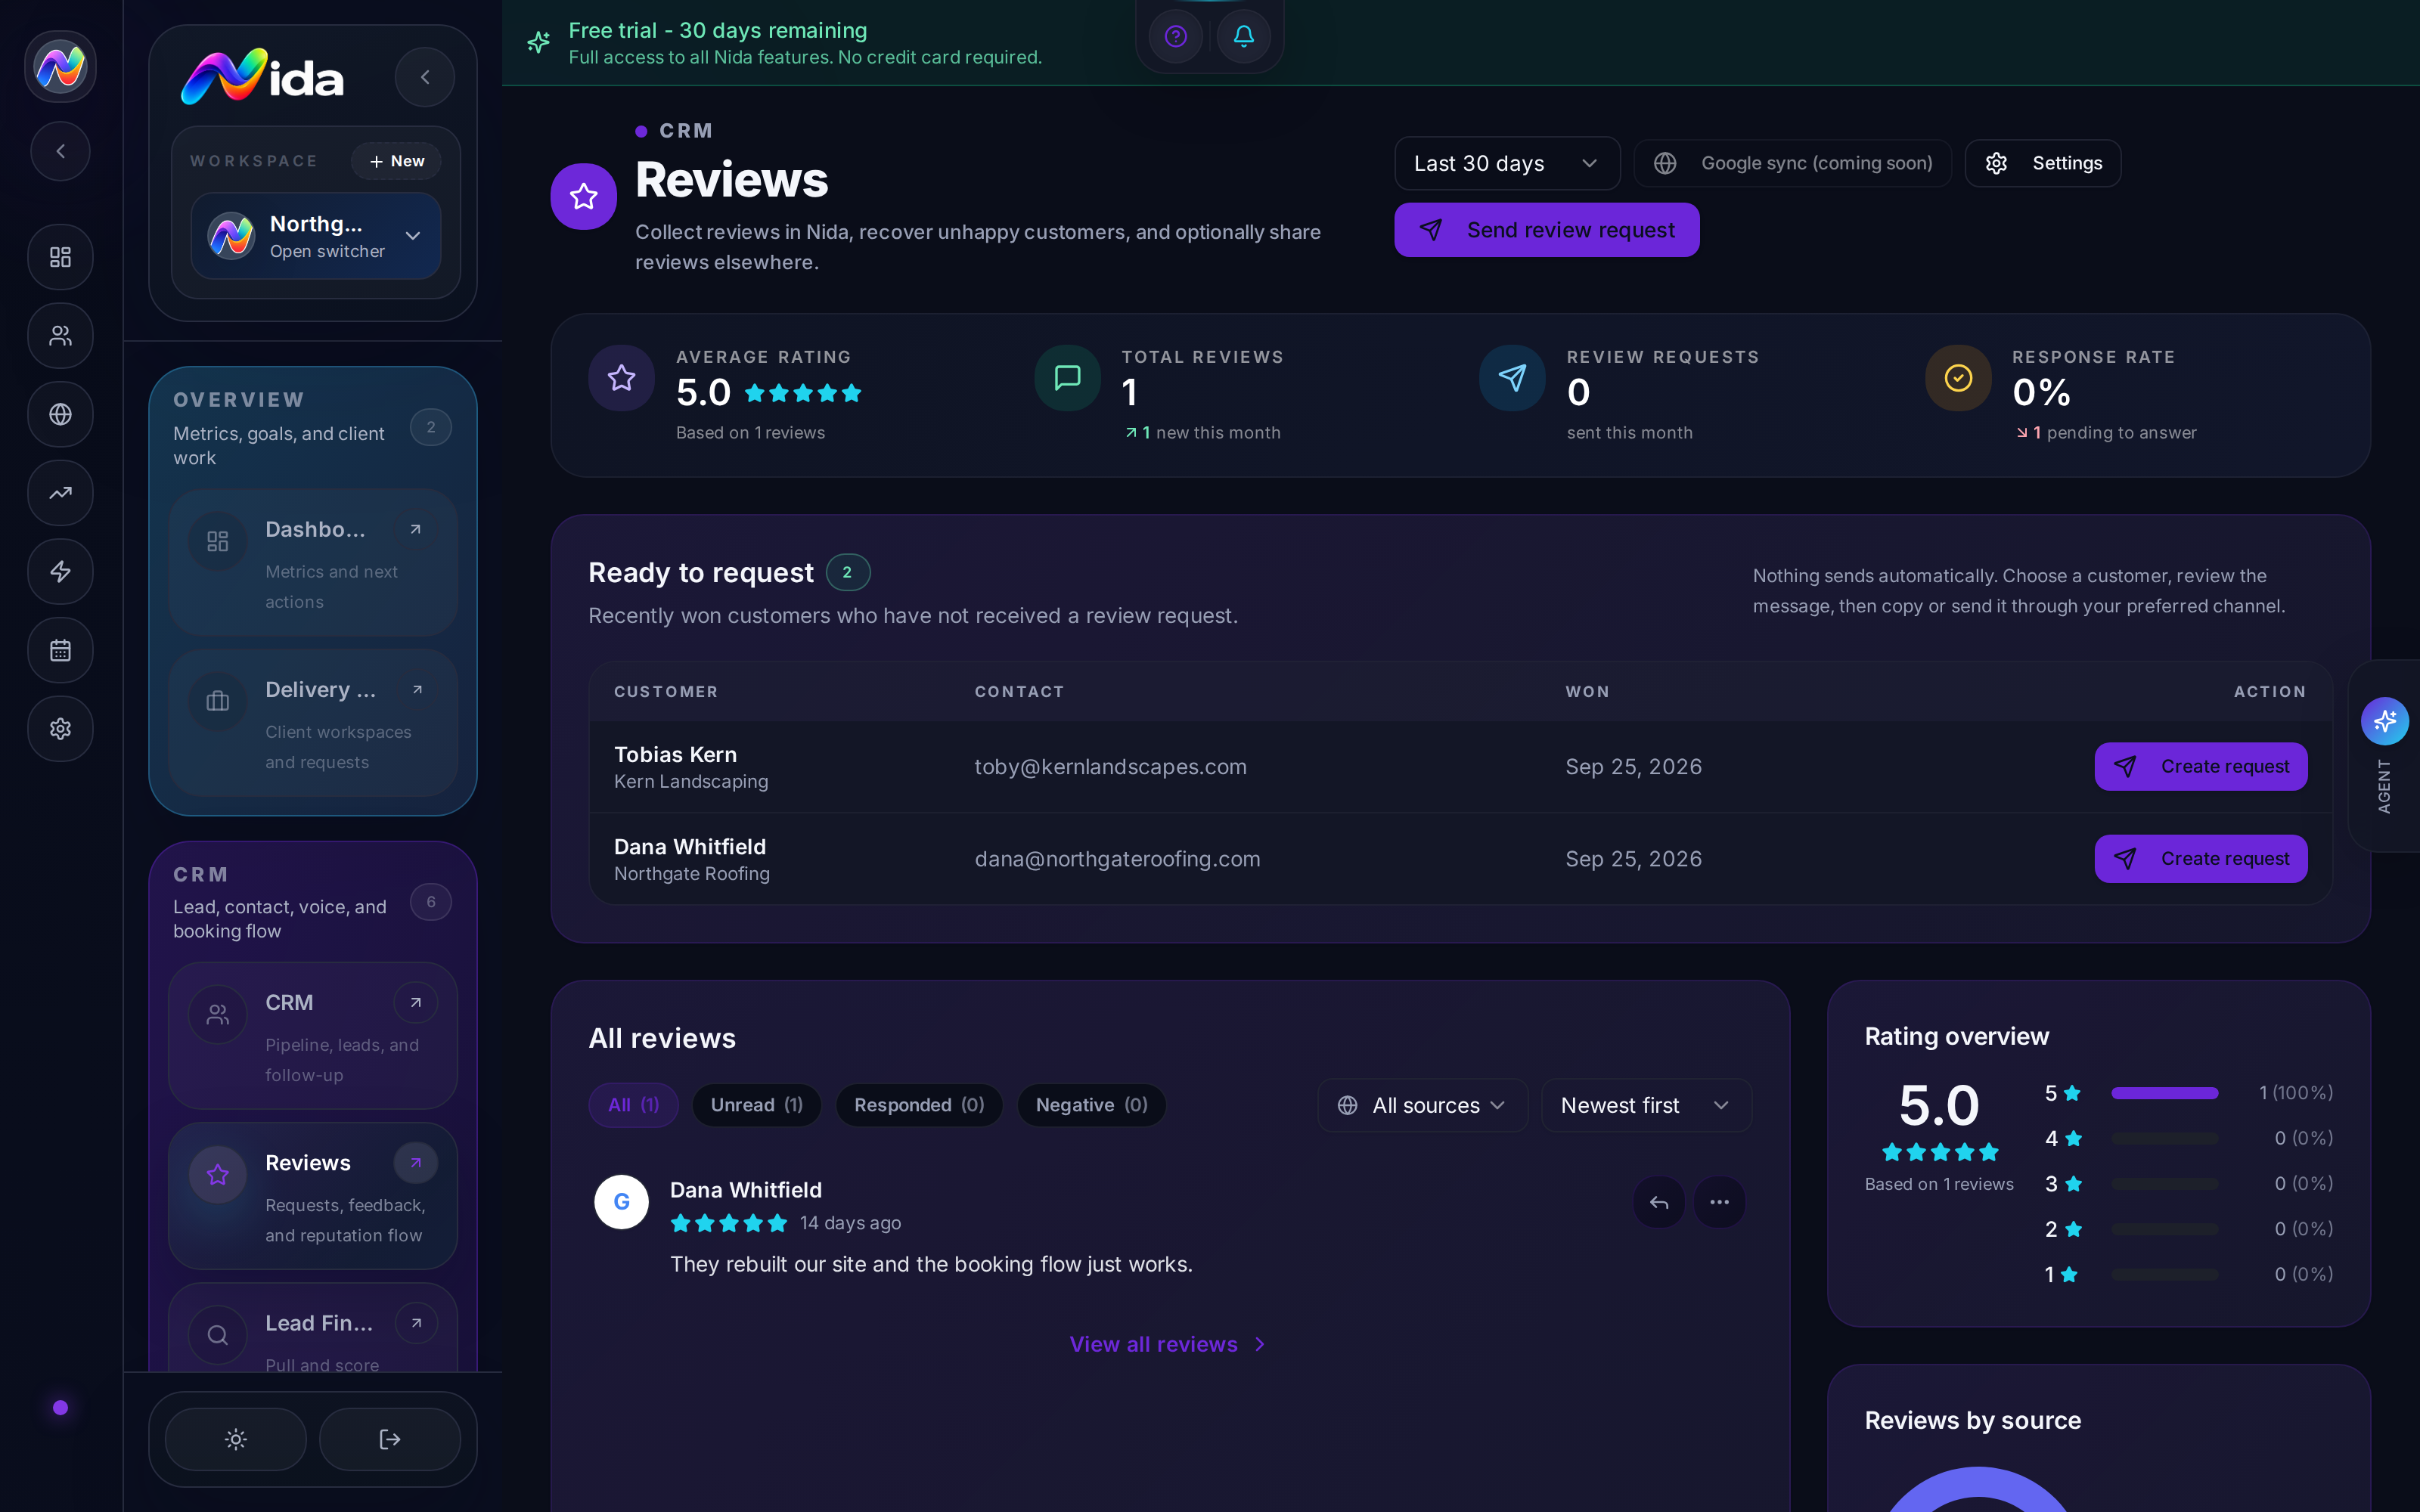
**Purpose:**Purpose: the reputation module. Request reviews from customers, monitor reviews across platforms, intercept negative reviews, and reply with AI assistance.
What you'll need: Google Business Profile access (for Google reviews), and optionally Facebook, Yelp, or industry-specific review platforms.
Walkthrough
The Reviews page (/reviews) has four tabs:
Tab 1 — Overview
KPI tiles:
- Average Rating (across connected platforms)
- Total Reviews
- New This Month
- Response Rate (% of reviews with a reply)
- Pending Requests (review requests sent, not yet completed)
- NPS Estimate (computed from rating distribution)
A line chart shows review volume over time.
Tab 2 — Reviews
A list of all reviews across platforms. Each row:
- Customer (name + avatar)
- Platform (Google, Facebook, etc.)
- Rating (1-5 stars)
- Review text
- Date
- Reply status
Click any review to see the full text and reply. AI Suggest Reply generates a draft response. Edit and post.
Tab 3 — Requests
The review-request campaign builder. Send a review request via:
- Email — uses your connected email
- SMS — uses your Twilio number
- QR code — generated, scannable, opens the review page
The request template is editable with merge tags. Trigger:
- Manual — pick a customer, send
- Auto — fires when a payment succeeds (Stripe webhook), a job is marked complete, a booking is attended, or any custom trigger
Tab 4 — Negative Review Interception
This is the killer feature. Set a threshold (default 3 stars). When a customer is about to leave a review with a rating below the threshold:
- The public review form is replaced with a private feedback form.
- The private feedback goes to you (the business owner) — not to Google.
- You can then reach out, resolve, and (if appropriate) ask the customer to leave a public review on their own.
Connect Google Business Profile
- Open Settings → Integrations → Google Business Profile.
- Click Connect.
- Pick the business location from the dropdown.
- Nida requests review-monitoring access.
- Reviews start appearing in the Reviews tab within 24 hours.
Connect Facebook
Same flow, but you need to be an admin of the business's Facebook Page.
Tips
- Always reply to negative reviews — even if you can't resolve the issue. A "we hear you, we're sorry" reply matters more than a 5-star average.
- The request campaign is the highest-ROI feature. Most businesses don't ask for reviews. Asking gets you 3-5x more reviews in 90 days.
- Send review requests at the right moment — after a job is marked complete, after a successful payment, after a positive CSAT. Not 6 months later.
- AI Reply is a draft, not a final. Always read it before posting. A personal touch matters.
Pitfalls
- Google Business Profile is required for Google review monitoring. Without it, you only see reviews if a customer tells you.
- Negative review interception depends on the customer using your review link. If they go directly to Google and leave a 1-star there, Nida can't intercept it. Always send customers through your Nida link.
- Facebook reviews are deprioritized by Facebook's algorithm — getting traction is hard. Don't expect many Facebook reviews unless you're in an industry where Facebook is dominant.
- Yelp filtering — Yelp's algorithm hides reviews it suspects. Don't expect a 1:1 mapping.
Related
- Chapter 22 — Payments — for the Stripe webhook trigger
- Chapter 15 — Automations — for the "after payment" trigger
- Recipe 12 — Negative Review Interception
Part 6 — Automation & AI
Chapter 15 — Automations
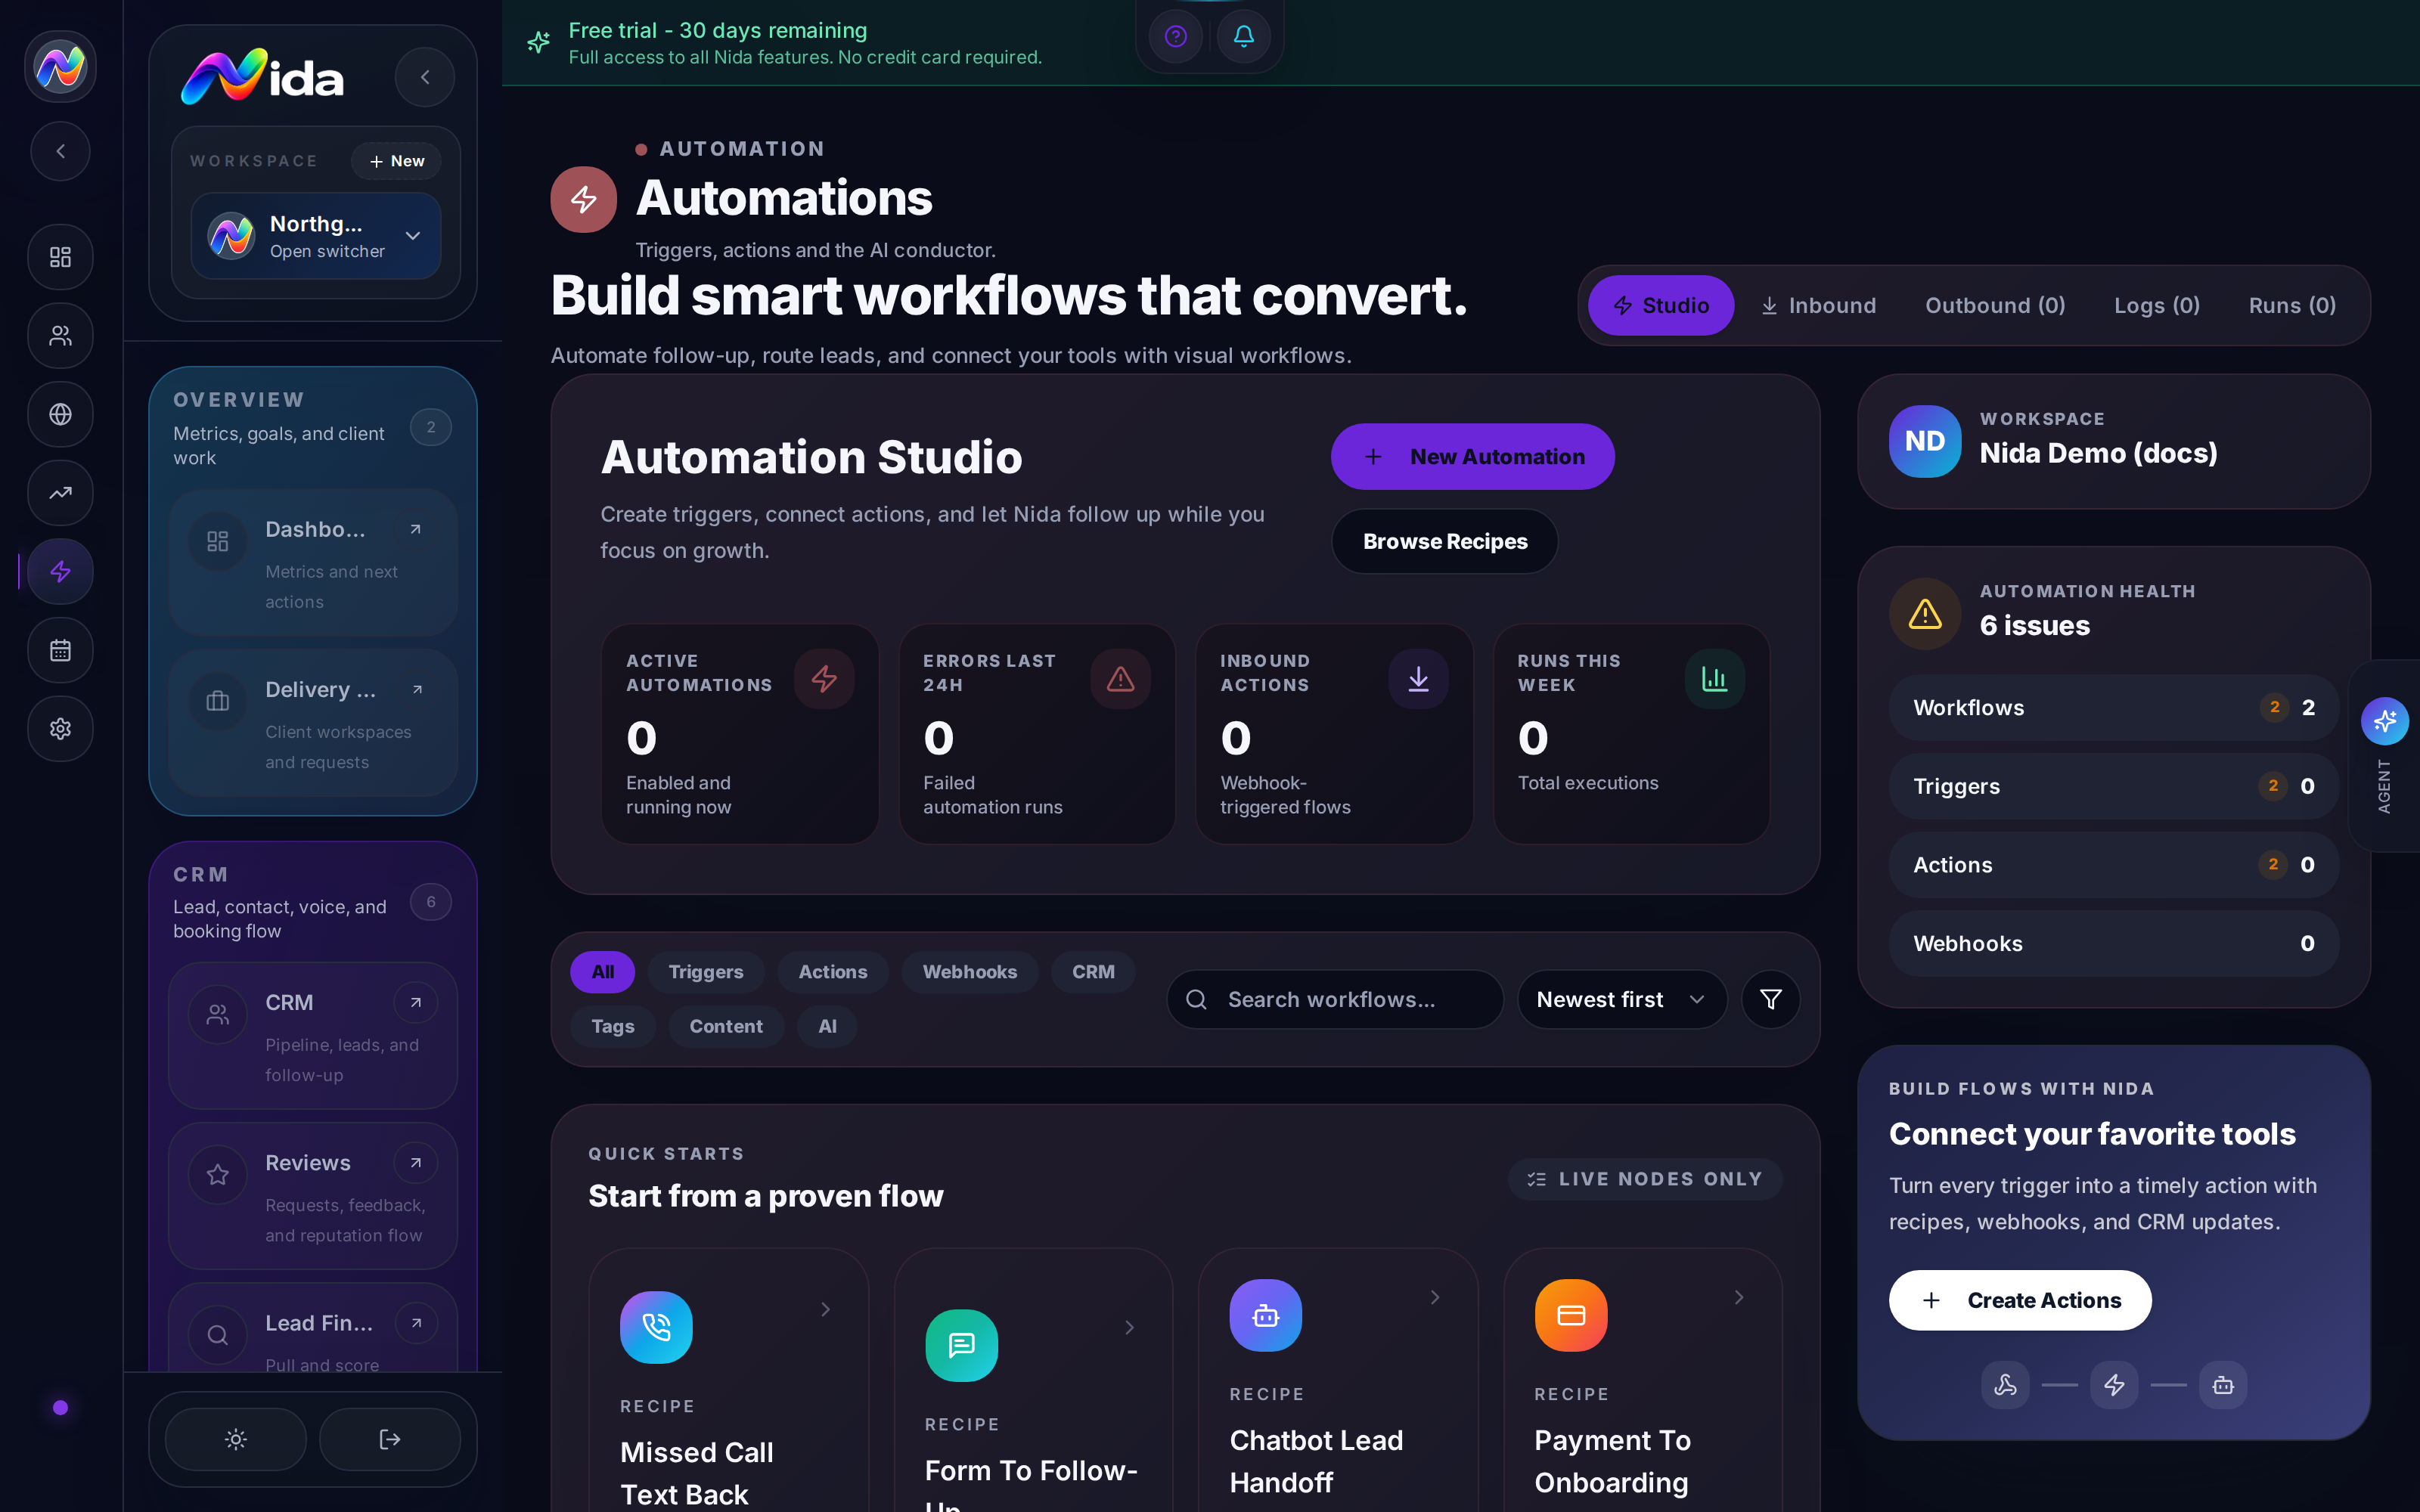
**Purpose:**Purpose: the rules engine. Build visual workflows that fire on triggers (form submitted, lead created, payment succeeded, etc.) and run actions (send email, send SMS, move stage, call webhook, etc.).
What you'll need: nothing. Open and build.
Walkthrough
The Automations page (/automations) is a visual workflow builder. The canvas is a vertical flow of nodes. Each node is either a Trigger (the entry point) or an Action (a step that runs).
Create an automation
- + New automation in the top-right.
- Name it (e.g., "New lead → Welcome email").
- The canvas opens with a single Trigger node.
- Pick a trigger:
- Form submitted — pick a form
- Chatbot message received — pick a chatbot
- Phone call missed — when an inbound call goes to voicemail
- Phone call completed — when a call ends
- SMS received — when an inbound text arrives
- Email received — when an inbound email arrives
- Payment succeeded — Stripe payment completes
- Payment failed — Stripe payment fails
- Subscription created — new Stripe subscription
- Subscription cancelled — Stripe sub cancelled
- Lead created — new lead in CRM
- Lead stage changed — pick a stage
- Lead tag added — pick a tag
- Booking created — pick a booking link
- Booking attended — pick a booking link
- Booking no-show — pick a booking link
- Review received — pick a platform + min rating
- Webhook received — custom trigger
- Schedule — fires on a cron-like schedule
- Add an action by clicking the + below the trigger.
- Pick an action:
- Send email — uses your connected email
- Send SMS — uses your Twilio number
- Send chatbot message — to the active thread
- Make a call — initiates a call to the lead
- Wait — pause for N minutes/hours/days
- Wait until — pause until a condition (e.g., "stage = Qualified")
- Move lead stage — change CRM stage
- Add tag — add a tag to the lead
- Remove tag — remove a tag
- Assign owner — assign a teammate
- Create task — create a to-do for the lead
- Update contact field — write a value to a custom field
- HTTP request — call any external API
- Run JavaScript — execute a JS snippet (workspace sandbox)
- Add to workflow — internal logic
- End — terminate the workflow
- Configure each action (recipient, message body, conditions).
- Save the automation. Toggle Active to enable.
AI Conductor (the special action)
There's one more action type: AI Conductor. This is Nida's reasoning agent. It reads the workspace state, the lead's history, and your instructions, and decides what to do next.
Example: "If this lead looks like a high-value opportunity, move to 'Qualified' stage and notify the sales team. Otherwise, send a nurturing email."
The Conductor uses the Automation AI task model (see Chapter 17). Use a top-tier model here — reasoning quality matters.
Recipes
Nida ships a library of starter recipes — pre-built automations you can clone and customize. Open the recipe library from the Automations page sidebar. Current recipes include:
- New lead welcome email
- Missed call text-back
- Payment receipt + onboarding
- Booking confirmation + reminder
- Review request after payment
- Re-engage cold leads (90 days no activity)
- Negative review alert
- Birthday email
- Subscription renewal reminder
- Subscription dunning sequence
- ...and ~30 more
Click a recipe, click Use this recipe, customize, save. Done in 2 minutes.
Tips
- The AI Conductor is the killer feature. It lets automations be smart, not just rule-based. Use it for any "should I do X?" decision.
- Webhooks are your escape hatch. If Nida doesn't have a built-in action for something, HTTP request to your own API. The webhook action can also return data back into the workflow.
- Test before activating. Use the Test button to fire the automation with sample data. Inspect what each action did.
- The run log is gold. Every automation run is logged with the trigger payload, every action's input/output, and any errors. Use it to debug.
- Use the "Wait" action for drip campaigns. A 7-email nurture sequence is one automation with 7 Send Email actions separated by Wait steps.
Pitfalls
- Automation runs cost AI tokens. Every Conductor call, every AI action consumes tokens. A 7-step automation with 2 Conductor calls might cost $0.10/run. Watch your bill.
- No rollback. If an automation sends 1,000 wrong emails, you can't undo. Test, then activate.
- Triggers don't always fire in real time. Some triggers (e.g., webhook received) fire within seconds. Others (e.g., search console sync) fire on schedule. Read the trigger doc.
- Custom JavaScript actions run in a sandbox. You have access to
fetchand limited Node APIs. No file system, no network to private IPs.
Related
- Chapter 16 — Autopilot — for autonomous goals
- Chapter 17 — AI Settings — for the Conductor model
- Recipe 2 — Missed Call Text-Back
- Recipe 3 — Form → CRM
- Recipe 4 — Booking → SMS Reminder
Chapter 16 — Autopilot
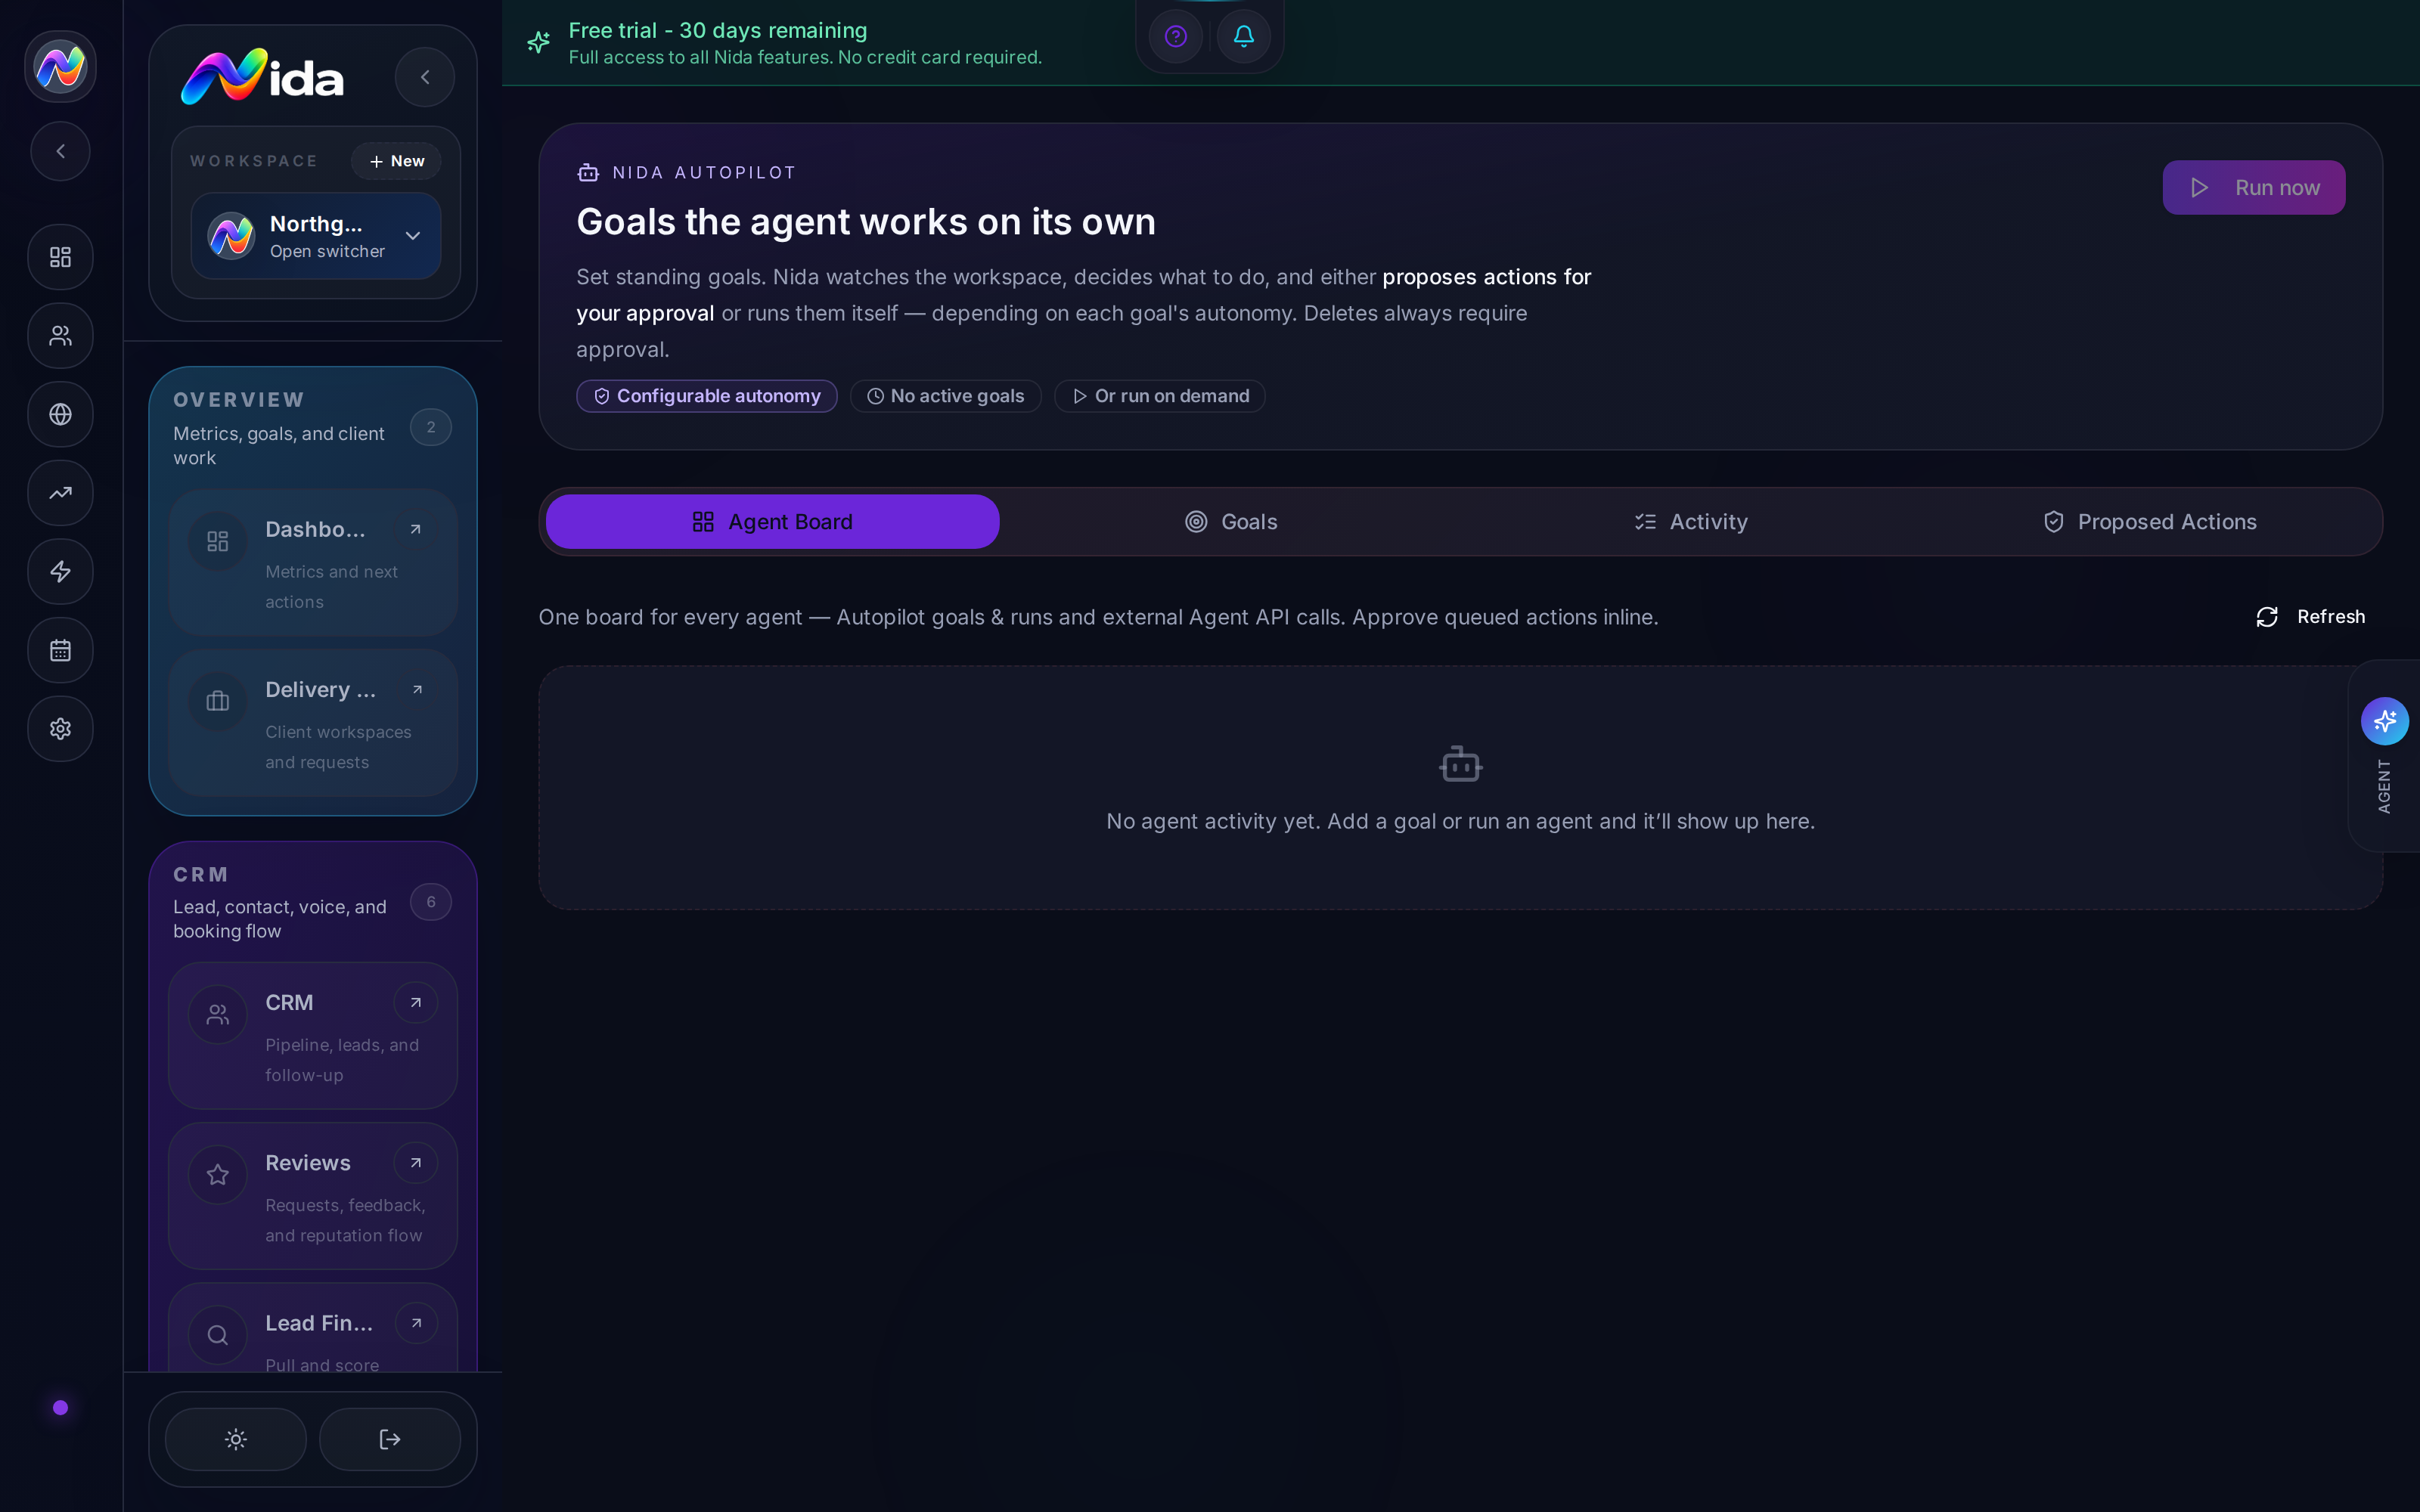
**Purpose:**Purpose: the autonomous agent. Autopilot reads your workspace state continuously, proposes actions, and (when approved) executes them. It's like having a smart operations manager working 24/7.
What you'll need: an AI provider, at least one active channel.
Walkthrough
The Autopilot page (/autopilot) has three tabs:
Tab 1 — Goals
A list of goals Autopilot is working toward. Each goal is a high-level objective ("Re-engage cold leads", "Improve review response time", "Identify upsell opportunities").
Create a goal:
- + New goal in the top-right.
- Name the goal.
- Description — what success looks like.
- Cadence — how often Autopilot checks for opportunities:
- Real-time — every 5 minutes
- Hourly — top of every hour
- Daily — at a specific time
- Weekly — on a specific day/time
- Mode:
- Suggest-only — Autopilot proposes actions, you approve. (Default and recommended.)
- Auto-execute safe — Autopilot runs read-only and low-risk actions automatically (e.g., draft an email, but not send).
- Auto-execute all — Autopilot does whatever it thinks is right. (DANGER — use only for testing or in low-stakes scenarios.)
- Allowed actions — pick which action types Autopilot can take (Move stage, Send email, Send SMS, Create task, etc.). If you don't allow an action type, Autopilot can never take it.
- Save the goal.
Tab 2 — Activity
A log of every Autopilot run. Each entry shows:
- Goal
- Timestamp
- Decision (what Autopilot decided)
- Action taken (what was actually done)
- Outcome (success/failure)
Click any entry to see the full reasoning chain ("I saw 12 leads that came in last week but haven't been contacted. I drafted a re-engagement email for each. Waiting for approval.")
Tab 3 — Proposed Actions
A queue of actions Autopilot has proposed but not yet executed. Each card shows:
- Goal (which goal proposed this)
- Action (e.g., "Send email to lead John Smith")
- Reasoning (why Autopilot thinks this is a good idea)
- Preview (the email content, the SMS body, etc.)
- Approve / Reject / Edit buttons
Click Approve to execute. Click Reject to discard and tell Autopilot not to propose this again. Click Edit to modify the action (e.g., tweak the email body) then approve.
The suggest-only default
By default, all goals are in suggest-only mode. This is intentional. Autopilot proposes, you decide. This gives you control over what actually gets sent to your customers.
The two upgrade paths:
- Auto-execute safe: read-only actions, drafts, internal notifications. Autopilot runs these without approval.
- Auto-execute all: everything. Once you trust Autopilot, this is where the magic happens. The agent becomes a 24/7 operations manager.
Most agencies run in suggest-only for customer-facing actions and auto-execute safe for internal actions. This is the recommended pattern.
Goals shipped as recipes
Nida ships starter goals you can enable with one click:
- Re-engage cold leads (no activity in 30/60/90 days)
- Identify hot leads (positive signals: chatbot engagement, form fill, repeat visit)
- Find upsell opportunities (customers who fit a higher tier)
- Audit review responses (un-replied reviews older than 7 days)
- Identify payment failures (subscriptions at risk of churn)
- Optimize ad spend (channels with high spend, low conversion)
- Weekly digest (summary of what happened, what needs attention)
Tips
- Start with one goal. Don't enable 5 at once. Enable one, watch it for a week, adjust, then enable another.
- The reasoning field is your window into Autopilot. If it makes bad proposals, the reasoning tells you why. Use it to refine the goal description.
- Weekly digest is the safest starting goal. It's read-only, summarizes activity, never sends anything to customers.
- The auto-execute modes are a trust ladder. Move up one rung at a time.
- Re-engage cold leads is the highest-ROI goal. It directly generates revenue.
Pitfalls
- Autopilot runs cost AI tokens. Every check is a model call. A goal with 5-minute cadence and 100 leads could be $50/day in token costs. Watch the usage meter in Chapter 24 — Settings → Usage.
- Goals are not "set and forget." Like a real operations manager, Autopilot needs feedback. Reject bad proposals, refine goal descriptions, restrict allowed actions.
- Autopilot doesn't know your business like you do. It can propose, but the final decision (especially on customer-facing actions) is yours.
- Auto-execute all is dangerous in production. Use it only after weeks of suggest-only on the same goal.
Related
- Chapter 15 — Automations — for rule-based automations
- Chapter 17 — AI Settings — for the Conductor model
- Recipe 8 — Re-engage Cold Leads
Chapter 17 — AI Settings (Model Routing)
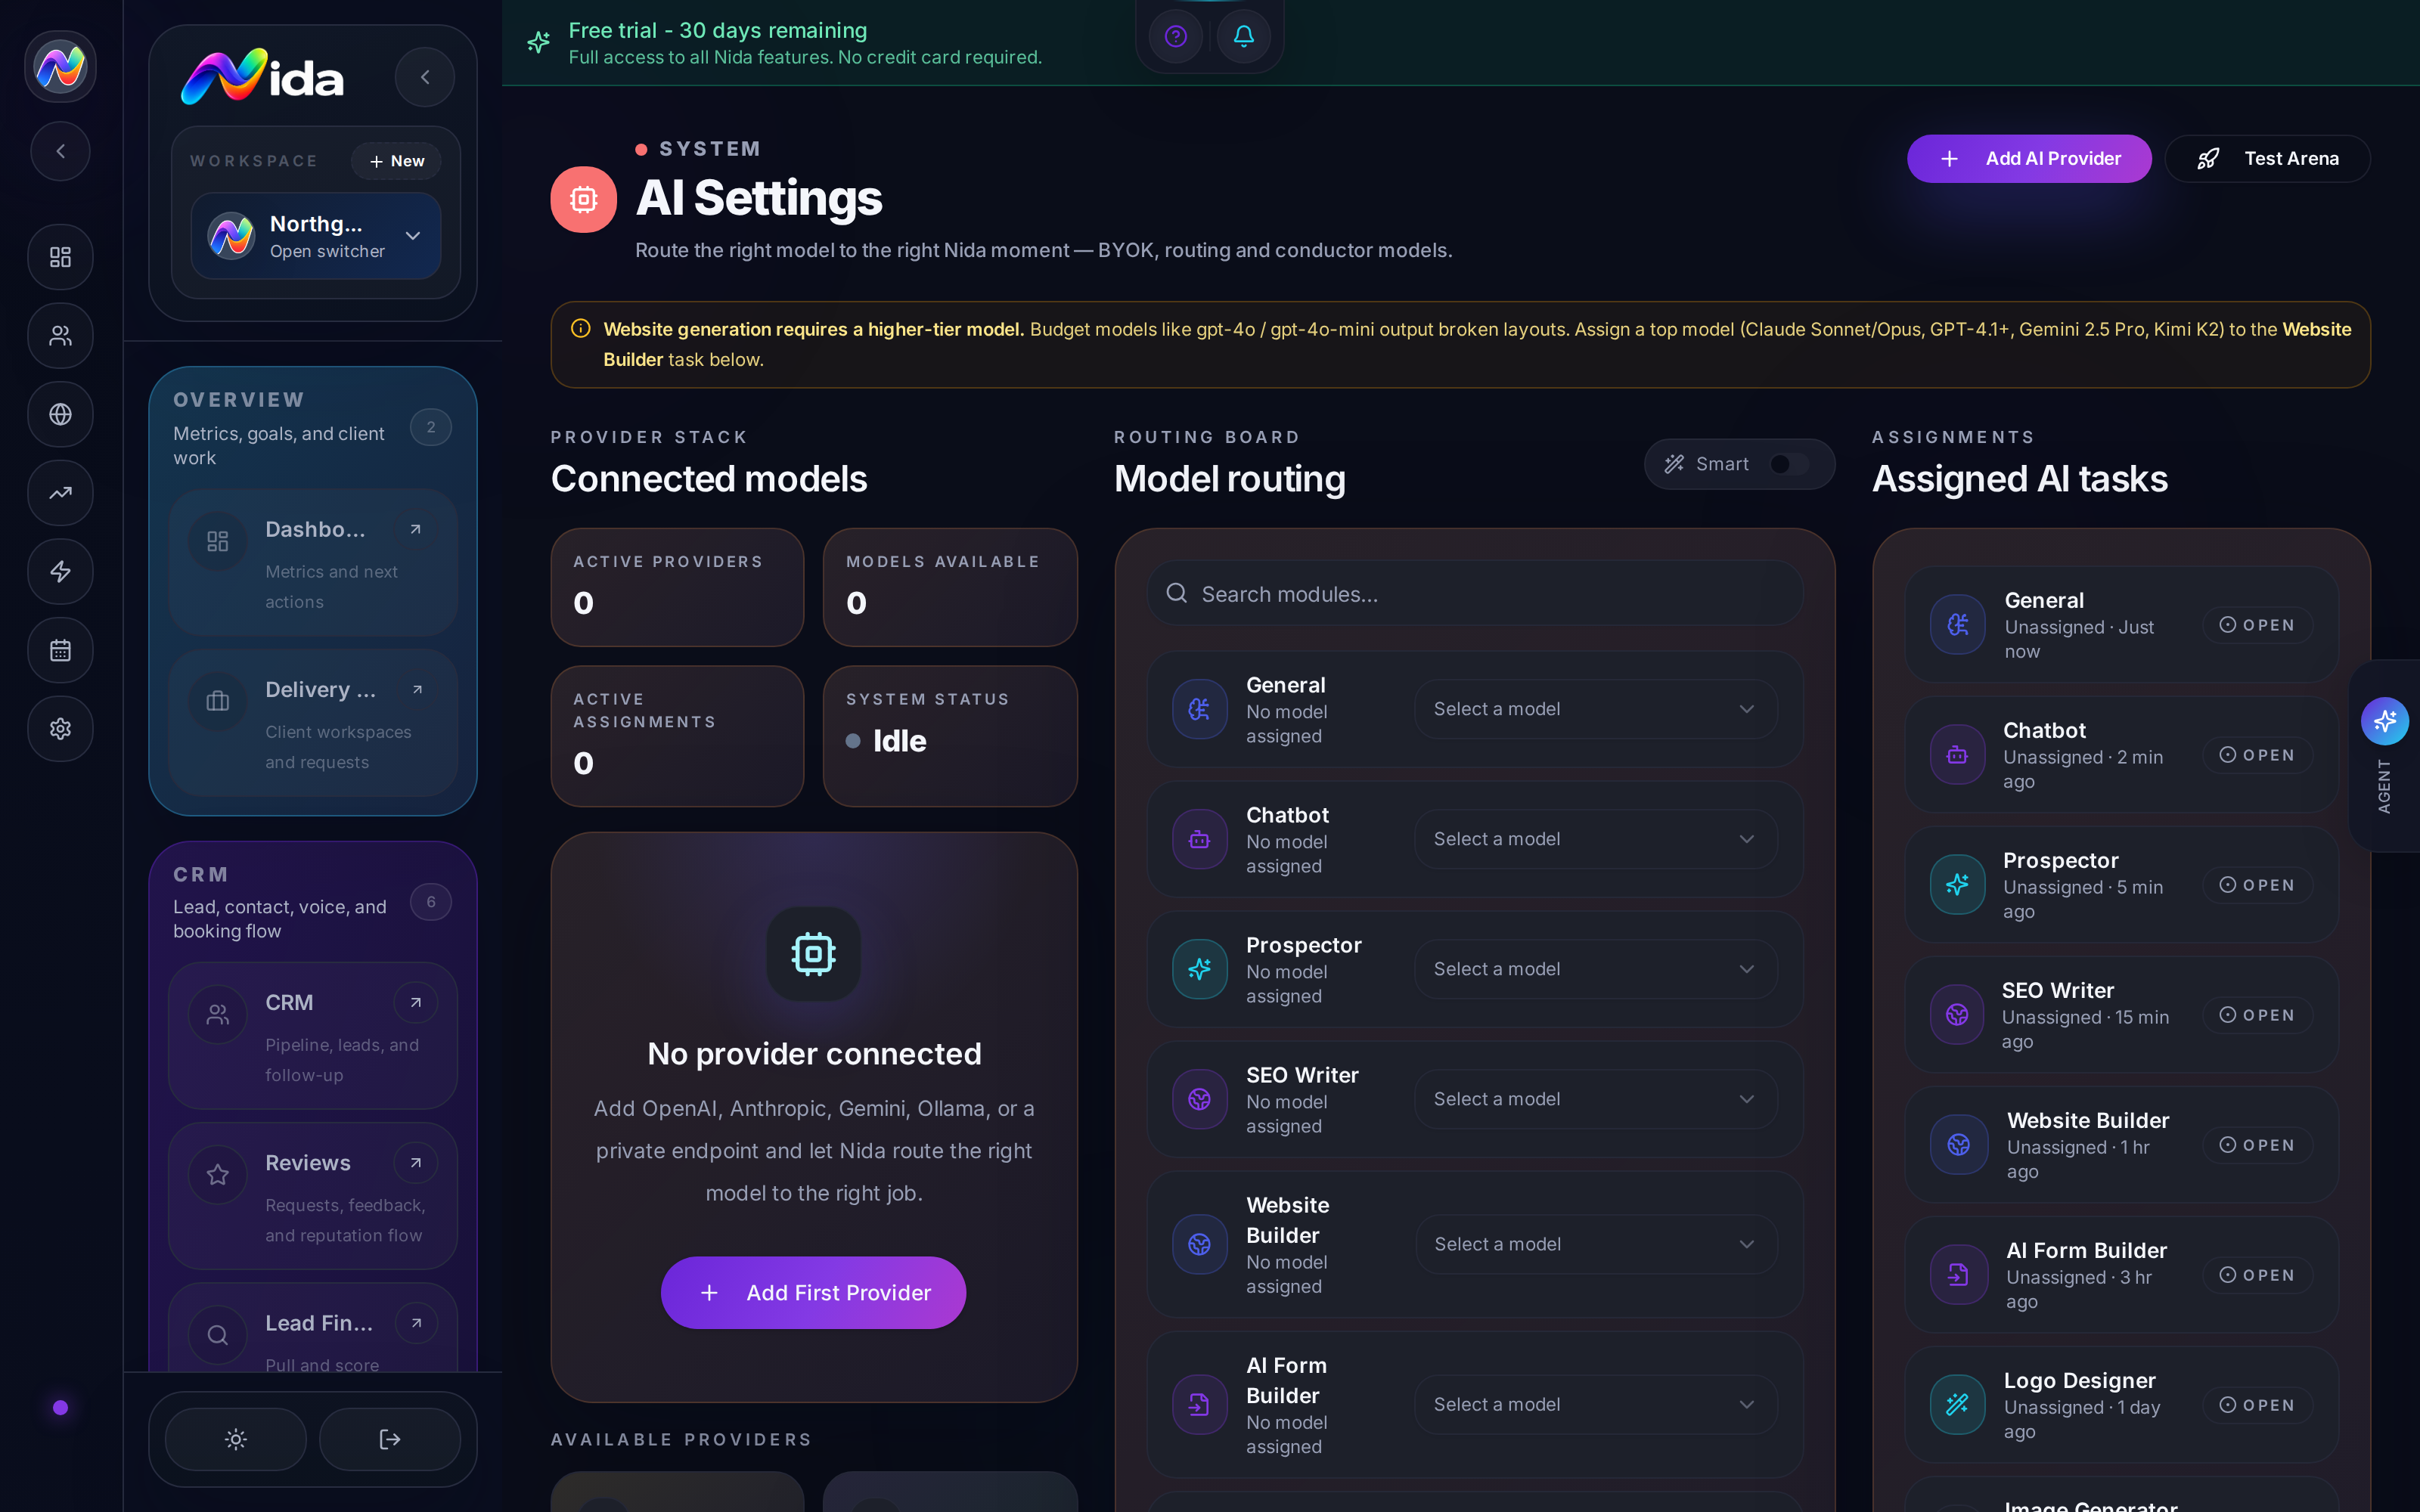
**Purpose:**Purpose: the brain center. Pick which AI model runs each task. Set the default routing, override per workspace, manage API keys, monitor usage.
What you'll need: at least one AI provider connected (see Tutorial 3).
Walkthrough
The AI Settings page (/ai-settings) presents model routing as a board of task slots — 13 roles, each with its own model assignment and a preferred quality/speed bias.
The 13 task slots
| Slot | Routing key | Bias |
|---|---|---|
| General | content_generation | quality |
| Chatbot | chatbot_responses | speed |
| Prospector (lead scoring) | lead_scoring | quality |
| SEO Writer | metadata_generation | quality |
| Website Builder | website_generation | quality |
| AI Form Builder | ai_form_generation | quality |
| Logo Designer | logo_generation | quality |
| Image Generator | image_generation | quality |
| Email Writer | email_generation | quality |
| Text Messaging | chatbot_responses | speed |
| Email Sending | email_generation | quality |
| AI Voice | voice_agent | speed |
| Automation (Conductor) | automation_conductor | quality |
Note that some slots share a routing key — Text Messaging rides on the Chatbot key, Email Sending rides on Email Writer.
For each task, you can pick:
- Provider (OpenAI, Anthropic, Gemini, OpenRouter, Ollama, xAI, Cloudflare, Higgsfield, Custom)
- Model (e.g., gpt-5.2, claude-sonnet-4-6, gemini-3-pro)
- Temperature (0 = deterministic, 1 = creative)
- Max tokens (cap on output length)
- System prompt (optional override of the default prompt)
Provider connections
The top section lists every connected provider. For each:
- Provider name
- Status (active, key invalid, rate-limited)
- Model count (e.g., 47 models for OpenRouter)
- Last used timestamp
- Add / Remove buttons
+ Add Provider opens a modal where you pick a provider and paste your API key. Nida validates the key by listing available models.
Fallback routing
If your primary model fails (rate limit, downtime, key invalid), Nida falls back to a configured secondary model. Set this per task.
Example: Content = gpt-5-nano (primary), claude-haiku-4-5 (fallback).
Usage monitoring
The right column shows:
- Tokens used today (across all tasks)
- Cost today (estimated, in USD)
- Tokens used this month
- Cost this month
- Per-task breakdown (table)
Click any task to see a 30-day token/cost history chart.
Supported providers (current list)
- OpenAI — gpt-5.2, gpt-5-nano, gpt-4o-mini (legacy), o-series reasoning models
- Anthropic (Claude) — claude-sonnet-4-6, claude-haiku-4-5, claude-opus-4-x
- Gemini — gemini-2.5-flash, gemini-2.5-pro, gemini-3-pro
- OpenRouter — every major model, one key (default
openai/gpt-5.2) - Ollama (self-hosted) and Ollama Cloud — local or hosted open models (e.g.
kimi-k2.7-code:cloud) - xAI (Grok) — grok-4 and later, via the custom OpenAI-compatible endpoint
- Cloudflare Workers AI —
@cf/black-forest-labs/flux-1-schnelland other open text-to-image models - Higgsfield —
nano_bananaand hosted image/video models - Custom endpoint — any OpenAI-compatible API (Together, Anyscale, your own server)
Tips
- OpenRouter is the easiest start. One key, 200+ models, one bill.
- Mix and match for cost/quality. Use
gpt-5-nanofor Content,claude-sonnet-4-6for Chatbot,gemini-2.5-flashfor Metadata. Save 60%+ vs. usinggpt-5.2everywhere. - For Logo, you need an image-capable model.
flux-1-schnell(Cloudflare) ornano_banana(Higgsfield). - Never route Website generation to a small model.
gpt-4oand other mini/nano models produce broken section layouts — use a top-tier model for Website copy and generation. - Conductor deserves a top-tier model. Don't put a nano model on Automation — bad reasoning breaks automations.
- Test the model before routing to it. The "Test" button on any task slot lets you send a sample prompt and see the response.
Pitfalls
- Provider keys are stored encrypted at rest. But they're still keys. If your workspace is compromised, rotate them immediately.
- Ollama local models are only as good as your hardware. A 7B model on a CPU is slow. A 70B model needs a serious GPU.
- OpenRouter adds 5-10% latency vs. direct provider. For real-time chatbot, test if it's noticeable.
- Custom endpoints must be OpenAI-compatible. Anything that speaks the OpenAI chat completions API works.
- Usage data is per-workspace. If you have multiple workspaces, each has its own usage. White-label customers can see their own usage but not yours.
Related
- Tutorial 3 — Connect an AI Provider
- Chapter 10 — Chatbots — the Chatbot task slot
- Chapter 16 — Autopilot — uses the Conductor model
- Recipe 9 — Multi-Model Routing
Chapter 18 — System Variables
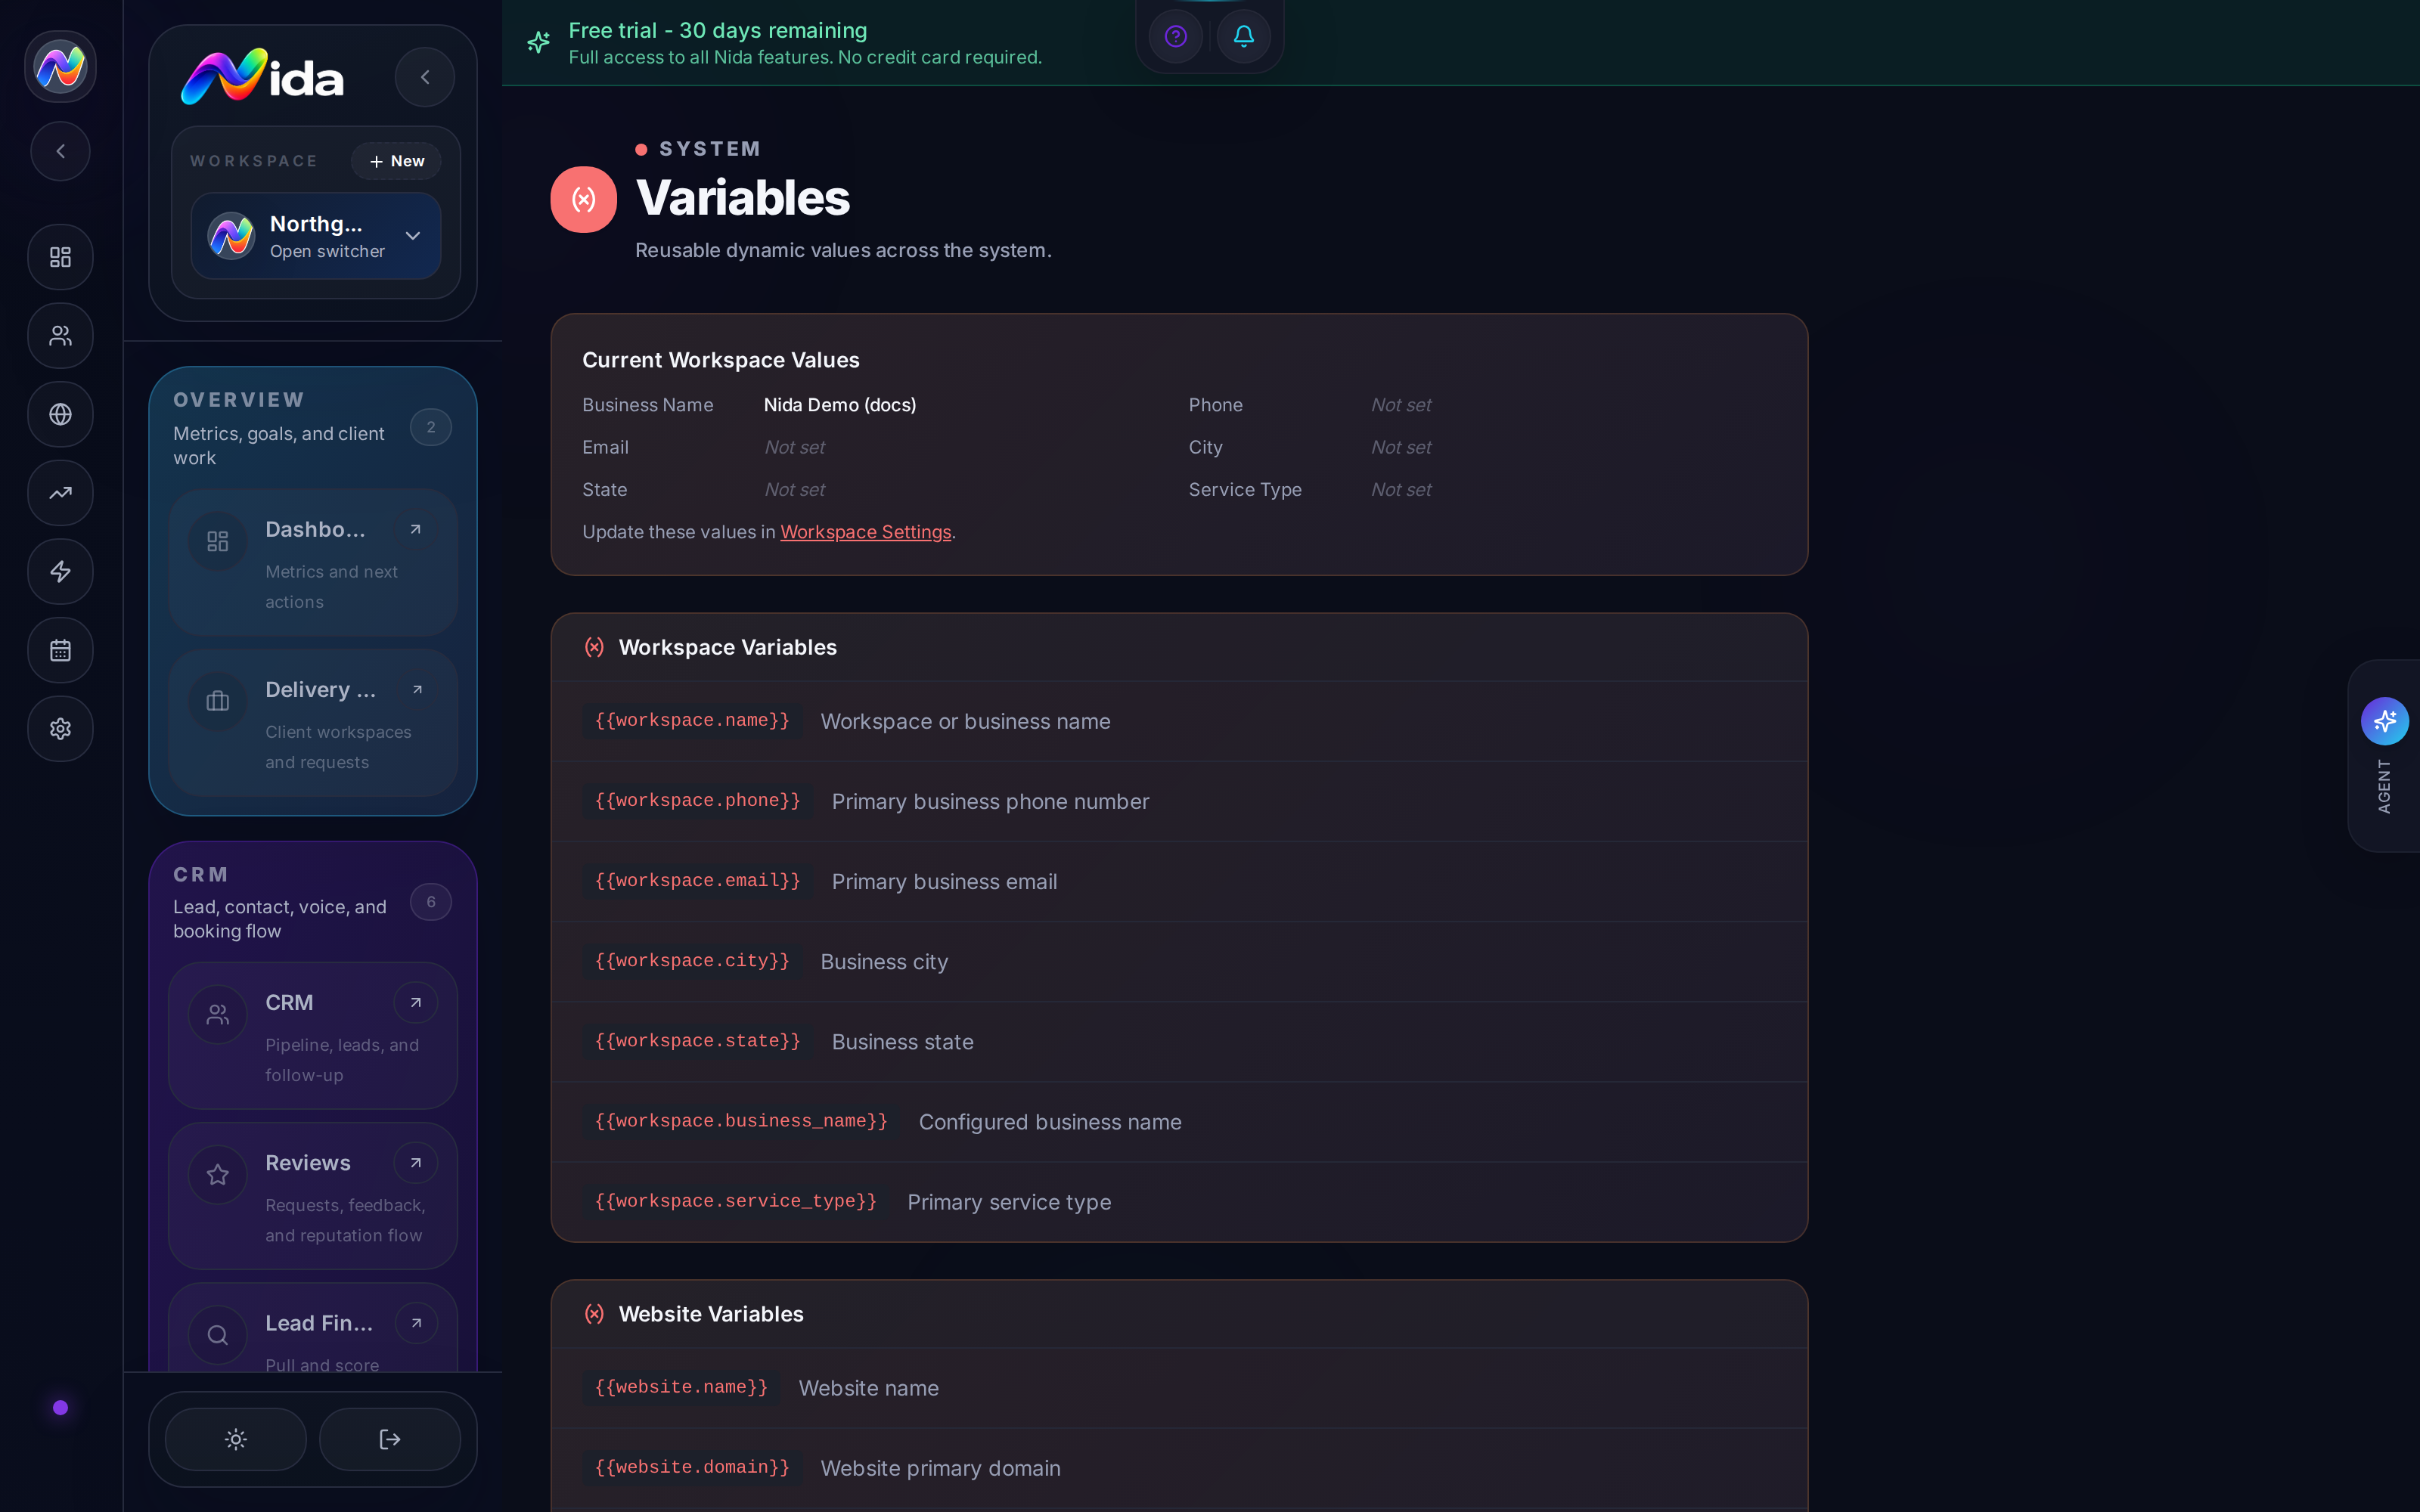
**Purpose:**Purpose: the merge-tag reference. Every variable you can use in emails, SMS, chatbot replies, form messages, automations, and webhooks. Click-to-copy.
What you'll need: nothing. Open and search.
Walkthrough
The Variables page (/variables) has two regions:
Top — Current Workspace Values
A live card showing the merge-tag values for your current workspace. Useful for previewing what a tag will render to. Examples:
[workspace.name]→ "My Workspace"[workspace.phone]→ "802-165-..."[workspace.city]→ "Accent Lead"[workspace.state]→ "Widgets Settings"[workspace.zip]→ "802-165"
Click any value to copy.
Bottom — All Variables (14 categories)
The full library, organized by category. Each variable has:
- Tag (the literal token to use, e.g.,
[lead.first_name]) - Description (what it resolves to)
- Click-to-copy (copy the tag to clipboard)
Categories:
- Workspace Variables —
[workspace.name],[workspace.phone],[workspace.email],[workspace.city],[workspace.state],[workspace.zip],[workspace.address] - Website Variables —
[website.name],[website.domain],[website.url],[website.subdomain], ... - Page Variables —
[page.title],[page.slug],[page.url],[page.meta.title],[page.meta.description] - Lead Variables —
[lead.first_name],[lead.last_name],[lead.full_name],[lead.email],[lead.phone],[lead.company_name],[lead.source],[lead.stage],[lead.owner],[lead.tags] - Contact Variables —
[contact.email],[contact.phone],[contact.first_name],[contact.last_name],[contact.full_name] - Form & Submission Variables —
[form.name],[submission.email],[submission.phone],[submission.field_name], ... - Chatbot Variables —
[chatbot.name],[conversation.visitor_name],[conversation.last_message] - SMS Variables —
[sms.from],[sms.body],[sms.sent_at],[sms.direction] - Phone Variables —
[phone.from],[phone.to],[phone.duration],[phone.recording_url] - Payment Variables —
[payment.amount_total],[payment.currency],[payment.product_name],[payment.customer_email],[payment.status],[payment.stripe_receipt_url] - Webhook Variables —
[webhook.url],[webhook.method],[webhook.headers],[webhook.body],[webhook.query], ... - AI Output Variables —
[ai.output],[ai.model],[ai.tokens_used],[ai.cost_usd],[ai.latency_ms] - Paystart Variables —
[paystart.subscription_id],[paystart.next_billing_date],[paystart.plan_name], ... - Quick Aliases — short forms for common tags (
[first_name]→[lead.first_name],[biz_name]→[workspace.name])
Search and filter
- Search bar at the top — substring match across tag and description
- Filter by category — checkbox list of the 14 categories
- Show only "available in current context" — toggle to show only variables that have a value right now (e.g., during a form submission, only form variables are available)
Usage
Variables are used in:
- Email body and subject — wrap in
{{ }}in email templates, or use the raw[variable]form - SMS body —
[lead.first_name]works - Chatbot replies —
[lead.first_name]works (resolved at message time) - Form thank-you messages — same
- Automation action inputs — same
- Webhook body — JSON-parse-able:
{ "name": "[lead.first_name]" }
Tips
- The Quick Aliases are the most-used.
[first_name],[biz_name],[my_phone]— they're shorter and easier to read. - Preview before sending. The Variables page shows the live value for your workspace. For per-lead values, open a lead and see the resolved values in the "Send test email" preview.
- Custom fields are also merge tags. If you have a custom field on leads called
project_type, you can use[lead.project_type]everywhere. - If a variable resolves to nothing, the tag is left as-is.
[lead.first_name]for a lead with no first name will appear in the email as[lead.first_name]. Not great. Always set defaults or use the Quick Aliases.
Pitfalls
- Variables are case-sensitive.
[Lead.First_Name]doesn't work. Use lowercase:[lead.first_name]. - Not all variables are available everywhere.
[payment.amount_total]only works in payment-triggered automations. Use the "show only available" filter to see what's live. - Quick Aliases are workspace-defined. If you create a new alias, it's only available in your workspace, not across Nida.
- Nested variables don't work.
[workspace.[lead.first_name]]is not a thing. Use automation logic to compose values.
Related
- Chapter 5 — Conversations — for SMS/email templates
- Chapter 10 — Chatbots — for chatbot replies
- Chapter 15 — Automations — for action inputs
Chapter 19 — API Keys
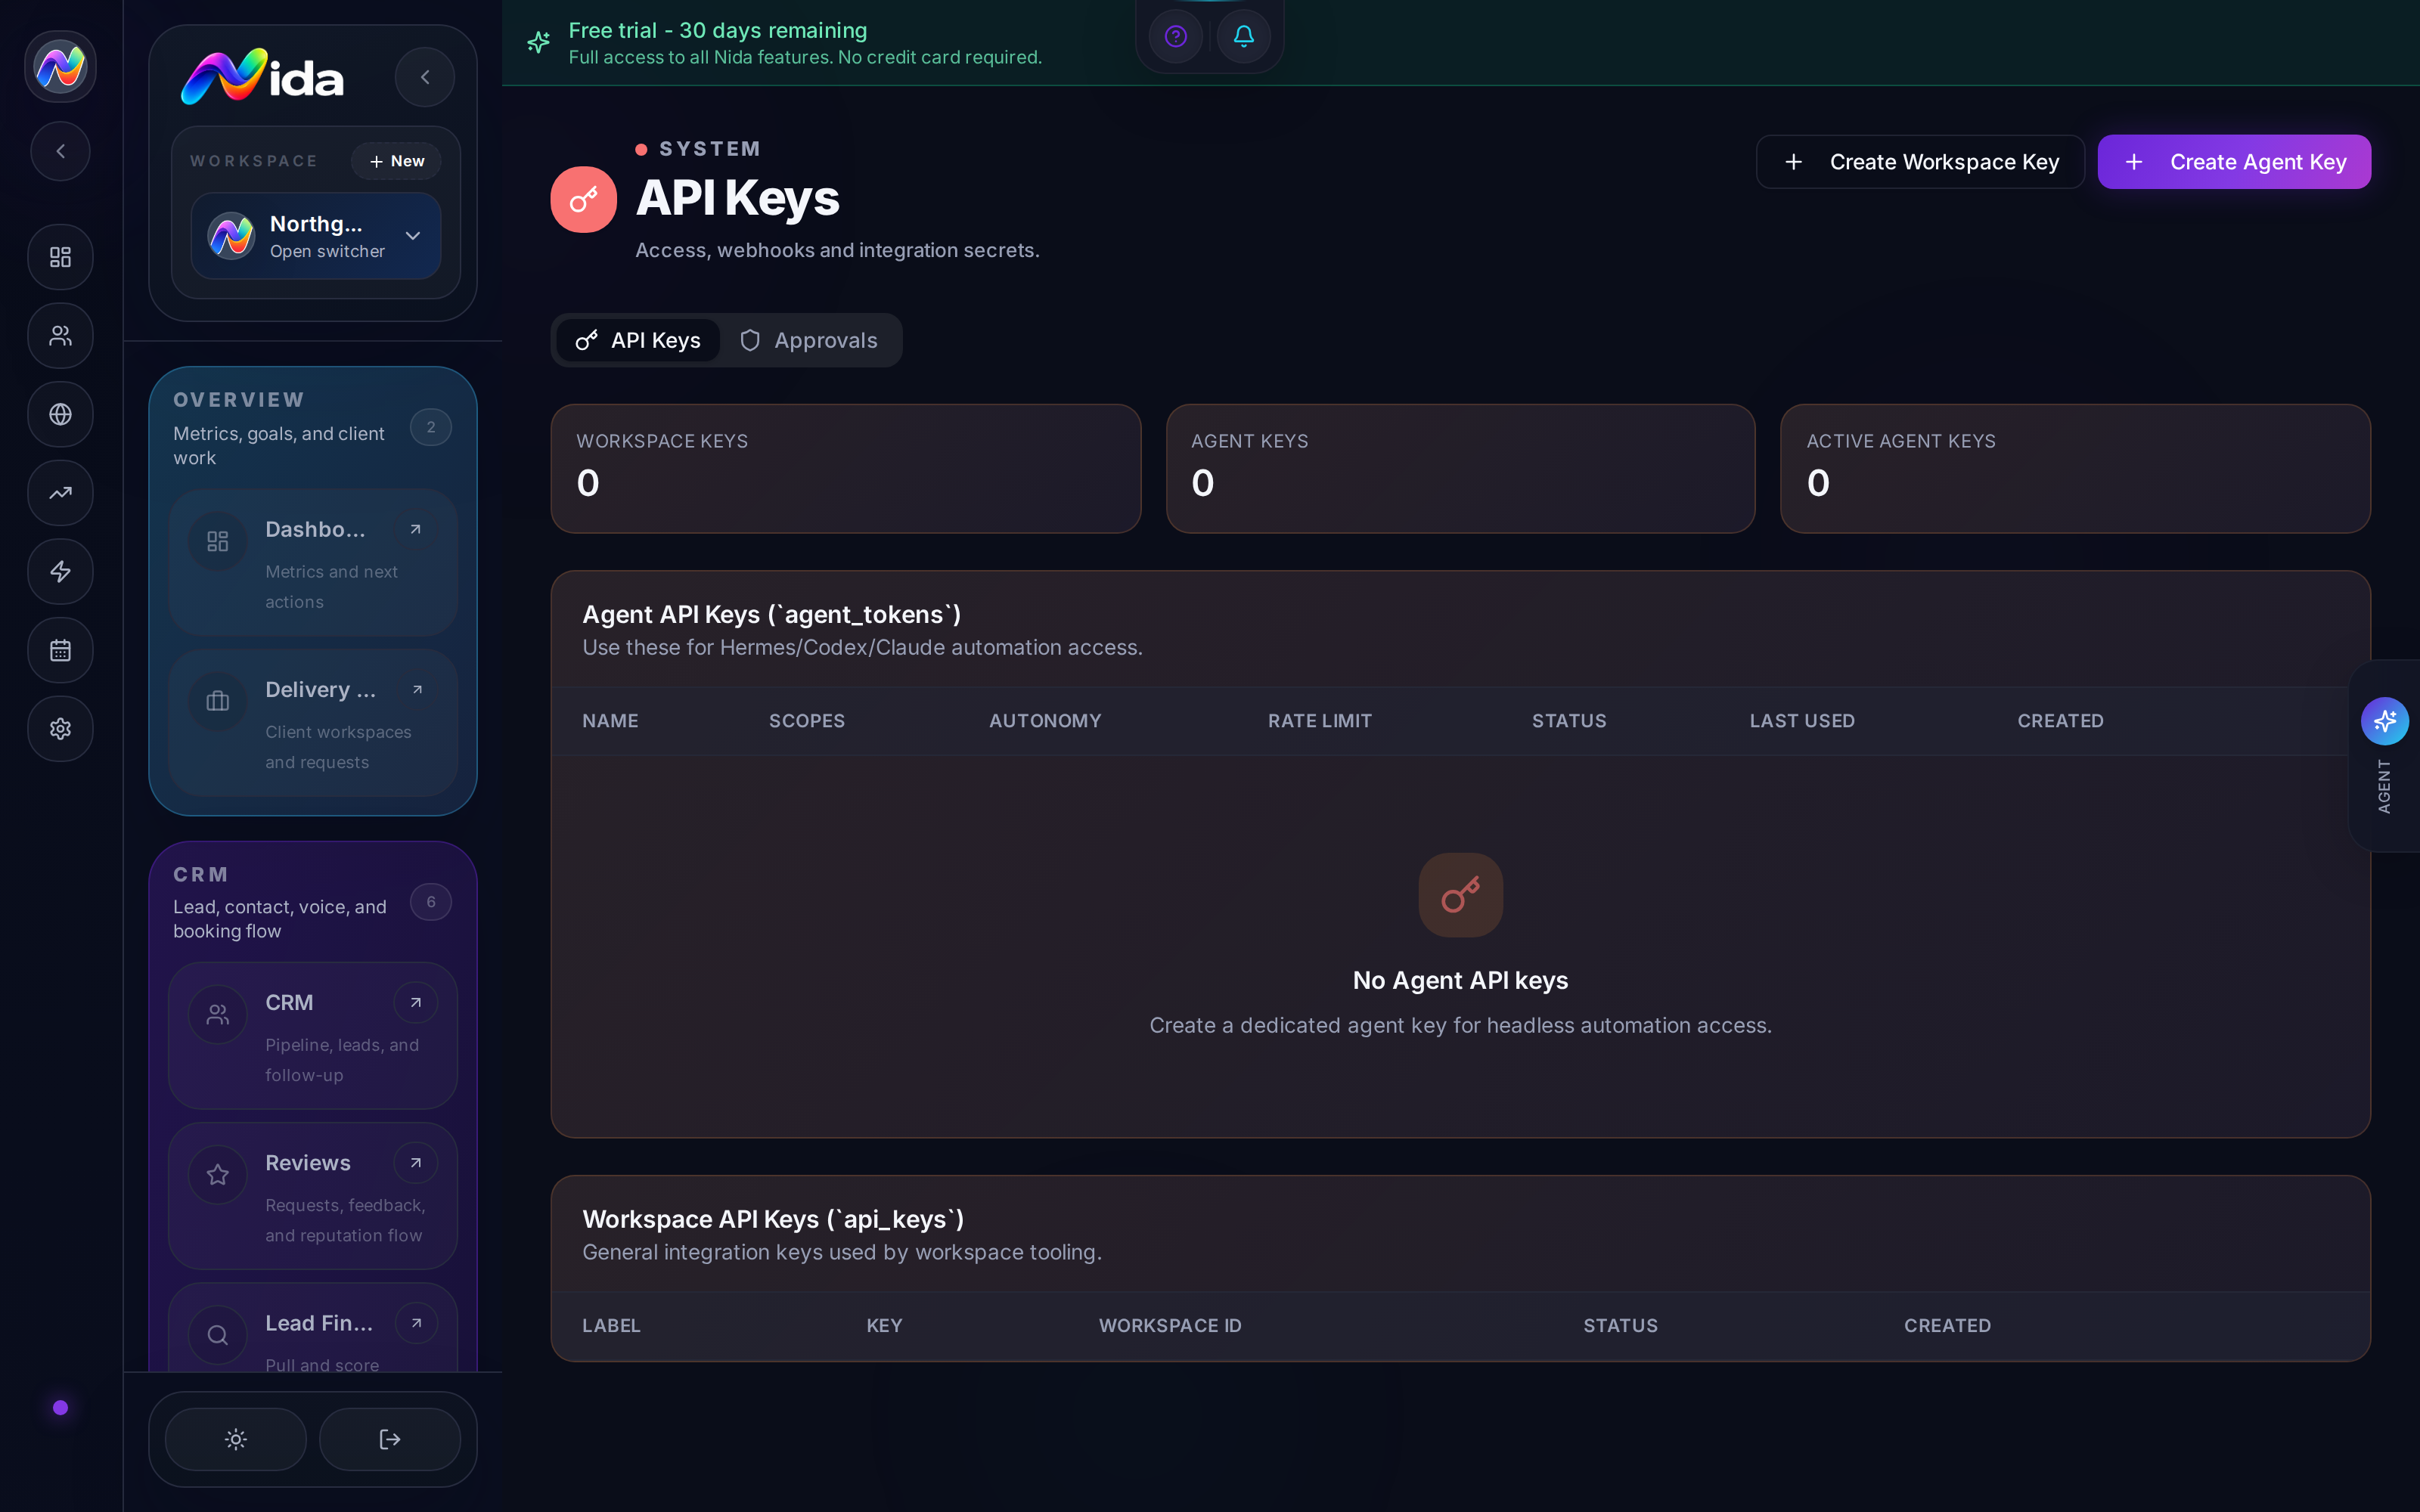
**Purpose:**Purpose: the credential manager. Two types of keys: Workspace API keys (general integrations) and Agent API keys (for autonomous agents like Hermes, Codex, Claude).
What you'll need: workspace admin access.
Walkthrough
The API Keys page (/api-keys) has two sections and an Approvals tab.
Section 1 — Workspace API Keys (api_keys)
- Purpose: general integration keys used by workspace tooling
- Format: random string, ~64 chars
- Scope: workspace-wide (no per-module restriction)
- Use for: custom integrations, third-party tools that need a Nida credential, your own backend services
Create a workspace key:
- + Create workspace key in the top-right.
- Label — describe what this key is for ("Make.com integration", "n8n production")
- Optional: expires — set an expiration date (recommended for security)
- Click Create. Nida shows the full key once. Copy it and store it securely. You will not see it again.
- The key appears in the table as a masked string (e.g.,
nida_ws_****a8b2) with the label, workspace ID, status, and creation date.
Section 2 — Agent API Keys (agent_tokens)
- Purpose: dedicated agent credentials for headless automation
- Format:
nid_agent_[a-z0-9]{32}(e.g.,nid_agent_a1b2c3d4e5f6g7h8i9j0k1l2m3n4o5p6) - Scope: per-key scope restrictions (e.g.,
contacts:read,websites:update) - Use for: Hermes, Codex, Claude Code, any autonomous agent that needs to read/write Nida data
Create an agent key:
- + Create agent key in the top-right.
- Name — describe the agent ("Hermes morning digest", "Codex lead enrichment")
- Scopes — pick which module:action combinations the key can perform:
*:*— full access (default for initial rollout)contacts:read,contacts:writeleads:read,leads:writewebsites:read,websites:updateautomations:trigger- ... and ~30 more
- Rate limit — set a per-minute cap (default 60, max 600)
- Optional: expires — set expiration
- Click Create. Nida shows the full key once. Copy and store securely.
- The key appears in the table with name, scopes, rate limit, status, last used, created.
Section 3 — Approvals
A log of high-risk agent actions that were approved (or rejected) by a human. This is the safety layer — destructive actions (delete, bulk-update, payment-related) require approval before an agent key can execute them.
Approve an action:
- The agent sends a request to
POST /api/agent/executewith a destructive action. - Nida returns
202 Acceptedwith an approval_id. - The action appears in the Approvals tab with a description, the agent that requested it, and the payload.
- A human clicks Approve or Reject.
- If approved, the action executes and the approval is logged.
Tips
- Use scoped keys in production.
*:*is fine for development. For production agents, scope to the minimum needed. - Rotate keys every 90 days. Treat them like passwords.
- Set rate limits per agent. A runaway agent that hits 600 req/min can cause real damage. Set tight limits.
- Approval workflow is the safety net. Don't disable it for "convenience."
- Last-used timestamp tells you if a key is stale. If a key hasn't been used in 6 months, revoke it.
Pitfalls
- Plain text is only shown once. If you lose the key, you have to revoke it and create a new one.
- No way to update a key's scope — revoke and re-create.
- Approvals don't auto-expire. Old approvals sit in the log forever. Clean up quarterly.
- Workspace keys are NOT scoped. They have full access. Don't use them for agents.
Related
- Chapter 20 — API Reference — for using the keys
- Tutorial 8 — Team — for who can create keys
Chapter 20 — API Reference (Agent API)
Purpose: the headless interface to Nida. Use it from external agents (Hermes, Codex, Claude), backend services, or your own code. The API is what makes Nida composable.
What you'll need: an Agent API key. See Chapter 19.
Walkthrough
The API Reference page (/api-docs) is the in-app documentation for the Agent API. Everything below is also on that page. This chapter explains how to use the API.
Base URL
https://www.nida-os.com(For self-hosted or custom-domain workspaces, replace with the workspace's base URL.)
Authentication
All authenticated endpoints require:
Authorization: Bearer nid_agent_xxxxxxxxxxxxxxxxxxxxxxxxxxxxxxxxThe token is hashed (SHA-256) server-side. Only the hash is stored. Nida cannot recover the plaintext — if you lose it, you must revoke and create a new one.
Rate limit: 60 requests/minute by default. Overridable per key (max 600 req/min). Exceeded → 429 Too Many Requests.
The 4 core endpoints
1. Discovery — GET /api/well-known-mcp
Returns the full set of modules, actions, and parameters available. Use this as the first call from a new agent to learn what Nida can do.
curl -s https://www.nida-os.com/api/well-known-mcp \
  -H "Authorization: Bearer nid_agent_..."
Returns:
{
  "modules": {
    "workspace": { "actions": ["state", "update", "switch"] },
    "lead": { "actions": ["list", "get", "create", "update", "delete", "stage"] },
    "contact": { "actions": ["list", "get", "create", "update", "delete"] },
    "website": { "actions": ["list", "get", "create", "update", "publish", "unpublish"] },
    "form": { "actions": ["list", "get", "create", "update", "submissions"] },
    "automation": { "actions": ["list", "get", "create", "update", "trigger", "enable", "disable"] },
    "chatbot": { "actions": ["list", "get", "create", "update", "conversations"] },
    "phone": { "actions": ["calls", "sms", "voicemail"] },
    "payment": { "actions": ["list", "get", "create", "refund"] },
    "review": { "actions": ["list", "get", "respond"] },
    "seo": { "actions": ["snapshots", "keywords", "pagespeed"] }
  }
}
2. Workspace State — GET /api/agent/workspace-state
Returns a snapshot of the workspace and key entity counts. Designed as the first call for an agent to hydrate context.
curl -s https://www.nida-os.com/api/agent/workspace-state \
  -H "Authorization: Bearer nid_agent_..."
Returns:
{
  "workspace": { "id": "...", "name": "My Workspace", "tier": "agency" },
  "counts": {
    "leads": 124,
    "contacts": 891,
    "websites": 3,
    "forms": 7,
    "automations": 12,
    "chatbots": 2
  },
  "active_channels": ["twilio", "stripe", "openai"]
}
3. Execute — POST /api/agent/execute
The unified action router. One endpoint for every action on every module.
curl -s https://www.nida-os.com/api/agent/execute \
  -H "Authorization: Bearer nid_agent_..." \
  -H "Content-Type: application/json" \
  -d '{
    "module": "lead",
    "action": "create",
    "workspace_id": "...",
    "params": {
      "first_name": "John",
      "last_name": "Smith",
      "email": "john@example.com",
      "phone": "+15551234567",
      "source": "agent"
    }
  }'
Module:Action combinations (most-used):
lead:list— list all leads, supports filter/paginationlead:get— get a specific lead by IDlead:create— create a new leadlead:update— update fieldslead:stage— change stagelead:delete— delete (requires approval)contact:list,contact:get,contact:create,contact:update,contact:deletewebsite:list,website:get,website:create,website:update,website:publishform:list,form:get,form:submissionsautomation:list,automation:trigger,automation:enable,automation:disablechatbot:list,chatbot:conversationsphone:calls,phone:smspayment:list,payment:get,payment:refundreview:list,review:respondseo:snapshots,seo:keywords
4. Tokens — GET/POST/DELETE /api/agent/tokens
Create, list, and revoke agent tokens. Creation requires a workspace admin (not just an agent key — a human must create the first key).
# Create
curl -s -X POST https://www.nida-os.com/api/agent/tokens \
  -H "Authorization: Bearer <admin_session_token>" \
  -H "Content-Type: application/json" \
  -d '{
    "name": "Hermes morning digest",
    "scopes": ["leads:read", "leads:update"],
    "rate_limit": 60
  }'

# List
curl -s https://www.nida-os.com/api/agent/tokens \
  -H "Authorization: Bearer <admin_session_token>"

# Revoke
curl -s -X DELETE https://www.nida-os.com/api/agent/tokens/<token_id> \
  -H "Authorization: Bearer <admin_session_token>"
Status codes
| Code | Meaning |
|---|---|
200 OK | Successful request |
202 Accepted | Destructive action awaiting approval |
400 Bad Request | Missing/invalid module or action; unknown module; unsupported action |
401 Unauthorized | Missing token, invalid token, revoked/expired token |
403 Forbidden | Token scope doesn't allow this action |
429 Too Many Requests | Rate limit exceeded |
500 Internal Server Error | Unhandled exception (rare) |
MCP discovery (Model Context Protocol)
Nida's discovery endpoint is MCP-compatible, which means MCP-aware clients (Claude Desktop, Cursor, etc.) can list Nida tools natively. Point your MCP client at https://www.nida-os.com/api/well-known-mcp with the bearer token, and the tools appear in the client's tool picker.
Tips
- Always call
workspace-statefirst when initializing a new agent. It tells you what's there. - The
executeendpoint is the only one you need for almost everything. Discovery is for initial learning; state is for context; tokens are for management. - The MCP compatibility is a power feature. If you use Claude Desktop, point it at Nida's discovery URL and Nida becomes a tool Claude can call.
- Approvals for destructive actions are enforced at the API layer, not just the UI. Even an agent can't delete without approval.
- Rate-limit tracking is per-token, not per-IP. A single agent with 60 req/min is more accountable than an IP-shared key.
Pitfalls
- The
workspace_idis required in the body for most execute calls. Don't put it in a header. - Module names are singular —
lead, notleads.contact, notcontacts. - Unknown modules return
400, not a 200 with empty data. This is intentional — fail loud. - Token creation is admin-only. An agent cannot create another agent token. You must do it in the UI.
Related
- Chapter 19 — API Keys — for creating and managing keys
- Recipe 11 — External Agent Creates a Lead
- The full in-app reference at
/api-docs
Part 7 — Analytics, Payments, Settings
Chapter 21 — Analytics
**Purpose:**Purpose: the traffic and conversion dashboard. Connect Google Analytics 4, see live activity, traffic trends, top events, traffic sources, top pages.
What you'll need: a GA4 property and a connected site. See Tutorial 6B.
Walkthrough
The Analytics page (/analytics) has five regions:
Top — Google Connection
- Live site URL — the site Nida is tracking
- GA4 Property ID — your GA4 property
- Measurement ID (optional) — your GA4 measurement ID
- Connect Google button — OAuth flow
- Connection status card — shows "connected" or "not connected"
Middle — KPI Tiles (5)
- Page Views (last 30 days)
- Visitors
- Sessions
- Conversions
- Conversion Rate
Each tile has a thin progress bar in a brand color. The data refreshes when you click Refresh data in the top-right.
Live Activity ("LIVE NOW")
- Active Now (last 30 min) — users in the last 30 min
- Live Views (last 30 min) — page views in the last 30 min
- Top live pages — currently trending pages
- Top live events — currently firing events
Bottom — Reports (3 panels)
- Traffic Trend — page views, visitors, conversions over time
- Top Events — busiest GA4 events
- Traffic Sources — source/medium drivers
Bottom — Top Pages
A table of top pages with: URL, page views, unique visitors, conversions, conversion rate.
Time range filter
- Top-right dropdown:
7 days,30 days,90 days, custom range - Click Refresh data to manually pull
Tips
- GA4 data has a 24-48 hour delay. Don't expect same-day numbers after connecting.
- Live Activity is real-time — it shows users on your site right now.
- Conversion events must be set up in GA4 — Nida reads them, doesn't define them.
- Filter by source/medium to see how each channel performs (e.g.,
google/organicvsfacebook/cpc).
Pitfalls
- No GSC data here — that's in Chapter 13 — SEO Intelligence.
- GA4 free tier limits 10M events/month — heavy sites need GA4 360.
- Real-time data can be flaky during GA4 outages.
Related
- Tutorial 6B — GA4 Setup
- Chapter 13 — SEO Intelligence — for search performance
Chapter 22 — Payments
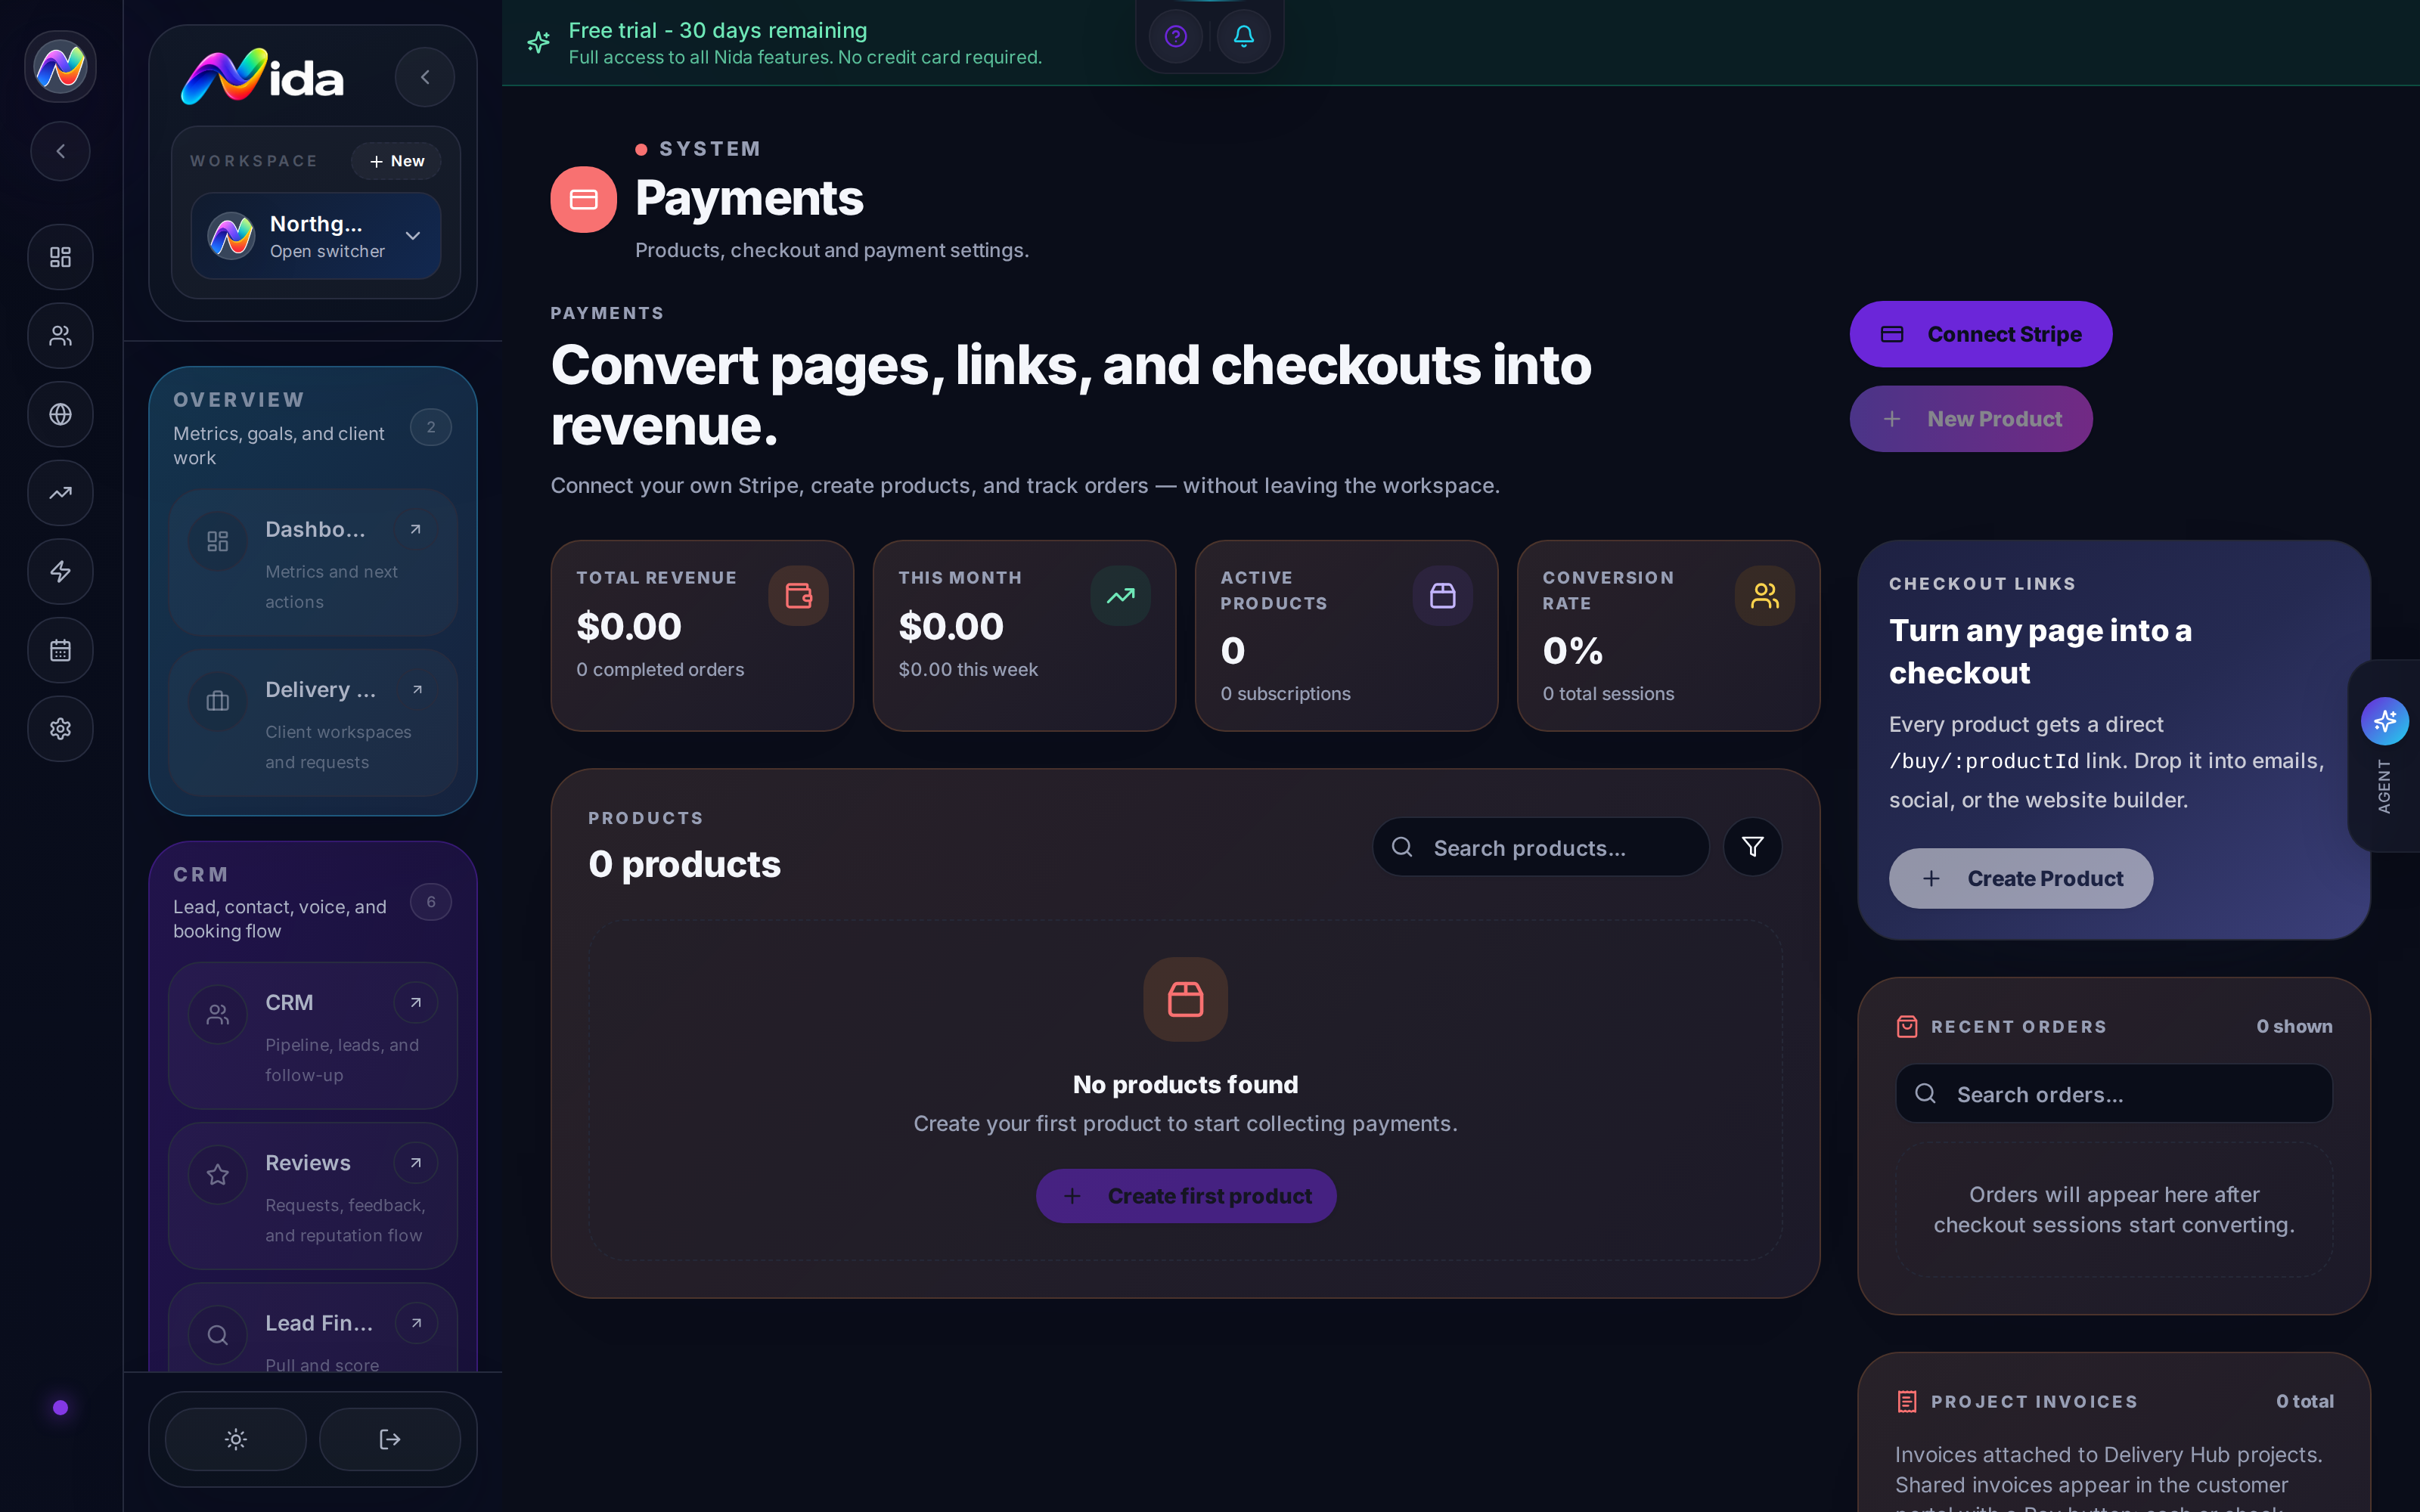
**Purpose:**Purpose: the commerce hub. Connect Stripe, create products, track orders, generate shareable checkout links, embed products in websites.
What you'll need: a Stripe account. See Tutorial 4.
Walkthrough
The Payments page (/payments) has five regions:
Top — Connect Stripe
- Status card — connected or "Not connected"
- Connect Stripe button (one-click OAuth)
- Connected account info (Stripe account email, account ID)
Middle — KPI Tiles (4)
- Total Revenue — all-time
- This Month — month-to-date
- Active Products
- Conversion Rate (checkout sessions → purchases)
Center — Products
A list of all products. Each row:
- Name
- Price
- Type (one-time or subscription)
- Status (Draft, Live, Archived)
- Sales count
- Revenue generated
Create a product:
- + New product in the top-right.
- Name — product display name
- Description (optional)
- Type —
One-time paymentorRecurring subscription - Price — amount + currency
- Recurring settings (if subscription): interval (monthly, yearly, weekly), trial days
- Stripe Price ID — auto-generated by Nida (or paste your own)
- Image — product image (optional)
- Internal notes (optional)
- Save as draft or Save and publish
Right — Recent Orders
A feed of recent orders. Each row:
- Customer (name + email)
- Product
- Amount
- Status (paid, refunded, failed)
- Date
Right — Checkout Links
- Each product gets a shareable URL:
https://app.nida-os.com/buy/<product_id> - The link is a Stripe Checkout page, branded with your Nida workspace's colors and logo.
- Drop the link in emails, SMS, chatbots, social bios, QR codes.
Bottom — Use in Builder
The "Use in Builder" card explains: drop a Product Grid block on any website to embed the products directly. The block renders as a clean product card layout with price and "Buy" button.
Tips
- Test mode is automatic. The Stripe OAuth flow starts in test mode. Make test purchases before going live.
- Recurring products are Stripe Subscriptions — Nida tracks them as subscriptions, with renewal, cancellation, and dunning events flowing through.
- One-time products are Stripe PaymentIntents — Nida tracks them as orders.
- Refund from inside Nida — open an order, click Refund, the refund goes through Stripe and the order status updates.
- Embed the checkout link in your chatbot. When a chatbot captures a lead, the bot can send the checkout link as a follow-up. See Recipe 6.
Pitfalls
- Nida does not take a fee on transactions. Stripe charges 2.9% + 30¢. That's it. Nida is free during open testing.
- Recurring products require Stripe Subscriptions to be enabled in your Stripe account. Most are by default; some restricted industries need approval.
- Refund policy is yours — Nida doesn't enforce one. Set your policy in Settings → Payments → Refund Policy.
- Failed payments are tracked but not auto-retried. Use an automation to send a "your payment failed" email and a retry link.
Related
- Tutorial 4 — Connect Stripe
- Chapter 9 — Websites — for the Product Grid block
- Chapter 14 — Reviews — for the post-payment review request
- Recipe 6 — Stripe → Onboarding
Chapter 23 — Billing & Subscription
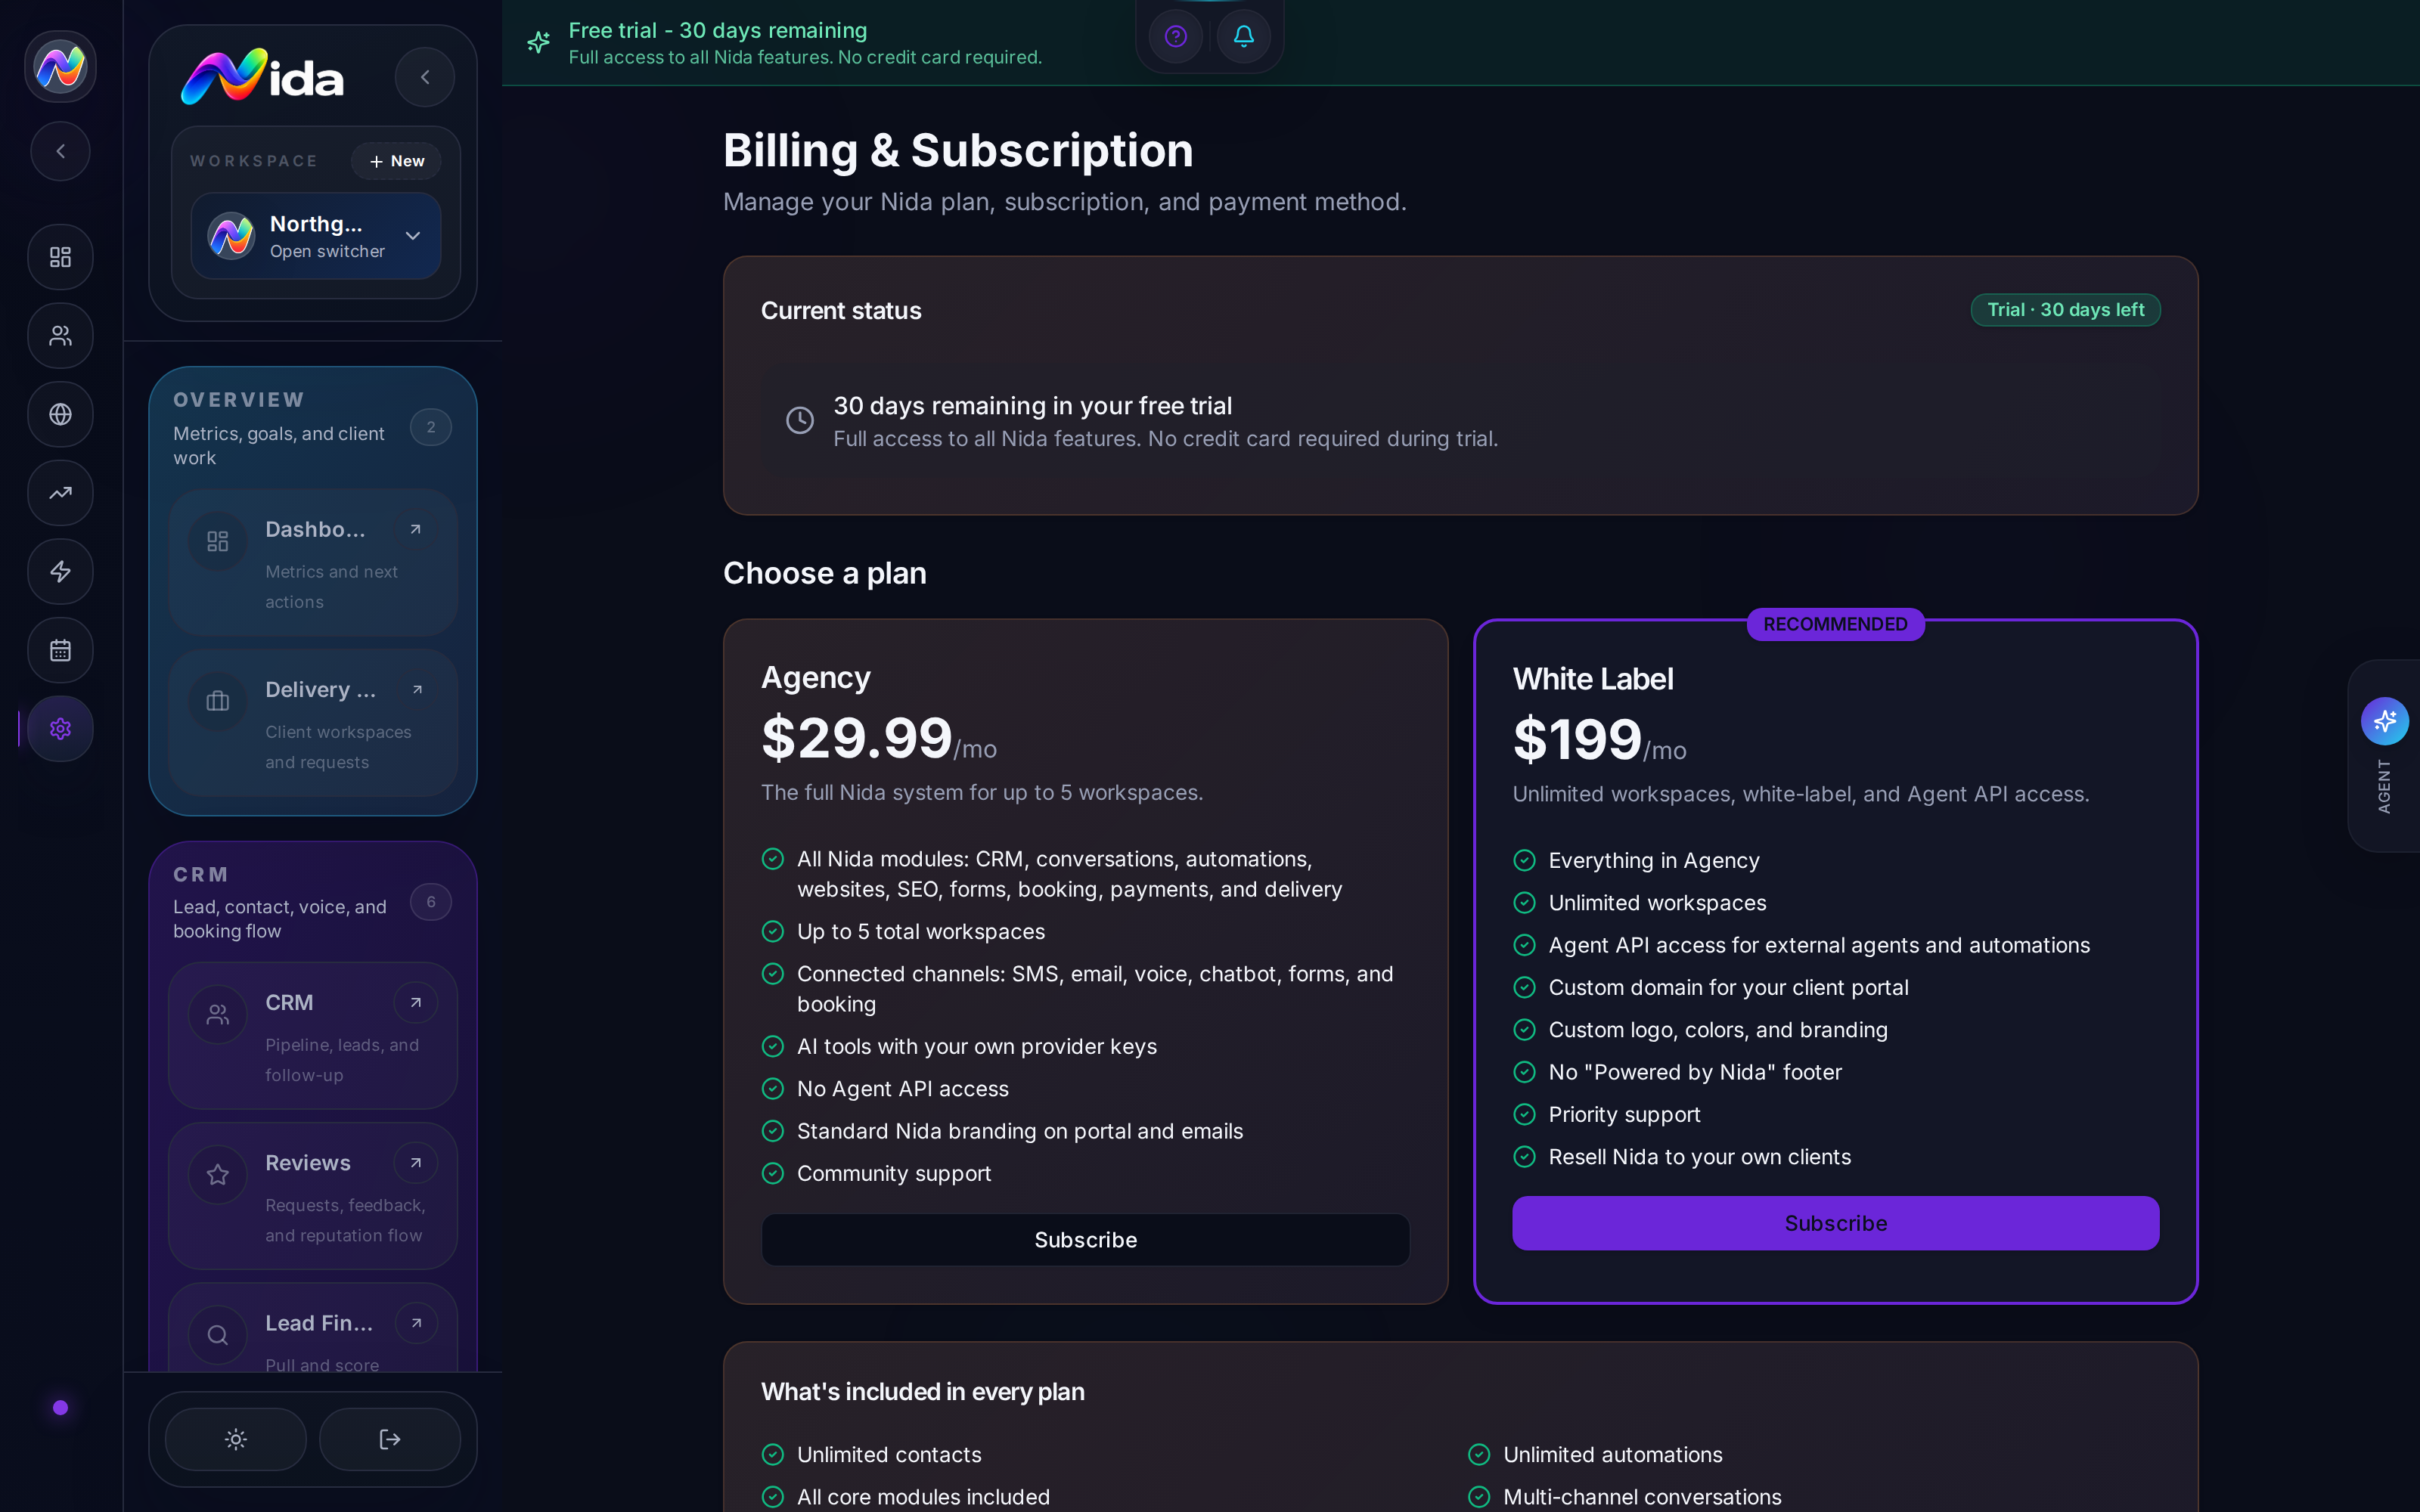
**Purpose:**Purpose: the billing page. Two plans: Agency ($99/mo) and White-Label ($299/mo). Free trial during open testing.
What you'll need: a payment method when you decide to subscribe.
Walkthrough
The Billing page (/settings/billing) has three regions:
Top — Trial Status
- A green banner with: "Free trial — N days remaining — Full access. No credit card required."
- A Current Status card with a green pill: "Trial · N days left"
Middle — Choose a Plan
Plan 1 — Agency — $99/mo
- Run your own business on Nida.
- All Nida features (CRM, conversations, automations, websites, SEO)
- Up to 10 connected channels (SMS, email, voice, chatbot, etc.)
- Standard Nida branding on portal and emails
- Community support
Plan 2 — White-Label — $299/mo — RECOMMENDED
- Resell Nida under your own brand.
- Everything in Agency
- Custom domain for the client portal
- Custom logo, colors, and branding
- No "Powered by Nida" footer
- Priority support
- Resell Nida to your own clients
Bottom — What's Included
A two-column box of features that come with every plan:
- Unlimited contacts
- Unlimited automations
- AI agent with 50+ actions
- Multi-channel conversations
- Built-in CRM
- Website builder with hosting
- SEO intelligence
- Forms and lead capture
Subscribe flow
- Click Subscribe on your chosen plan.
- Nida redirects to a Stripe Checkout (in your connected Stripe account — see Tutorial 4).
- Enter payment method. (For Agency: your personal/business card. For White-Label: usually a business card.)
- Confirm. The subscription is active.
- You return to the Billing page. The status card now shows your plan and next billing date.
Tips
- The trial is fully functional — every feature is available, no usage limits.
- No credit card required for the trial — but you'll need one to subscribe.
- The first 50 subscribers at V1 launch get a lifetime deal. If you want to lock in lifetime pricing, subscribe during the V1 launch window.
- White-Label is the better long-term play if you have any aspiration to resell. The custom domain alone is worth $200/mo.
- Downgrade at any time — your workspace remains active on the lower tier, but you lose the higher-tier features.
Pitfalls
- Subscriptions are non-refundable mid-cycle. You can downgrade and the change takes effect at the next billing date.
- The trial countdown is in 3 places (top banner, current status card, status pill) — it's hard to miss.
- There is no annual pricing toggle yet at the time of writing. Pricing is monthly. Annual pricing is on the roadmap.
- Taxes are not included in the displayed price. Stripe adds applicable sales tax / VAT at checkout.
Related
- Tutorial 4 — Connect Stripe
- Chapter 24 — Settings — for the data-removal request
Chapter 24 — Workspace Settings
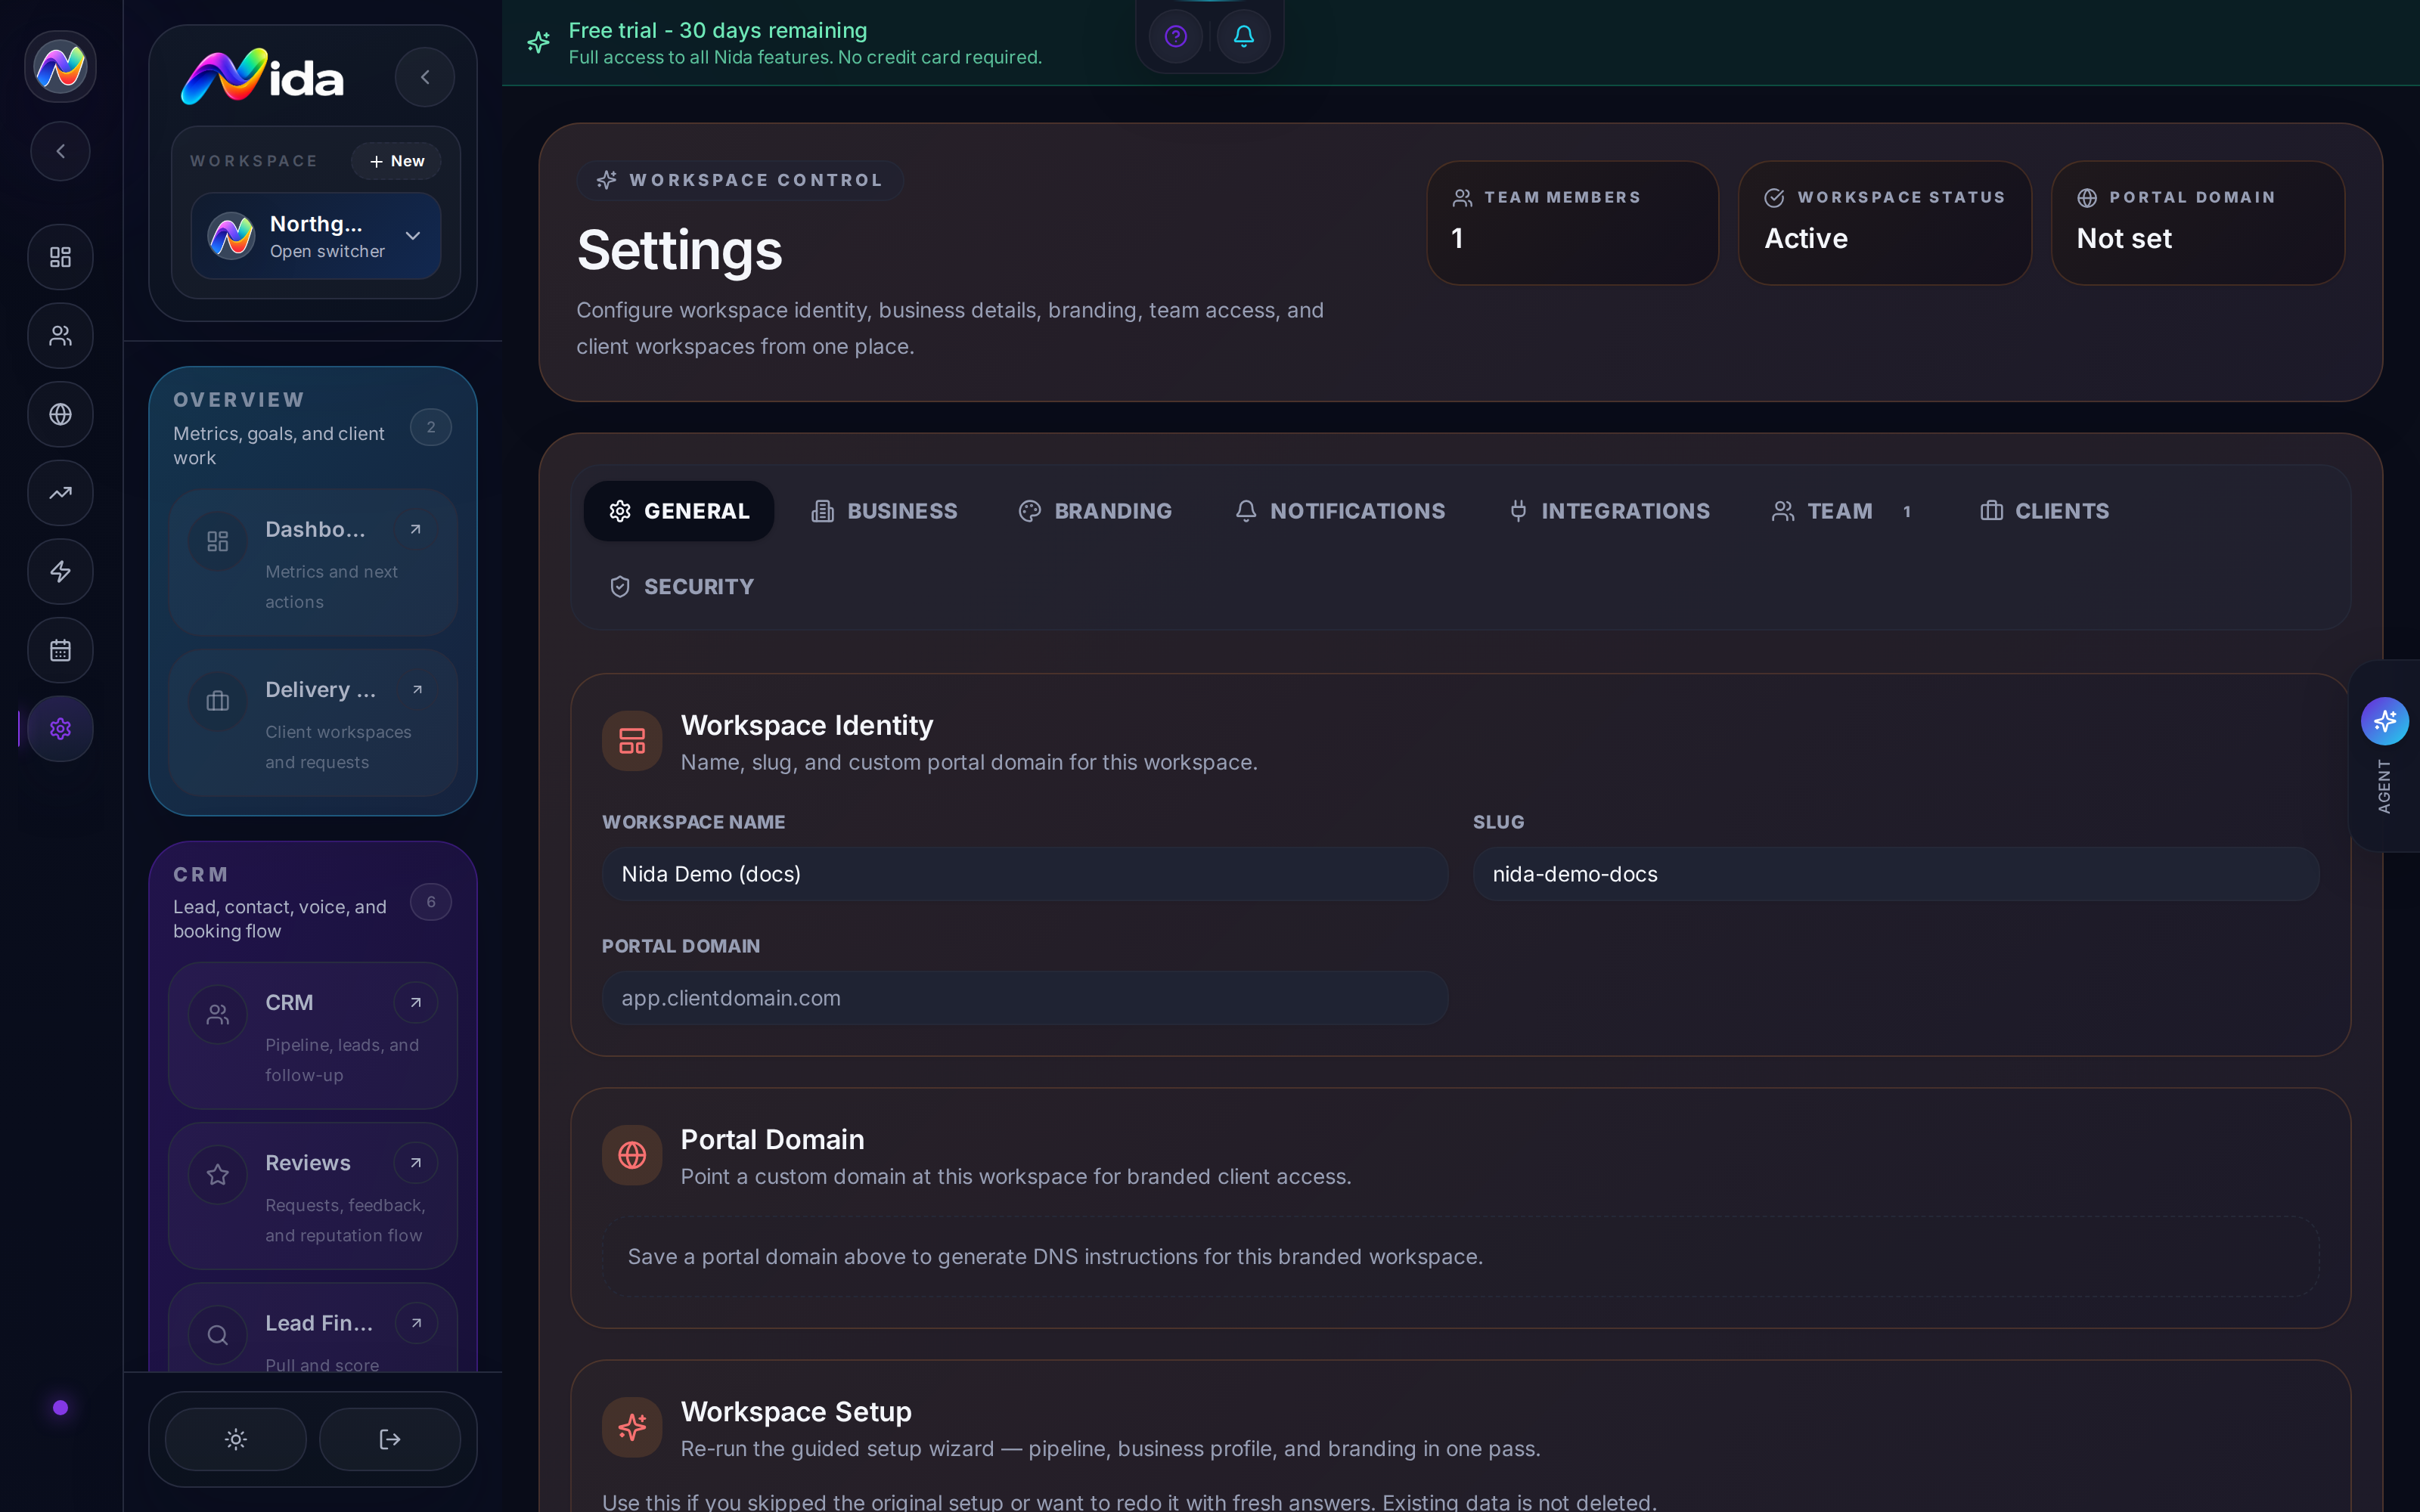
**Purpose:**Purpose: the workspace configuration. Workspace name, slug, portal domain, branding, email, team, client workspaces, and data removal.
What you'll need: admin access to the workspace.
Walkthrough
The Settings page (/settings) has six tabs:
Tab 1 — General
- Workspace Name — the display name
- Slug — URL-safe identifier
- Portal Domain — custom domain for the client portal (e.g.,
app.clientdomain.com) - Data Removal — request removal of your profile and personal data
- Workspace Portal Domain — instructions to point a custom domain at the workspace
Tab 2 — Business Info
- Phone — primary business phone
- Email — primary business email
- Address — street, city, state, zip
- Industry — service type (used for AI ICP scoring)
- Logo — workspace logo
- Time Zone
- Currency (default for products)
- Working Hours — for calendar booking
Tab 3 — Branding
- Primary Brand Color — hex code, used for buttons and accents
- Logo — uploaded image
- Portal Background — light/dark/custom
- Email Signature — appended to all transactional emails
- Portal Footer Text — shown in the client portal footer
- Hide Nida Branding (White-Label only) — removes the "Powered by Nida" footer
Tab 4 — Email
- Sender Name — e.g., "Acme Roofing"
- Sender Email — e.g.,
hello@acmeroofing.com - Reply-To — e.g.,
support@acmeroofing.com - Connected Domains — verified sending domains (DKIM/SPF)
- Email Templates — quick edits to: Welcome, Payment receipt, Booking confirmation, Review request, Subscription renewal
Tab 5 — Team
- List of members — name, email, role, status, last active
- + Invite member — send a new invite
- Roles: Owner, Admin, Member, Viewer
- Pending invites — list of unaccepted invites
- Activity log — recent actions by team members
Tab 6 — Client Workspaces
- List of client workspaces — separate workspaces for each client (White-Label customers)
- + Create client workspace — provision a new one
- Each client workspace has its own team, branding, and modules
Data removal
The General tab has a Request data removal button. Click it to:
- Submit a request to remove your profile and personal data
- Nida processes the request within 30 days
- Active subscriptions are cancelled
- Workspace data is anonymized (not deleted, for legal/financial record retention)
Tips
- Set the brand color before adding modules — many modules inherit the color (chatbot bubble, button styles, etc.). Setting it first avoids rework.
- The slug cannot be changed after creation. Pick a slug you can live with. If you need to change it, contact support.
- The portal domain can be changed any time. The old domain stops working immediately, the new one starts working after DNS propagation.
- Email templates are workspace-wide. Customize once, applies to all transactional emails.
Pitfalls
- Workspace name and slug are not the same. Name is display-only; slug is in the URL. Don't put a "/" or special characters in the slug.
- Deleting a workspace is irreversible. Nida has no "undo." Download a backup first (Settings → Export).
- Data removal is not immediate. It's a 30-day process.
- Client workspaces are separate — they have their own billing, team, and data. Don't confuse them with the agency workspace.
Related
- Tutorial 7 — Branding
- Tutorial 8 — Team
- Chapter 2 — Delivery Hub — for client workspaces
Part 8 — The "Tie Together" Recipes (end-to-end flows)
These are the recipes that make Nida feel like one system. Each one shows the trigger, the path through the modules, the expected outcomes, and the failure modes. They're how the v3 architecture was designed to be used.
Recipe 1 — Capture a Lead from a Website Chatbot and Push to CRM
Goal: A visitor lands on your website, chats with the AI chatbot, the bot qualifies them, the bot captures their email, the lead appears in your CRM pipeline.
Modules used: Chatbot, CRM, Lead Finder (optional enrichment), AI Settings
What you need:
- A website published in Chapter 9 — Websites
- A chatbot configured in Chapter 10 — Chatbots with lead capture ON
- CRM pipeline with at least a "New" stage (Chapter 3 — CRM Pipeline)
The flow:
- Visitor lands on your website. The chatbot script tag loads the bubble in the bottom-right corner.
- Visitor clicks the bubble. Greeting message appears: "Hi! I'm the Acme Sales Assistant. How can I help?"
- Visitor types a question. Chatbot uses the knowledge base + AI to respond. No CRM action yet.
- After 3-5 exchanges, the chatbot (because lead capture is ON) asks: "Want me to send you a follow-up email? What's your name and email?"
- Visitor provides name and email. Chatbot stores them in the conversation context.
- On conversation close (the visitor says "thanks" or closes the tab), the chatbot fires a webhook:
POST /api/agent/executewithmodule=lead, action=create. The webhook body includes the visitor's name, email, and the conversation transcript. - Nida creates a lead in the CRM with
source = chatbot,stage = New, and a tag likechatbot-engaged. - The conversation transcript is attached to the lead's activity timeline.
- An automation fires (this is the "tie together" part — see below) to send a welcome email and notify the sales team.
The tie-together automation:
- Trigger:
Lead created(filter:source = chatbot) - Action 1:
Wait 0 minutes(immediate) - Action 2:
Send email— template: "Welcome to Acme — here's what to expect" with merge tags[lead.first_name],[workspace.name] - Action 3:
Create task— "Follow up with [lead.first_name] from chatbot" assigned to the sales team, due in 1 hour - Action 4:
Send internal notification— to the workspace's bell icon
Variations:
- Score the lead with AI. Add an AI Conductor action: "If the visitor's questions suggest they're a high-value prospect, move stage to Qualified."
- Enrich with Lead Finder data. If the lead mentions a company, fire a Lead Finder lookup to add company info.
- Multi-language. Detect language from the conversation; route to a language-specific bot.
Failure modes:
- Chatbot doesn't capture email if the visitor never says "yes" to the offer. Solution: shorten the offer ("Quick question — what's your email so I can send you the guide?").
- Lead is created but not assigned. Default owner is the workspace owner. To assign by region/team, use the AI Conductor to decide.
- Email is sent but bounces. Verify the email format in the chatbot; check the SMTP setup in Settings → Email.
Expected outcome: within 60 seconds of the visitor's last chat message, a lead is in CRM, an email is sent, and a task is created.
Recipe 2 — Missed Call Text-Back Automation
Goal: A prospect calls your business number. You miss the call. They get a friendly text within 30 seconds, and you get a follow-up task. They become a lead instead of a missed opportunity.
Modules used: Phone, Conversations (SMS), Automations, CRM, AI Settings
What you need:
- Twilio connected and a phone number live (Tutorial 5)
- CRM with a "New" stage
- A SMS template saved
The flow:
- Prospect calls your Twilio number. The call rings to your browser via WebRTC. If no one answers within 25 seconds, the call goes to voicemail.
- Twilio fires a webhook to Nida:
call.completed, status=no-answer. - Nida logs the call in the Phone module's Recent Call Activity as
outcome = No Answer. - An automation fires on
Phone call missed:- Action 1:
Wait 30 seconds(give them a moment) - Action 2:
Send SMSto the caller's number — template: "Hi! Sorry we missed your call. How can we help? Reply here or book a time: [booking_link]" - Action 3:
Create or update lead— if the caller number matches an existing lead, attach the call to that lead; if not, create a new lead withsource = missed_call_textback - Action 4:
Create task— "Follow up on missed call from [caller_name]" assigned to the sales team
- Action 1:
- Prospect receives the SMS. They can reply. The reply comes into Conversations → Texts.
- AI Conductor evaluates the reply: "Is this a sales inquiry or a support question?" Routes accordingly.
The tie-together automation:
- Trigger:
Phone call missed(filter: outcome =no-answerorvoicemail) - Action 1:
Wait 30 seconds - Action 2:
Send SMSwith merge tag[caller_name] = "there"(if no name) and the booking link - Action 3:
Create or update lead(idempotent — checks for existing lead by phone) - Action 4:
Create task"Follow up missed call" - Action 5:
AI Conductor— "Read the prospect's SMS reply. If they want to book, send a booking link. If they have a question, answer it. If they're spam, mark as not-a-lead."
Variations:
- Personalize with caller name. If the caller ID matches a contact name, use
[lead.first_name]in the SMS. - Send to voicemail AND text. If the caller leaves a voicemail, transcribe it and include a snippet: "Got your voicemail about [topic] — here's a link to book."
- Only during business hours. Trigger condition:
Time is between 9am-5pm. Outside hours, don't text.
Failure modes:
- TCPA / regulatory issues. In the US, you need prior express written consent to send marketing texts. Make sure the caller is an existing customer or has opted in. Use a different message for cold-callers.
- Number is disconnected. If the caller number is fake, the SMS fails silently. Nida logs the failure.
- Caller is in the DNC list. Nida doesn't enforce DNC by default. You should.
Expected outcome: 90% of missed calls become text conversations; 30% become booked appointments; 15% become customers.
Recipe 3 — Form Submission → CRM → Email Follow-Up
Goal: A prospect fills out your "Contact Us" form. Within 60 seconds, they're in your CRM with a welcome email sent and a task created for your team.
Modules used: Forms, CRM, Automations, Conversations (Email), AI Settings
What you need:
- A form configured (Chapter 11 — Forms)
- The form embedded on a website
- CRM with a "New" stage
- An email template saved
The flow:
- Visitor lands on your website, scrolls to the "Contact Us" form.
- Visitor fills out the form (name, email, phone, message) and clicks Submit.
- Nida validates the submission (required fields, format checks).
- Nida fires a webhook to the configured destination (CRM, email, or both).
- Lead is created in CRM with
source = form,stage = New. All form fields are mapped to lead fields and custom fields. - The visitor sees the thank-you page (or stays on the form with a success message).
- The visitor gets the auto-response email ("Thanks! We'll be in touch within 24 hours.").
- An automation fires on
Form submitted:- Action 1:
Send emailto the lead with a personal touch ("Hi [first_name], got your message about [topic]...") - Action 2:
Create task"Respond to [first_name]'s form submission" due in 1 hour - Action 3:
AI Conductor— "Categorize this submission: sales, support, or spam. If sales, move stage to Qualified. If support, assign to support team. If spam, mark as not-a-lead."
- Action 1:
The tie-together automation:
- Trigger:
Form submitted(pick your specific form) - Action 1:
Send email(immediate auto-response, already sent by the form, but you can send a SECOND more personal one here) - Action 2:
Create task"Follow up" - Action 3:
Wait 1 hour - Action 4:
Check condition— has the lead been contacted? (open the lead and check the activity timeline) - Action 5 (if not contacted):
Send SMSto the lead "Hi [first_name], got your form — any questions I can answer right now?"
Variations:
- Multi-step form with progressive profiling. Ask for name+email on step 1, then phone on step 2 if they continue. The progressive data is stored on the lead.
- Conditional routing. If the message contains "pricing", assign to sales. If it contains "support", assign to support. If it contains "press", assign to PR.
- Calendar booking link in the auto-response. "Want to skip the email back-and-forth? Book a 15-min call here: [link]"
Failure modes:
- Spam submissions. Add a hidden honeypot field. Add a CAPTCHA. Use the AI Conductor to detect spam patterns and auto-reject.
- Email is in the DNC list. Nida doesn't enforce DNC. Filter manually.
- The visitor gave a fake email. Verify with a verification email. If the verification bounces, mark the lead as "unreachable."
Expected outcome: 100% of form submissions are in CRM with full data, an email sent, a task created, and a category assigned.
Recipe 4 — Booking → Calendar → Reminder SMS → Review Request
Goal: A prospect books a call via your booking link. They get a confirmation, a reminder, they show up, and after the call they get a review request.
Modules used: Calendar, Automations, Conversations (SMS), Phone, Reviews
What you need:
- A booking link configured (Chapter 7 — Calendar Engine)
- Twilio for SMS
- A Google Business Profile connected (Chapter 14 — Reviews)
The flow:
- Prospect visits your booking link (shared via email, chatbot, SMS, or website).
- Prospect picks a time slot (only available times shown).
- Prospect fills out pre-booking questions (name, email, phone, "what do you want to discuss?").
- Prospect confirms. Nida creates the booking, sends confirmation email, and pushes to the assigned person's Google Calendar.
- 24 hours before the call (T-24h), an automation fires:
- Action:
Send SMS— "Reminder: your call with [name] is tomorrow at [time]. Reply CANCEL to reschedule."
- Action:
- 1 hour before the call (T-1h), an automation fires:
- Action:
Send SMS— "Your call is in 1 hour. Joining link: [link]"
- Action:
- The call happens (or doesn't).
- If they show up: the booking is marked
attended. An automation fires:- Action 1:
Wait 1 day(give them time to reflect) - Action 2:
Send email— "Thanks for the call! Here's the next step. [link]" - Action 3:
Wait 3 days - Action 4:
Send review request— "Enjoyed working with us? Leave a quick review: [link]"
- Action 1:
- If they no-show: the booking is marked
no-show. An automation fires:- Action:
Send SMS— "Sorry we missed you! Want to reschedule? [link]"
- Action:
The tie-together automation (post-attendance drip):
- Trigger:
Booking attended - Action 1:
Wait 1 day - Action 2:
Send email"Thanks + next step" - Action 3:
Wait 3 days - Action 4:
Send review request(via email or SMS) - Action 5:
Wait 7 days - Action 6:
Move lead stageto "Proposal" or "Won" based on the call notes
Variations:
- Different reminders per booking type. A 60-min consultation gets 3 reminders; a 15-min intro call gets 1.
- Reschedule flow. If the prospect replies CANCEL to a reminder, send them a self-serve reschedule link.
- No-show fee. If the booking required a deposit and they no-show, charge the deposit (Stripe integration).
Failure modes:
- Reminder is sent at the wrong time because of time zones. Use the prospect's time zone (collected at booking), not yours.
- The call doesn't happen (calendars don't match). Google Calendar sync catches this — if the booking is removed from Google, the automation can detect and cancel.
- They reply to the reminder with a question. Nida catches the reply in Conversations → Texts; the AI Conductor can answer or escalate.
Expected outcome: 80% show-up rate (vs 60% without reminders); 15% leave a review after the call.
Recipe 5 — Lead Finder → CRM → Auto-Dialer → Booking
Goal: Find 50 HVAC contractors in Austin, score them with AI, push to CRM, auto-dial the top 10, and book a discovery call with whoever picks up.
Modules used: Lead Finder, CRM, Phone, Calendar, Automations, AI Settings
What you need:
- Google Places API key
- AI provider for lead scoring
- Twilio for auto-dialer
- A booking link
The flow:
- Run a Lead Finder search: category = "HVAC contractor", location = "Austin, TX", radius = 25 miles, max results = 50.
- Filter: min rating 4.0, min reviews 10, has website.
- Score with AI. The model returns Need/Fit/Priority for each.
- Sort by Priority desc. Pick the top 10.
- Import to CRM with
stage = New,source = lead_finder,owner = <sales rep>. - For each lead, fire an automation:
- Action 1:
Wait 0 minutes(immediate) - Action 2:
Make a call— auto-dial the lead. If voicemail, leave a pre-recorded message. If answered, connect to a sales rep. - Action 3 (if call connected):
Send SMSto the lead "Hi [name], this is [rep] from Acme. Just spoke — here's a link to book: [booking link]"
- Action 1:
- If they book: standard booking flow (Recipe 4)
- If they don't answer: add to a re-dial list, try again in 3 days.
The tie-together automation:
- Trigger:
Lead created(filter:source = lead_finder,priority >= 70) - Action 1:
Wait 5 minutes(let the import settle) - Action 2:
Make a call— auto-dial - Action 3:
Wait 1 day - Action 4:
Check condition— has the lead been contacted? (no call log entry) - Action 5 (if not contacted):
Send SMS— "Hi [name], tried calling about HVAC lead-gen for [company]. Quick chat? [link]" - Action 6:
Wait 3 days - Action 7 (if still not contacted):
Send email— "Following up..."
Variations:
- Power dialer mode. Auto-dial the next lead as soon as the previous call ends. (Nida's phone module supports this — see Chapter 6 — Phone.)
- A/B test the call script. Use the AI Conductor to generate 2 different opening lines; track which converts better.
- Enrich with Clearbit before scoring (outside Nida, via webhook).
Failure modes:
- TCPA / DNC violations. You must have consent to call. Cold calling with auto-dialer is heavily regulated in the US. Use this recipe only for opted-in lists or warm prospects.
- Wrong numbers. Lead Finder data isn't always current. Expect 10-20% wrong numbers.
- Voicemail every time. Most calls go to voicemail. The voicemail message matters. Test it.
Expected outcome: 10% answer rate, 30% of those book a call, 50% of those become customers. (Industry averages.)
Recipe 6 — Stripe Payment → Onboarding → Delivery Hub Portal
Goal: A customer pays for your service. They're immediately added to your onboarding portal, get a welcome sequence, and the Delivery Hub tracks their progress.
Modules used: Payments, Delivery Hub, Automations, Conversations (Email), CRM
What you need:
- A Stripe product configured (Chapter 22 — Payments)
- A Delivery Hub onboarding portal template (Chapter 2 — Delivery Hub)
- An email welcome sequence
The flow:
- Customer hits the checkout link (
/buy/<product_id>). - Stripe Checkout opens, branded with your workspace.
- Customer enters payment details and pays.
- Stripe fires
charge.succeededwebhook to Nida. - Nida creates the order in the Payments module.
- Nida fires an automation:
- Trigger:
Payment succeeded(filter: product = "Strategy Session") - Action 1:
Create or update contact(idempotent on email) - Action 2: `Create onboarding portal** in Delivery Hub, link to the contact
- Action 3:
Send email"Welcome to Acme — here's your portal link: [link]" - Action 4:
Wait 1 day - Action 5:
Send email"Step 1: complete your business profile" - Action 6:
Wait 3 days(check if business profile is done) - Action 7:
Check condition— is the profile complete? - Action 8 (if not):
Send email"Need help? Reply here." - Action 9 (if yes):
Send email"Great! Step 2: schedule your kickoff call. [booking link]"
- Trigger:
- The customer logs in to the portal via the welcome email link.
- The customer completes onboarding tasks. The readiness meter updates in real time.
- Your team sees the readiness meter in the Delivery Hub. If a customer is stalled (readiness < 30% after week 1), Autopilot flags it.
The tie-together automation:
- Trigger:
Payment succeeded - Action 1:
Create contact(if not exists) - Action 2:
Create onboarding portal(linked to the contact) - Action 3:
Send welcome emailwith portal link - Action 4:
Move contact to onboarding pipeline - Action 5:
Notify team(bell icon) - Action 6:
Wait 7 days - Action 7:
Check readiness— is onboarding 50%+ complete? - Action 8 (if no):
Trigger Autopilot goal"Re-engage stalled onboarding"
Variations:
- Recurring subscription. Use
Subscription createdinstead ofPayment succeeded. Add dunning emails for failed payments. - Multiple products, multiple portals. Filter by product to send different welcome sequences.
- Pre-fill the portal. If the customer provided data at checkout (name, email, phone), pre-populate the portal's first task.
Failure modes:
- Customer doesn't open the welcome email. Send a follow-up SMS.
- Customer doesn't log in to the portal. Add a "magic link" to the email that auto-logs them in.
- Stripe webhook is delayed. Rare, but possible. Nida retries. Check the automation run log if the portal isn't created.
- Failed payment. If the customer's card fails, the automation doesn't fire. Add a separate
Payment failedautomation for dunning.
Expected outcome: 80% of paying customers complete onboarding within 14 days; 95% within 30 days.
Recipe 7 — Weekly SEO Snapshot → AI Summary → Client Portal
Goal: Every Monday morning, every client workspace gets a fresh SEO summary pushed to their Delivery Hub portal.
Modules used: SEO Intelligence, AI Settings, Delivery Hub, Automations, Conversations (Email)
What you need:
- Each client has Google Search Console connected (Tutorial 6A)
- Each client has a Delivery Hub portal
- An automation per client workspace
The flow:
- Monday 6am — schedule trigger fires in each client workspace.
- Nida pulls fresh SEO data from Search Console (last 7 days vs prior 7 days).
- Nida's AI reads the data and generates a client-facing summary: "Your site had 1,240 impressions this week (up 12% from last week). Your top opportunity is the 'roofing services' page, ranking at position 14. Better title and a few backlinks could push it to page 1."
- Nida writes the summary to the Delivery Hub portal as a new content block on the "Weekly Snapshot" page.
- Nida emails the client with a link: "Your weekly SEO snapshot is ready: [link]"
- Client logs in, reads the summary, sees the data and the recommendations.
The tie-together automation:
- Trigger:
Schedule— every Monday 6am - Action 1:
Fetch SEO data(Nida's internal action — calls Search Console) - Action 2:
AI Conductor— "Read this SEO data and write a 1-page client-facing summary in plain English. Highlight wins, losses, and 2-3 opportunities." - Action 3:
Push to portal— add a new content block to the "Weekly Snapshot" page - Action 4:
Send emailto the client - Action 5:
Notify teamif impressions dropped > 20% week-over-week
Variations:
- Daily snapshots for high-touch clients. Same flow, daily trigger.
- Multi-source summary. Include Google Analytics data, review data, lead data in the summary.
- Auto-implement recommendations. For low-risk changes (meta description updates, alt text), use the AI Conductor to implement directly and ask for approval.
Failure modes:
- Search Console rate limit. Pulling daily is fine; pulling multiple times per hour can hit limits.
- AI generates a misleading summary. Always have a human review the first few weeks. Tune the AI prompt.
- Client doesn't read it. Add a "comment" feature on the snapshot so clients can reply with questions. The reply creates a task for the team.
Expected outcome: Clients log in weekly to read the snapshot; agency team gets 2 hours back per client per week (no manual report writing).
Recipe 8 — Autopilot "Re-engage Cold Leads" Goal
Goal: Identify leads that haven't been contacted in 30/60/90 days, draft a re-engagement email, and propose it for approval. (Suggest-only mode by default.)
Modules used: Autopilot, AI Settings, CRM, Conversations (Email)
What you need:
- A workspace with at least 50 leads
- Autopilot enabled with the Conductor model configured
The flow:
- Autopilot goal is enabled: "Re-engage cold leads — find leads with no activity in 30+ days and draft a re-engagement email."
- Autopilot runs every hour (configurable).
- The Conductor reads the workspace state and queries the CRM for leads where
last_activity_at < now() - 30 days. - For each cold lead, the Conductor:
- Reads the lead's history (last conversation, what they were interested in, why they went cold)
- Drafts a personalized re-engagement email
- Adds the proposal to the Proposed Actions tab
- You review the proposals. You see a queue: "Lead X — drafted 'Hi [name], it's been a while. Still interested in [topic]?'" Click Approve to send, Reject to discard, Edit to modify.
- Approved emails are sent. Nida logs the activity on the lead's timeline.
The tie-together Autopilot goal:
- Goal: "Re-engage cold leads"
- Description: "Find leads with no activity in 30+ days. Read their history. Draft a personalized re-engagement email. Propose for approval. Do not send without approval."
- Cadence: Hourly
- Mode: Suggest-only
- Allowed actions: Send email (with approval)
Variations:
- Multiple thresholds. Run two goals: 30-day and 90-day. The 30-day uses a friendly check-in. The 90-day uses a stronger "still interested?" question.
- Multi-channel re-engagement. If the email isn't opened in 3 days, propose a SMS follow-up. If the SMS isn't replied, propose a call.
- A/B test the email. Use the Conductor to generate 2 versions, split the cohort 50/50, track which converts better.
Failure modes:
- Autopilot proposes bad emails. Reject them. The Conductor learns from rejections (within session) — refine the goal description.
- Sends too many emails. Lower the cadence. Or set a daily cap on Autopilot proposals.
- Ignores opt-outs. Nida doesn't enforce email unsubscribes automatically. Check the unsubscribe status before sending.
Expected outcome: 5-10% of cold leads re-engage per quarter.
Recipe 9 — Multi-Model AI: Cheap Model for Content, Smart Model for Chatbot
Goal: Optimize AI costs by using the right model for each task. Save 60%+ on AI spend without sacrificing customer experience.
Modules used: AI Settings, Chatbots, SEO Blog Studio, Content generation across modules
What you need:
- Multiple AI providers connected (OpenRouter is easiest)
- 10 minutes to set up routing
The model assignments:
| Task | Recommended model | Reasoning |
|---|---|---|
| Content (blog posts) | gpt-5-nano or claude-haiku-4-5 or gemini-2.5-flash | High volume, mid quality OK. ~10x cheaper than top-tier. |
| Chatbot | gpt-5.2 or claude-sonnet-4-6 or gemini-3-pro | Customer-facing, needs to reason well. |
| Metadata (SEO) | gpt-5-nano or claude-haiku-4-5 | Short structured output, doesn't need top-tier. |
| Website copy | gpt-5.2 or claude-sonnet-4-6 | Section content needs structural reasoning — never a small model. |
| Logo | flux-1-schnell (Cloudflare) or nano_banana (Higgsfield) | Image generation, requires image-capable model. |
| Lead Scoring | gpt-5-nano or claude-haiku-4-5 | Structured output, reasoning not critical. |
| Automation (Conductor) | gpt-5.2 or claude-sonnet-4-6 or gemini-3-pro | Reasoning over workspace state. Top-tier matters. |
How to set it up:
- Open AI Settings (Chapter 17).
- For each of the 13 task slots, click the OPEN button and pick the model.
- Set fallbacks: e.g., Content primary =
gpt-5-nano, fallback =claude-haiku-4-5. If OpenAI is rate-limited, Nida falls back to Anthropic. - Save. Routing takes effect immediately.
The cost math:
Say you produce 100 blog posts/month, each 2,000 tokens, with 5,000 tokens of input. With gpt-5.2 at $1.75/M input + $14/M output:
- Input: 100 × 5,000 = 500K tokens = $0.88
- Output: 100 × 2,000 = 200K tokens = $2.80
- Total: $3.68/month
With gpt-5-nano at $0.05/M input + $0.40/M output:
- Input: $0.03
- Output: $0.08
- Total: $0.11/month
Savings: 97% on content.
Now the chatbot. 1,000 conversations/month, 500 tokens input, 300 tokens output per turn, 5 turns avg. With gpt-5.2:
- Input: 1,000 × 5 × 500 = 2.5M tokens = $4.38
- Output: 1,000 × 5 × 300 = 1.5M tokens = $21.00
- Total: $25.38/month
With gpt-5-nano:
- Total: $0.73/month — but the chatbot sounds dumber.
That's why you don't downgrade the chatbot. The customer experience matters.
Important — Website generation is the exception. Do not apply the cheap-model rule to Website copy or generation. Small models (including gpt-4o and the nano tiers) produce broken section layouts — malformed HTML, mismatched styling, missing blocks. Routing Website generation to a top-tier model costs more per build but ships a site that actually works. This is the one task where "cheap" is a false economy.
Variations:
- Use Ollama for non-customer-facing tasks. Local models = free. Run Content, Metadata, Website, and Lead Scoring on Ollama. Save 100% on those.
- Use a different provider per task. OpenAI for Chatbot, Anthropic for Conductor, Gemini for Metadata. Diversify.
- Self-host Conductor. Use Ollama with a strong local model (llama-3-70b, qwen-72b) for the Conductor. Free, but you need a GPU.
Failure modes:
- The fallback doesn't work because the secondary model doesn't support the same features. Test the fallback.
- Cost savings don't materialize because the model is rate-limited and the fallback is expensive. Set up multiple fallbacks.
- Quality drops on Content. If blog posts sound worse on the cheap model, the cost savings aren't worth it. Use a mid-tier model.
Expected outcome: 60-90% reduction in AI costs with no measurable drop in customer experience.
Recipe 10 — White-Label Agency: Onboard a New Client Workspace
Goal: A new client signs with your agency. Within 30 minutes, they have a fully branded client workspace, a portal to log into, and a checklist of what they need to provide.
Modules used: Workspace switching, Delivery Hub, Branding, Team, Client Workspaces
What you need:
- White-Label tier
- A client workspace template (built once, reused)
- An onboarding portal template (built once, reused)
The flow:
- Client signs your contract (offline or via your own checkout).
- In your agency workspace, go to Settings → Client Workspaces.
- + Create client workspace. Name it (e.g., "Acme Landscaping Client").
- Pick the template. Your pre-built client workspace template includes:
- Default CRM stages
- Default automation recipes
- Default chatbot persona
- Default forms
- Default email signatures
- Nida provisions the workspace in ~30 seconds.
- Apply the white-label branding: go to Branding in the client workspace, upload logo, set brand color, set portal domain (
app.clientdomain.com). - Set up the onboarding portal: in Delivery Hub → + New client portal → Onboarding template, assign to the client.
- Invite the client to the workspace: in Settings → Team, add the client as a Member.
- Client receives an email with a sign-in link. They log in, see their branded portal, see the onboarding tasks.
- As they complete tasks, the readiness meter updates. You see the same in your agency view.
The reusable templates:
Build these once:
- Client workspace template (CRM stages, automations, etc.)
- Onboarding portal template (6 default tasks)
- Delivery portal template (5 default tasks)
- Email templates (welcome, payment receipt, etc.)
Every new client uses the same templates. Customization per client happens AFTER they're onboarded, not during.
Variations:
- Bulk import. If you have 10 new clients at once, use the API to create 10 client workspaces in parallel.
- Self-serve portal. Build a Stripe product that, on purchase, auto-creates a client workspace via automation. See Recipe 6.
- Multi-brand agency. If you run multiple brands, use different workspace templates per brand.
Failure modes:
- DNS doesn't propagate. The custom portal domain takes 5-60 minutes. Plan for this.
- Client doesn't log in. Send a follow-up SMS or call.
- Workspace has too much default content. Strip the template to essentials; let the client customize.
Expected outcome: New client fully onboarded in 1 hour (vs 1-2 days manually).
Recipe 11 — External Agent (Codex/Claude/Hermes) Creates a Lead
Goal: A autonomous agent (running on your machine or in the cloud) uses the Nida Agent API to create a lead, then trigger an automation on it.
Modules used: Agent API, CRM, Automations
What you need:
- An Agent API key with
leads:writescope (Chapter 19 — API Keys) - A workspace_id
The flow:
Agent (running in your terminal or IDE) initializes by calling:
bashcurl -s https://www.nida-os.com/api/agent/workspace-state \ -H "Authorization: Bearer nid_agent_..."This returns the workspace context: workspace_id, lead counts, active channels.
Agent decides to create a lead. It calls:
bashcurl -s https://www.nida-os.com/api/agent/execute \ -H "Authorization: Bearer nid_agent_..." \ -H "Content-Type: application/json" \ -d '{ "module": "lead", "action": "create", "workspace_id": "ws_abc123", "params": { "first_name": "Sarah", "last_name": "Johnson", "email": "sarah@acmecorp.com", "phone": "+15551234567", "source": "agent_research", "custom_fields": { "company_size": "50-100", "industry": "HVAC" } } }'Nida creates the lead in the CRM and returns:
json{ "id": "lead_xyz789", "stage": "New", "created_at": "2026-06-18T16:45:00Z", "url": "https://www.nida-os.com/crm?lead=lead_xyz789" }The lead triggers an automation (because
source = agent_researchmatches an automation filter):- Send email "Welcome to Acme"
- Create task "Follow up"
- Move stage to "Qualified" (if the agent included a
priorityfield with a high value)
The agent moves on to other tasks. It can come back later and check the lead's status with:
bashcurl -s https://www.nida-os.com/api/agent/execute \ -H "Authorization: Bearer nid_agent_..." \ -H "Content-Type: application/json" \ -d '{ "module": "lead", "action": "get", "workspace_id": "ws_abc123", "params": { "id": "lead_xyz789" } }'
Common agent tasks:
- Enrich a list of leads. Read a CSV, for each row, find the company on the web, add the data to the lead.
- Score and route. Score all new leads, move high-priority to "Qualified", low-priority to "Nurture".
- Sync with external CRMs. Pull from Salesforce, push to Nida. Or pull from Nida, push to HubSpot.
- Build a custom dashboard. Read workspace data, render a custom HTML dashboard.
- Daily digest. Read the workspace state, send yourself a Slack/email summary.
Variations:
- Bidirectional sync. Use webhooks to push Nida events to your agent, and the agent pushes actions back via the API.
- MCP integration. If your agent supports MCP, point it at
https://www.nida-os.com/api/well-known-mcpand the tools appear natively. - Multi-workspace. Use different keys for different workspaces. One agent, many tenants.
Failure modes:
- Rate-limited. 60 req/min default. A burst of 100 leads will hit the limit. Use the
waitaction in your agent. - Scope is too tight. If the key doesn't have
leads:write, the create call returns 403. Recreate with broader scope. - Destructive actions require approval.
lead:delete, bulk updates, and payment-related actions need human approval. The API returns 202, the agent must wait for the human to approve. - Workspace ID is wrong. Every execute call needs the correct workspace_id. If you have multiple workspaces, store the mapping.
Expected outcome: A single agent can manage hundreds of leads per hour, with full audit trail, scope restrictions, and approval workflows for destructive actions.
Recipe 12 — Negative Review Interception and Private Feedback
Goal: A customer is unhappy. Before they leave a public 1-star review on Google, Nida intercepts the review form and routes the feedback to you privately.
Modules used: Reviews, Automations, Conversations (Email), CRM
What you need:
- A Google Business Profile connected (Chapter 14 — Reviews)
- The Negative Review Interception feature enabled (Settings → Reviews → Threshold: 3 stars or lower triggers interception)
- A private feedback form
The flow:
- Customer is at the end of a job. You send them a review request (via the Reviews module's auto-campaign).
- Customer clicks the review link. They see a form (NOT Google directly) — this is the interception point.
- Customer rates 1-3 stars. Nida detects low rating and intercepts.
- The Google review form is NOT shown. Instead, the customer sees a private feedback form: "We're sorry you had a bad experience. Can you tell us what went wrong? We'll make it right."
- Customer submits private feedback. The feedback goes to you (the business owner), NOT to Google.
- An automation fires:
- Action 1:
Create task"Address unhappy customer" assigned to the owner - Action 2:
Send internal notification(bell icon) with the feedback - Action 3:
Move customer to support pipeline - Action 4:
Wait 2 days - Action 5:
Send SMSto the customer "Hi [name], I saw your feedback. I'd love to make it right. Can we talk? [link to book]"
- Action 1:
- You call or message the customer. You resolve the issue.
- After resolution, the Reviews module offers a "Request public review" button. If the customer agrees, they go to Google directly. If not, they don't.
The tie-together automation:
- Trigger:
Negative review submitted(private form, rating ≤ 3) - Action 1:
Create task"Address unhappy customer — high priority" - Action 2:
Notify team(urgent bell icon) - Action 3:
Send email to customer"We're sorry. Can we make it right?" - Action 4:
Wait 2 days - Action 5:
Check condition— has the issue been resolved? (manual flag) - Action 6 (if not resolved):
Notify team(escalate to manager)
Variations:
- Different thresholds. 1-2 stars = escalation. 3 stars = private feedback only.
- Follow-up survey. After resolution, send a CSAT survey. Track the trend.
- Recovery campaign. For "saved" customers, offer a discount on the next service. The discount goes through Stripe.
Failure modes:
- Customer goes to Google directly (not through your Nida link). Nida can't intercept. Always send customers through your Nida review link.
- Customer doesn't fill out the private form. They just close the tab. Nida logs the click but not the feedback. Follow up via SMS or call.
- You don't respond to the private feedback in time. The customer, frustrated by the silence, posts a 1-star on Google anyway. Set a 24-hour SLA on the task.
Expected outcome: 60% of negative feedback is intercepted before going public; 40% of intercepted cases are resolved and the customer comes back as a 4-5 star reviewer.
Part 9 — Reference
Appendix A — Glossary
Agent API — the headless interface to Nida that external agents (Hermes, Codex, Claude) use to read and write workspace data. See Chapter 20.
AI Conductor — Nida's reasoning agent. Reads workspace state, proposes actions. Used in automations and Autopilot. See Chapter 16 and Recipe 8.
AI Settings — the page where you pick which AI model runs each of Nida's task types. See Chapter 17.
Autopilot — the autonomous agent that runs continuously, proposing actions based on goals. See Chapter 16.
BYOK — Bring Your Own Key. You supply the API keys for AI providers, Twilio, Stripe, etc. Nida doesn't have its own accounts for these services.
Chatbot — an AI conversational agent. Can be embedded on a website, shared via link, or trigger via SMS. See Chapter 10.
CRM Pipeline — the visual deal-flow board. Leads move through stages (New, Contacted, Qualified, etc.). See Chapter 3.
Delivery Hub — the white-label client portal. Two portal types: Onboarding (kickoff checklist) and Delivery (project tracking). See Chapter 2.
Form — a lead-capture form. Single-step, multi-step, popover, slide-in. See Chapter 11.
Knowledge Base — the content a chatbot uses to answer questions. URL, PDF, or text. See Chapter 10.
Lead — a potential customer in your CRM pipeline. Has a name, contact info, source, stage, owner, and an activity timeline.
Lead Activity Timeline — the shared timeline used across Dashboard, CRM, and Delivery Hub. Shows every touch (form, call, email, payment, automation, stage change).
Lead Finder — the outbound prospecting tool. Search by category + location, score with AI, import to CRM. See Chapter 8.
MCP — Model Context Protocol. A standard for exposing tools to AI clients. Nida's discovery endpoint is MCP-compatible.
Merge Tag — a variable like [lead.first_name] that gets replaced with the actual value at send time. See Chapter 18.
Portal Domain — the custom domain (e.g., app.clientdomain.com) clients use to log in. White-Label only.
Quick Alias — a short form of a merge tag, like [first_name] for [lead.first_name]. See Chapter 18.
Recipe — a pre-built automation or workflow that you can clone and customize. See Chapter 15 and Part 8.
Scope — the set of module:action combinations an Agent API key is allowed to perform. See Chapter 19.
System Variables — the full library of merge tags organized by category. See Chapter 18.
Webhook — an HTTP callback. Nida sends a POST to a URL you specify when an event happens (form submitted, payment succeeded, etc.). Used in integrations and automations.
White-Label — the $299/mo tier that lets you resell Nida under your own brand with a custom domain. See Chapter 23 — Billing.
Workspace — a single tenant in Nida. Contains all your leads, contacts, websites, automations, etc. You can have multiple workspaces (e.g., one per client in White-Label).
Appendix B — Troubleshooting
"My chatbot doesn't know anything"
Cause: Knowledge base is empty or URL hasn't been scraped yet.
Fix:
- Open the chatbot → Knowledge Base tab.
- Check that at least one source is added (URL, PDF, or text).
- If the source is a URL, click Re-sync. The scrape runs in ~30 seconds.
- If the source is a PDF, check the file size (<10MB) and re-upload if needed.
- Use the Test query feature to confirm the bot can answer.
"My automation isn't firing"
Cause: The trigger condition isn't matching, or the automation is in Draft.
Fix:
- Open the automation and check the Active toggle. It must be on.
- Check the trigger filter. If you filtered on
source = chatbot, a form-submitted lead won't match. - Open Activity → Runs to see the latest run. The error message is usually specific.
- Use the Test button to fire the automation with sample data.
"Stripe checkout doesn't work"
Cause: Stripe is in test mode but the card is real (or vice versa), or OAuth permissions are wrong.
Fix:
- Open Stripe dashboard in a new tab. Check that the workspace's Stripe account is in the mode you expect (test or live).
- Use Stripe's test cards for test mode:
4242 4242 4242 4242succeeds,4000 0000 0000 0002is declined. - If the OAuth connection is broken, go to Payments → Settings → Reconnect Stripe.
"Phone calls aren't coming in"
Cause: Twilio number isn't routed to Nida, or working hours are blocking.
Fix:
- Open Twilio Console → Phone Numbers → your number → Voice & Fax.
- Verify the "A Call Comes In" webhook is
https://www.nida-os.com/api/twilio/voice/.... - In Nida, check Phone → Status. If "Offline", click Reconnect.
- Check Settings → Working Hours. If outside hours, calls go to voicemail.
"AI is returning weird responses"
Cause: Wrong model assigned, or temperature is too high.
Fix:
- Open AI Settings and check the model for the affected task.
- Lower the temperature (0.2 for factual, 0.7 for creative).
- If using a local Ollama model, check that it's running and the model is loaded.
- Test the model directly with the Test button. If the test fails, the issue is the model, not the workflow.
"Lead is in CRM but not in the pipeline"
Cause: Lead was created as a Contact, not as a Pipeline Lead.
Fix:
- Open the contact → Convert to lead → pick a stage.
- The contact is now also a pipeline lead, with all the activity timeline preserved.
"White-Label features are missing"
Cause: You're on the Agency tier. White-Label is $299/mo.
Fix:
- Open Billing.
- Click Subscribe on the White-Label plan.
- The change takes effect immediately. No data migration needed.
"Custom domain isn't working"
Cause: DNS not propagated, or wrong CNAME.
Fix:
- Open Settings → General → Portal Domain.
- Check the DNS instructions card.
- Verify the CNAME in your DNS provider matches exactly.
- Wait 5-60 minutes for DNS propagation.
- Use
dig app.clientdomain.com CNAMEto check the resolution.
"Autopilot is making bad proposals"
Cause: Goal description is too vague, or the wrong model is assigned.
Fix:
- Open the goal and refine the description. Be specific about what good and bad look like.
- Check the AI Settings — the Conductor task should use a top-tier model (
gpt-5.2,claude-sonnet-4-6). - Reject bad proposals consistently. The Conductor doesn't learn across sessions, but rejecting teaches you what the model is getting wrong so you can refine the prompt.
"The Agent API returns 401"
Cause: Invalid or revoked token.
Fix:
- Open API Keys and check the status of the token.
- If revoked, create a new one.
- If the token is valid, check the format:
Authorization: Bearer nid_agent_...(with theBearerprefix).
"I lost my Agent API key"
Cause: Plain text is only shown once at creation.
Fix:
- The key is unrecoverable. Revoke it and create a new one.
- Update any systems using the old key.
"Email is going to spam"
Cause: SPF/DKIM not configured, or the from-domain isn't verified.
Fix:
- Open Settings → Email → Connected Domains.
- Follow the DNS instructions to add SPF, DKIM, and DMARC records.
- Verify the domain in Nida.
- Wait 24-48 hours for DNS propagation and reputation to build.
"Form submissions aren't creating leads"
Cause: The form's destination isn't set, or the field mapping is wrong.
Fix:
- Open the form → Routing section.
- Verify the destination is set (CRM, webhook, email, or all).
- Check the field mapping. If "Email" is mapped to a non-existent CRM field, the submission fails.
- Test the form with sample data.
"I'm rate-limited on the API"
Cause: Hit the 60 req/min default.
Fix:
- Open API Keys and check the rate limit on your key.
- If 60 is too low, create a new key with a higher limit (up to 600 req/min).
- Add retry logic to your agent (exponential backoff on 429).
Appendix C — Frequently Asked Questions
Q: Can I use Nida without connecting any external services? A: Yes. The CRM, Contacts, Websites, and Forms work without any external service. You only need external services for AI features (AI provider), payments (Stripe), phone (Twilio), search (Google), and email sending (your SMTP).
Q: Is Nida open source? A: No. Nida is a managed service. The Agent API is open and well-documented, but the source code is not.
Q: Can I self-host Nida? A: Not at this time. Self-hosting is on the roadmap for White-Label customers.
Q: How is Nida different from GoHighLevel? A: Nida is built around an AI agent layer (Conductor, Autopilot) and a headless API (MCP-compatible). GHL is built around a marketplace of prebuilt campaigns (snapshots) and a broader phone stack. See Appendix E for a detailed comparison.
Q: Can I import my contacts from another CRM? A: Yes. Contacts → Import → upload a CSV. First row must be headers matching the contact fields. Max 10,000 rows per import.
Q: Can I export my data? A: Yes. Settings → Export. Everything (leads, contacts, automations, websites) is exportable as JSON or CSV.
Q: Does Nida have a mobile app? A: Not at this time. The web app is mobile-responsive. Native apps are on the roadmap.
Q: How do I cancel my subscription? A: Billing → Manage Subscription → Cancel. The cancellation takes effect at the end of the current billing period.
Q: Can I have multiple workspaces? A: Yes. Click the workspace switcher in the sidebar → + New. Useful for separating different businesses or (in White-Label) provisioning client workspaces.
Q: What's the difference between a Lead and a Contact? A: A Lead is an active opportunity in your CRM pipeline. A Contact is anyone in your address book — past customers, partners, newsletter subscribers. A lead becomes a contact when archived; a contact becomes a lead when promoted.
Q: Can I share an automation across workspaces? A: Not directly. You can copy an automation between workspaces manually. Workspace-level templates are on the roadmap.
Q: Does Nida support multiple languages? A: The Nida UI is in English. Your content (chatbots, emails, forms, websites) can be in any language. Multi-language UI is on the roadmap.
Q: What happens to my data if I cancel? A: Your data is retained for 90 days after cancellation. After 90 days, it's permanently deleted. Export before cancelling if you want a copy.
Q: Can I integrate Nida with Zapier, Make, or n8n? A: Yes. Nida's Agent API is OpenAI-compatible and supports webhooks. You can also use the dedicated nida app in Zapier (in beta) or the nida module in Make.
Q: Can I use Nida for B2B sales? A: Yes. The CRM is industry-agnostic. For B2B, you may want to add custom fields (company size, industry, decision-maker role) and use Lead Finder for account-based prospecting.
Q: Can I use Nida for ecommerce? A: Partially. Nida has Stripe products and a product grid block, but it's not a full e-commerce platform. For a full store, use Shopify + Nida (use Nida for the marketing/CRM side, Shopify for the catalog/checkout).
Q: How do I get support? A: Community support for Agency tier, priority support for White-Label. See Appendix F for all channels.
Appendix D — Keyboard Shortcuts and Power-User Tips
Global shortcuts
Cmd/Ctrl + K— command palette (search everything: leads, contacts, modules, settings)Cmd/Ctrl + /— show keyboard shortcutsCmd/Ctrl + B— toggle sidebarCmd/Ctrl + Shift + L— toggle theme (light/dark)?— show context help for the current page
CRM pipeline shortcuts
J/K— navigate leads1-6— move lead to stage 1-6E— open email composerT— open task creatorN— new leadEsc— close lead drawer
Conversations shortcuts
J/K— navigate threadsR— replyCmd/Ctrl + Enter— sendCmd/Ctrl + Shift + R— reply all (if supported)T— open templates picker
Automations shortcuts
Cmd/Ctrl + S— saveCmd/Ctrl + Enter— test runCmd/Ctrl + D— duplicate selected nodeDelete— delete selected node
Forms shortcuts
Cmd/Ctrl + Enter— previewCmd/Ctrl + S— save
Power-user tips
- Use the command palette (
Cmd/Ctrl + K) for everything. It's faster than clicking through the sidebar. - Pin the lead drawer when working through a list. Move between leads without closing the drawer.
- Set up browser notifications for the bell icon. You'll know when Autopilot proposes actions.
- Bookmark the most-used module URLs with workspace context:
https://www.nida-os.com/crm?workspace=YOUR_WORKSPACE_ID - Use the activity log (Settings → Team → Activity) to audit team actions. Catch mistakes early.
- Test automations with sample data before activating. Use the Test button.
- Use the "Move stage" automation on every stage change. Stages are the heartbeat of your pipeline — automate everything around them.
- Set a daily review time for Autopilot proposals. Mornings are best — review yesterday's proposals, approve/reject, then move on.
- Export quarterly. Even if you don't leave, having a backup is good practice.
- Use the API for bulk operations. Importing 1,000 contacts via the UI is painful; via the API it's 1 cURL call.
Appendix E — Nida vs. GoHighLevel (Feature Comparison)
| Category | Feature | Nida | GHL |
|---|---|---|---|
| CRM | Pipeline (visual) | ✅ | ✅ |
| Contacts | ✅ | ✅ | |
| Custom fields | ✅ | ✅ | |
| Lead scoring (AI) | ✅ (multi-model) | ⚠️ (basic) | |
| Activity timeline | ✅ (shared across modules) | ⚠️ (per-contact) | |
| Conversations | Unified inbox | ⚠️ (tab-segmented) | ✅ (true unified) |
| SMS | ✅ (via Twilio) | ✅ (native) | |
| ✅ | ✅ | ||
| Facebook Messenger | ❌ (roadmap) | ✅ | |
| Instagram DMs | ❌ (roadmap) | ✅ | |
| ❌ (roadmap) | ✅ | ||
| Phone | Browser dialer | ✅ (Twilio) | ✅ (native) |
| AI voice agent | ❌ (roadmap) | ✅ | |
| IVR / call flows | ⚠️ (basic) | ✅ (advanced) | |
| Voicemail transcription | ✅ | ✅ | |
| Call recording | ✅ | ✅ | |
| Mobile app | ❌ (web-responsive only) | ✅ (iOS + Android) | |
| Calendar | Booking links | ✅ | ✅ |
| Round-robin | ✅ | ✅ | |
| Calendar sync (Google/Outlook) | ✅ | ✅ | |
| Automations | Visual builder | ✅ | ✅ |
| AI Conductor (reasoning agent) | ✅ | ❌ | |
| Trigger library | ⚠️ (~30 triggers) | ✅ (200+) | |
| Recipes / templates | ✅ (~30) | ✅ (1000+ snapshots) | |
| AI | Multi-model routing (13 task slots) | ✅ | ⚠️ (single model) |
| BYOK | ✅ | ⚠️ (limited) | |
| Self-hosted (Ollama) | ✅ | ❌ | |
| Autopilot (autonomous agent) | ✅ (goals-based) | ⚠️ (workflow-only) | |
| Content | Website builder | ✅ (block-based) | ✅ (more mature) |
| Blog / SEO | ✅ (with Auto Blogger) | ✅ | |
| Forms | ✅ | ✅ (more mature) | |
| Chatbots (AI, RAG) | ✅ (with KB) | ✅ | |
| SEO | Search Console | ✅ | ⚠️ (basic) |
| PageSpeed | ✅ | ❌ | |
| AI client summaries | ✅ | ❌ | |
| Reviews | Multi-platform | ✅ (Google, FB) | ✅ (more platforms) |
| Negative review interception | ✅ | ⚠️ | |
| AI replies | ✅ | ⚠️ | |
| Payments | Stripe (BYOK) | ✅ | ✅ |
| Order management | ✅ | ✅ | |
| Subscriptions | ✅ | ✅ | |
| White-Label | Custom domain | ✅ ($299/mo) | ✅ ($297/mo) |
| Resell rights | ✅ | ✅ | |
| API | Agent API | ✅ (MCP-compatible) | ⚠️ (REST, not MCP) |
| Webhooks | ✅ | ✅ | |
| Rate limiting | ✅ | ✅ | |
| Pricing | Free trial | 28 days | 14 days |
| Agency tier | $99/mo | $97/mo | |
| White-Label tier | $299/mo | $297/mo |
Where Nida wins
- AI layer — multi-model routing, Conductor reasoning agent, Autopilot autonomous goals
- Open backend — Agent API is MCP-compatible, well-documented
- SEO Intelligence — deeper than GHL (PageSpeed, AI summaries, opportunity queue)
- Delivery Hub — dual-portal model for client onboarding and delivery
- Design polish — modern, dark-mode-first
- Free trial — 28 days vs 14
Where GHL wins
- Phone stack — AI voice agent, advanced IVR, native mobile app
- Unified inbox — true cross-channel (chat, SMS, email, social)
- Workflow trigger library — 200+ triggers vs ~30
- Snapshot marketplace — 1000+ prebuilt campaigns
- Maturity — older product, more integrations, larger user base
Recommendation
- Choose Nida if you prioritize AI capabilities, open APIs, modern design, and longer trial.
- Choose GHL if you need a phone-heavy business, social channels in the inbox, or want to deploy proven snapshots.
Appendix F — Where to Get Help
In-product
- Command palette (
Cmd/Ctrl + K) — search anything - Contextual help (
?on any page) — keyboard shortcuts and tips - Empty states — most empty states have a "Learn more" link to relevant docs
- Tooltips — hover over any label for an explanation
Documentation
- This manual —
~/Documents/Nida Docs/Nida-User-Manual.md - API reference — in-app at
/api-docs - Variables reference — in-app at
/variables - Changelog — Settings → Changelog (when available)
Community
- Community forum — for Agency tier; ask questions, share recipes
- Discord — link in the workspace settings (when launched)
- X / Twitter —
@naborlyor similar handle (check the website for the current one)
Support
- Email —
support@nida-os.com(Agency tier, 24h response) - Priority email — White-Label customers get a dedicated email (4h response, business hours)
- Live chat — available in the workspace for White-Label customers
Bug reports and feature requests
- In-app feedback — bell icon → "Send feedback"
- Email —
feedback@nida-os.com - GitHub issues — the Agent API has a public GitHub repo for SDKs and examples
Status and incidents
- Status page —
status.nida-os.com(when launched) - Twitter status —
@naborly_status(when launched)
For developers
- Agent API docs —
/api-docsin the workspace - MCP discovery —
https://www.nida-os.com/api/well-known-mcp - Postman collection — available in the API docs
- SDKs — official JS and Python SDKs on GitHub (when launched)
End of the Nida OS Complete User Manual.
This manual was generated from live screenshots and live UI review on June 18, 2026. If you find inaccuracies, please report them via Settings → Send feedback.
Total modules documented: 24. Total recipes: 12. Total setup tutorials: 8. Total pages: ~150.